
Creating a ToDo App Using MyEclipse and Ionic Framework
Using MyEclipse 2015, learn to create a single-page ToDo mobile app that uses the Ionic Framework and the bundled AngularJS. The app also uses local storage to save the ToDo list data onto the device.
This tutorial was written starting with a Basic Blank Application template. Note that MyEclipse 2015 CI 11 integrated Ionic Framework support with Ionic PhoneGap project templates and an Ionic widget palette. In this tutorial, you will learn how to:
- Create a new PhoneGap project
- Add third-party JavaScript libraries
- Add third-party CSS files
- Use local storage for saving items
Note: Mobile development was removed in MyEclipse 2016. This tutorial only applies to MyEclipse 2015.
1. Download the Ionic Framework
Note: MyEclipse 2015 CI 11 integrated Ionic Framework support with Ionic PhoneGap project templates and an Ionic widget palette. The steps in this tutorial accommodate use of MyEclipse 2015 Stable 1.0, which does not include integrated Ionic Framework support.
- Visit ionicframework.com, and click on the download button.

Download the Ionic Framework - Extract the files into an easy-to-remember location. These will be need to be copied into the MyEclipse project folder later.
2. Create a New PhoneGap Application Project
Create a new PhoneGap application project, naming the project todoApp. On the template selection page of the wizard, choose the Blank template.

Creating a New Project
3. Open and Configure index.html
After the project creation, expand the project’s directory structure to the www folder, and double-click index.html to open it in the editor.

Project Structure Expanded
Inside the index.html file, remove all default text, leaving only required content. Title the app My Todo App.

Index.html file stripped down
4. Include the Ionic Library Files
- Navigate to the Ionic framework files you downloaded.
- Expand the js folder, copy ionic.bundle.min.js, and paste into your project’s js folder.
- Expand the css folder of the downloaded files, copy ionic.min.css, and paste into your projects css folder.
Note: On new templates the css folder might not exist. If not, you can create it by right-clicking the www folder and selecting New>Folder.
The final file directory structure should look like this, the added folder and files are highlighted:
Added files into structure - Reference the additional .js files in the index.html file as shown below. The added lines are highlighted.
Note: Be sure your reference to ionic.bundle.min.js comes before the existing reference to cordova.js.
Adding script references to index.html
5. Add UI Elements
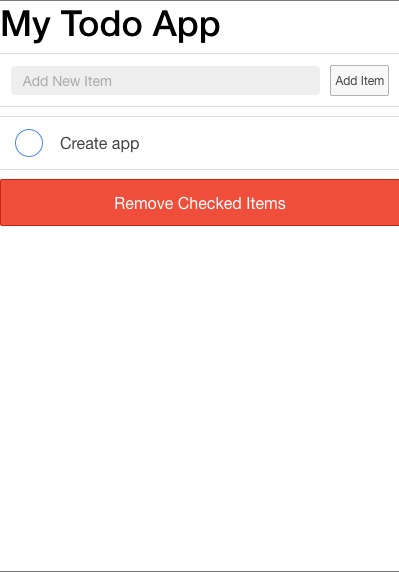
The todoApp uses the Ionic CSS framework for its user interface and AngularJS to control the app. New users to the frameworks can find it confusing at first which is why a bit of reading up on the frameworks will help familiarize you with its structuring. The final app will look like this:

Final app preview
The app starts with a basic H1 header. Next is an input for the todo item with a button. Below that is where the todo items appear in a list structure. Finally, a button allows removal of completed (checked) items.
5.1 Defining an Angular App
Add the following properties to the HTML body tag to define the app as an Angular app.
<body ng-app="myApp" ng-controller="todoCtrl">
The first property, ng-app, defines this as an Angular app with the variable string myApp. The next property, ng-controller, defines a controller object for the app. Inside this controller will be the various javascript functions.
5.2 Adding the Heading
After the body tag add the app’s title wrapped in the h1 tag to make it larger and stand out.
<h1>My Todo App</h1>
5.3 Adding the Ionic Input Item
Ionic uses a div tag along with a class to define its elements. Due to the variations in each class, they won’t be discussed here. Instead only the code actually used will be shown. To learn more about customizing the app, visit the Ionic Framework home page. Reference links are at the end of this tutorial.
Add the following div content after the h1.
<div class="item item-input-inset">
  <label class="item-input-wrapper">
  <!-- The actual input tag which is bound to the todoInput using ng-model -->
    <input type="text" placeholder="Add New Item" ng-model="todoInput" size="100">
  </label>
  <!-- Our button thay will call our funtion to add a new todo item -->
  <button class="button button-small" ng-click="todoAdd()">
    Add Item
  </button>
</div>
You can see the various components to the input item you added. Two things to note are the ng-model tag in the actual input element and the ng-click in the button element.
Ng-model is a tag that ties the input element to the string. This is part of the magic that is AngularJS; it is completely handled internally.
Ng-click is a tag much like onclick in HTML, but tied into Angular.
5.4 Facilitating Repeating List Items
After the input is set up, the code to display the actual list is called. Again the magic behind Angular is going to be used to do the work.
Add the following div content.
<div ng-repeat="x in todoList">
    <li class="item item-checkbox">
     <label class="checkbox">

     <!-- this is the checkbox element, you will see it is bound to the done setting in the items array -->
     <!-- When clicked it calls the update function to update the item to its done status -->
       <input type="checkbox" ng-model="x.done" ng-click="update()">
     </label>

     <!-- this is a span tag that shows the item text, I am using ng-bind, instead of the span tag we could have used {{x.todoText}} as well -->
     <span>{{x.todoText}} </span>
  </li>
</div>
The first line, ng-repeat, takes the array and for each item in the array a new item, or items is created and defined in the div tag of that ng-repeat. In this example, for each todo item in the todoList array a checkbox item and label for that checkbox is created.
The check box item itself uses the ng-model x.done. This is part of the array item that indicates if the todo item is completed or not. This is also tied to a function called update that will update local storage with the new array data.
Lastly is a span tag that binds the actual text of the item, x.todoText, using the double curly markup {{x.todoText}}.
5.5 Remove Checked Items Button
The last element to add is the button to remove all checked items. Add the following code:
<!-- the remove button will call the remove function and remoave all items that are marked done -->
<button class="button button-block button-assertive" ng-click="remove()">
 Remove Checked Items
</button>
The button uses the ng-click tied to the remove function, as well as the button-assertive tag, which changes the appearance of the button to the red danger color, acting as a caution to the end user.
6. Implement Functions Using JavaScript
At this stage is it possible to test the application in the Web Simulator and see the effects of the previous sections, but there is no functionality yet. The app’s implementation happens in the index.js file.
- Expand the project’s js folder, and double-click index.js to open in the editor.
- Delete the default functions and comments so the index.js file is blank. These will not be needed.
- Define the app as a variable.
var myApp = angular.module('myApp',[]); - Add a function to be defined as the controller. This should use the same function name used in the index.html body tag ng-controller, todoCtrl.
myApp.controller('todoCtrl', ['$scope', function($scope) {

}]);
The function looks a little different than the standard JavaScript function and uses $scope, which is needed by Angular as an object to refer to the application model. All code for this application must be placed inside this controller function.
6.1 Setting Up Local Storage
Since the app should store the todo list using local storage, code is needed to first check if there is already a todo list saved. Add the following code inside the todoCtrl function.
 //if local storage is null save the todolist to local storage
 if (localStorage.getItem("mytodos") == null)
 {
$scope.todoList = [ {todoText:'Create app', done:false} ];
    localStorage.setItem("mytodos", angular.toJson($scope.todoList));

 }else
 {
     //set the todolist from local storage
     $scope.todoList = angular.fromJson(localStorage.getItem("mytodos"));
 }
If there is no todo list in local storage, the function creates a todoList array with a default item and then places it into local storage. The else statement is used when there is already a list in local storage.
Note the toJson and fromJson before getting and setting the array to local storage. These are used to convert the array object to a string that local storage can use. Otherwise the data would not be recalled in a usable format.
At this point, you can test the application and see the list with the single item.
Make sure your files are saved, right-click the project, and select PhoneGap>Preview Application in Mobile Web Simulator. Select either iOS or Android. The selection does not affect the application; it just provides a mock faceplate to simulate the look of the device.

Running in the Web Simulator
While the application now looks good, there is still no real functionality other than displaying the array as list items.
6.2 Adding an Item to the Array
To add an item to the array using the button you defined, create a function with the same name used in the ng-click tag, todoAdd.
// Add an item function
    $scope.todoAdd = function() {

    };
Within that function you need to check if the add item input field contains text. If it doesn’t, exit the function. Note the use of both the null (undefined) check, as well as a blank string. This allows a check to see if it is truly empty or just has blank spaces, neither of which should be valid. As an extension to the app, you could use an alert to provide feedback to the user that text is required.
Add the following code to the function:
//check to see if text has been entered, if not exit
  if ($scope.todoInput == null || $scope.todoInput == ''){return;}
The return statement ends the current function.
If there is input text, then take that text and add an item to the array. Add the following to continue:
//if there is text add it to the array
$scope.todoList.push({todoText:$scope.todoInput, done:false});
The above example references the current scope with the todoList array, pushes the text contained in the todoInput into the array, and sets the done indicator to false. In index.html, the ng-model with the todoInput was used and saves you from having to do anything else in JavaScript. Angular is handling it for you.
Next, include the code to clear the text box:
//clear the textbox
$scope.todoInput = "";
Again, Angular is at work with this simple line of code.
Now that the todoList has been modified this needs to be saved back into local storage in case the user closes the app. Add the following:
//resave the list to localstorage
localStorage.setItem("mytodos", angular.toJson($scope.todoList));
Now when you test in the web simulator, you can add items to the todo list and have them show up as a new checkbox item.

Web Sim adding a new item
6.3 Removing Completed Items
After adding items, the app should be able to remove the old completed items when the user wants to. This is done with the Remove Checked Items button added earlier that calls the remove function. The remove function copies the current todoList array into a temporary list, then it clears the main todoList. The temporary list is cycled though and each item checked to see if it has been completed. If it has not been completed it is pushed back into the array. After all items have been cycled though, the list is saved back into local storage.
Add the remove function:
$scope.remove = function() {
  //copy list
    var oldList = $scope.todoList;
    //clear list
    $scope.todoList = [];
    //cycle through list
    angular.forEach(oldList, function(x) {
      //add any non-done items to todo list
        if (!x.done) $scope.todoList.push(x);
    });
    //update local storage
     localStorage.setItem("mytodos", angular.toJson($scope.todoList));

};
This is another good place to see Angular at work. The function only works with the items in the array. Because the list items are tied to the array, they are automatically updated in the user interface!
6.4 Updating Local Storage for Checked Items
In the html each todo list item is tied to a function called update. This is a very simple function that updates the local storage item to reflect the user clicking on the checkbox.
Add the following function:
//The Update function
//This waits 100ms to store the data in local storage
$scope.update = function() {
//update local storage 100 ms after the checkbox is clicked to allow it to process
setTimeout(function(){
localStorage.setItem("mytodos", angular.toJson($scope.todoList));
},100)

}
The biggest thing to notice here is the use of the setTimeout function that waits for 100ms before saving to local storage. The reason for this is the animation effect of the checkbox. While it is subtle, there is a slight delay after tapping the checkbox before the check mark is shown. The timeout provides enough time for the animation to complete before saving the array. If this executed at the same time, the items done object would not be set to true.
With the JavaScript now complete, test in the Web Simulator. The app should be fully functional.
7. Resources
- Complete project: todoAppProject.zip
To use in MyEclipse select File>Import, expand General, and select Existing Projects Into Workspace. Choose the Select Archive File option, and browse to the download location of the zip file. - Get this app for iOS, Android or Blackberry
- http://ionicframework.com
- https://angularjs.org