
MyEclipse HTML and JSP Designer
1. Visual Designer for HTML & JSP
This document provides a quick overview of the concepts, features, and basic operating procedures for the MyEclipse HTML and JSP Web Designers. Both Designers have similar features and the same operations model, but are specialized to their type of content. The examples in this document were created using the MyEclipse HTML Designer.
- Multi-mode Editor with toolbar and design palette
- Outline view
- Properties view
- Source
- Design/Source split screen
- Preview
- Renders HTML, JSP, Struts, JSF controls
- Design palette containing HTML, JSP, Struts, JSF controls (depending on project facets)
- Visually drag-and-drop/copy/cut/paste UI controls
- CSS support
- Image rendering
- HTML
- JSP
- Colored syntax highlighting
- Code-assist for HTML, JSP, JSTL, Struts, JSF and custom tag libraries
- Real-time validation as you type
- Validation errors displayed in Problems view and the editor overview margin
- Format all or portion of a document
- View source content in MyEclipse internal browser
- Translate and render Struts and JSF HTML tags to HTML approximation
- Executes JavaScript
- Extension point for adding renderers for custom tag-libraries
The HTML Web Designer has a Design/Source split-screen mode so you can view the source code as you use the WYSIWYG designer. The HTML palette is divided into HTML4, HTML5, Ionic and JQuery Mobile elements.
The Ionic palettes available in MyEclipse 2015 CI 11 and later.
HTML Web Designer in Design mode
1.1 Content-Type Support (HTML, JSP)
The MyEclipse HTML Web Designer is specialized towards the creation and editing of HTML files. The MyEclipse JSP Web Designer is geared towards the creation and editing of JSP files including Struts and JSF documents. During the Designer launch process, the content of the file being loaded is inspected and the Eclipse platform selects the corresponding HTML or JSP Web Designer based on the document’s content type.
1.2 Editor Modes
The Designer provides three edit modes to support any style of editing.
- Source Mode — The Source mode is a source code editor for HTML and JSP code that includes smart content assist, line numbering, colored syntax highlighting, format operations, real-time validation, marking of problematic source as you type, and code formatting.
- Design Mode — The Design mode has a dual panel view with the Design mode in the top panel and the Source mode in bottom panel. The design mode is a WYSIWYG visual editing mode. The design canvas allows web UI controls to be selected, copied, cut, pasted, and repositioned using drag-and-drop. This mode includes a design palette that contains UI web controls you can add to the design canvas.
- Preview Mode — The Preview mode allows you to quickly see how your page looks in a browser. This mode gives an IE preview as well as a Mozilla preview. The Preview mode loads the current source from the Design mode, even if the editor contents have not yet been saved. The HTML source is rendered in the Preview mode and is “rooted” at the location of the resource. If images in the HTML document are relative to the current location of the HTML page, then the images are rendered correctly in the preview.
A tab for each mode is at the bottom-left of the editor panel. To switch modes, click the tab for the mode you want to view.
![]()
Editor mode tabs
1.3 Properties & Outline Views
The HTML and JSP Web Designer feature-sets include custom property editors for all HTML, JSP, JSF, and Struts tags and a structured Outline view. Custom property editors are activated automatically and displayed in the Properties view when a corresponding tag is selected in the Source panel, Design panel or Outline view.
Properties view
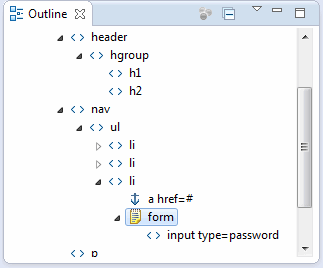
The Outline view provides a structured tree view of the Visual Designer content. Nodes in the Outline view can be added, deleted, expanded, and contracted. See Section 2 for instructions on how to open the Properties and Outline views.
Outline view
1.4 Synchronization between Editor Modes and Views
To present an accurate view of a web document’s current state across all edit modes and supporting views, the Visual Designer maintains two types of information synchronization. The first is Selection Synchronization. The Visual Designer maintains a common selection context between Source and Design windows and the Outline and Properties views. The second form of synchronization, known as Design-Source Synchronization, is between the source code of the Source window and the WYSIWYG rendered state of the Design window.
1.4.1 Selection Synchronization
Selection synchronization enables you to select anywhere in the Source window, Design window or Outline view and have all views display the common selection context. Additionally, if the common selection involves an HTML, JSF or Struts tag, the Properties view displays a custom properties editor for that tag. The image below illustrates how selecting the Login button results in the Outline view scrolling to and highlighting the HTML `<input>` tag for the Login button, and the Source window scrolls to and highlights the source line containing the button source code.
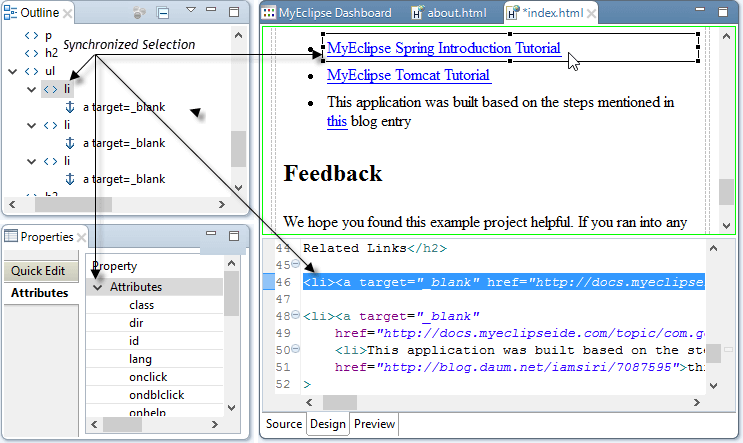
Selection synchronization
1.4.2 Design-Source Synchronization
The Source window is the master panel to which the Design window, the Preview window and the Properties and Outline views synchronize their state. When an edit operation is initiated in the Design window, the Properties view, or the Outline view, the operation is routed to the Source window where it is applied and the source updated. The Source window then signals the other panels, windows and views of the specific changes, synchronizing their presentation state to that of the Source window. You can observe the source code and rendered design updating and synchronizing in real-time.
2. Launching the Web Designer, Related Views and Perspective
To launch the HTML or JSP Web Designer do one of the following:
- Double-click an HTML or JSP file to launch the Visual Designer
- Right-click an HTML or JSP file, and select Open or Open With>MyEclipse HTML Designer or MyEclipse JSP Designer.
2.1 Opening Properties View
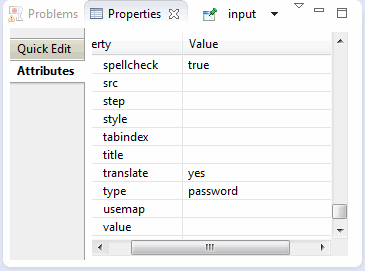
The Properties view displays spreadsheet-style editors for the tag selected in the Visual Designer. To open the Properties view, select Window>Show View, and select Properties. The Properties view opens in the location defined by the current perspective.
Properties view
2.2 Opening the Outline View
To open the Outline view, select Window>Show View, and select Outline. The Outline view open in the location defined by the current perspective.
Outline view
2.3 Resetting the MyEclipse Perspective
The view arrangement of the MyEclipse Workbench perspective is optimized for web development tasks. The MyEclipse default perspective includes the Properties and Outline views and the Image Preview. You might choose to modify the view organization of the workbench perspectives. To reset any perspective to its default view, select Window>Reset Perspective.
3. WYSIWYG Design Editing Basics
The Design window consists of a WYSIWYG web design canvas and UI control palette. In this window, you can insert, edit, delete and move HTML and JSP UI controls and text. Drag-and-drop operations allow UI controls on the design canvas to be easily repositioned. Extended Copy/Paste operations enable text and HTML content from outside sources that have been placed on the system clipboard to be added to the design canvas. The design canvas renders CSS styles and images that are located relative to the document being edited. These operations are defined in more detail in this section.
3.1 Working with Text
The Visual Designer text editing functions are similar to those of a word processor. They enable you to enter, delete, and revise text anywhere on a web page. To add text, place the cursor at the desired location and type. To delete text, place the cursor at the location or select text, and press either the Delete or Backspace key. The main toolbar includes actions for the following text attributes: Underline, Bold, Italic, Small and Big ![]() . These toolbar actions are dynamically enabled/disabled according to their applicability to the current design or source selection context. The text tools are disabled when no text is selected. Note that text attributes such as color, indent, or alignment should be controlled using CSS.
. These toolbar actions are dynamically enabled/disabled according to their applicability to the current design or source selection context. The text tools are disabled when no text is selected. Note that text attributes such as color, indent, or alignment should be controlled using CSS.
3.2 Working with Web UI Controls
The Design mode includes a UI Controls palette for adding new UI controls to the design canvas. The JSP Web Designer’s UI palette includes HTML, JSP, JQuery, and JSTL controls. Struts and JSF controls are also included if these facets have been added to the project. The HTML Web Designer’s palette includes only HTML4, HTML5, and JQuery UI controls.
When adding JSF or Struts UI controls to a web document, you must ensure that the page includes the appropriate taglib entry, e.g., `<%@ taglib uri=”http://java.sun.com/jsf/html” prefix=”h” %>` , to avoid design-time validation errors in the editor and runtime errors at deployment. Note that when you drag elements from the Struts and JSF palettes onto the designer, the taglib entry is added for you.
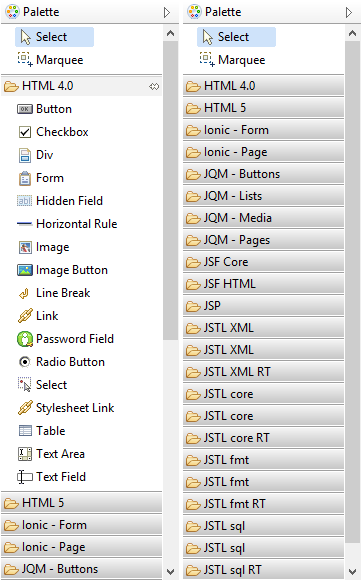
HTML and JSP UI Controls palettes
To add a UI control from the palette, drag the control to the desired location on the page.
3.3 Working with Context Menus
Right-clicking the Design window opens the context menu with actions that are valid for the current design selection. Below is an example of the selection in a table row. The context menu shows the actions available for an HTML table.

Context menu actions available for a table element
3.4 Working with CSS
The Design panel recognizes CSS styles defined by either linking to a stylesheet file or using in-document styles, or in-line style attributes.
The Design mode loads and renders stylesheets linked in the <HEAD> element using the <LINK> tag. Similar to images, if the href attribute of the <LINK> tag is a relative link to a CSS file, the stylesheet renders in the Design mode. <link rel=”stylesheet” type=”text/css” href=”./styles.css”/>
CSS styles can be specified within a web document using the STYLE element placed in the `HEAD` element.
<STYLE type="text/css">
div {
border: 2px solid black;
color: red;
}
</STYLE>
Following is an example of an in-line style attribute. Design mode recognizes these attributes and renders them immediately.
<div style="background: blue;"/>
4. Designing JSP, JSF and Struts Web Pages
Visual design of JSP documents using the JSP Web Designer differs from HTML page design in that:
- The Design palette includes Struts and JSF UI controls (if those facets are applied to the project).
- HTML approximations of Struts and JSF UI controls are provided in the Design and Preview modes.
- Visual artifacts for JSP scripting elements such as declarations, expressions, and scriptlets and non-visual JSP tags are optionally displayed in-line with JSP, Struts and JSF UI controls. These artifacts can be manipulated much like UI controls in the design canvas.
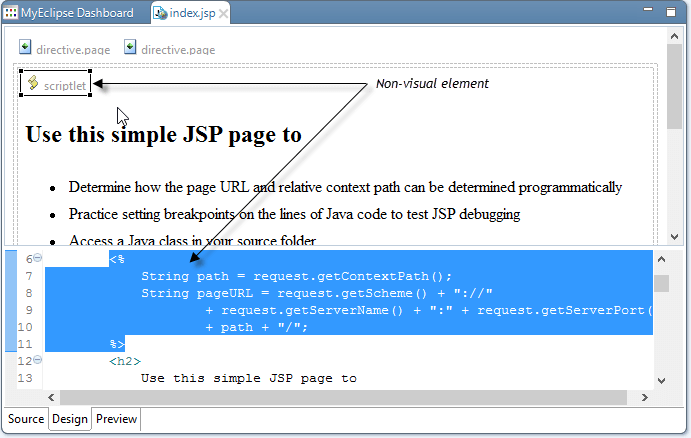
Visual and non-visual JSP elements
The purpose for rendering JSP scripting elements and non-visual tags is to make you aware of the scripting element’s presence relative to UI controls within the source. These non-visual elements can be visually repositioned using Copy/Paste and drag-and-drop operations similar to any HTML or JSP UI control. Thus, dragging and dropping a scriptlet element is possible.
Note: It is possible to delete a non-visual element by selecting and deleting its visual artifact or by deleting a multiple element selection that includes a non-visual element.
The JSP Web Designer has rendering support for many tag libraries including the JSF and Struts HTML tag libraries. Not all JSTL tags and custom-defined tags have specialized design-time rendering support. For these tags, the default design-time rendering is a gray tag name. The image below illustrates the default design-time rendering of several JSTL tags.

Default element rendering
5. Preview Mode
The Preview mode enables you to quickly view the web document as it will be rendered at runtime. The Preivew mode has an IE or Safari (depending on platform) preview as well as a Mozilla preview. For JSPs that include Struts and JSF HTML tags, the Preview mode evaluates and attempt to translate each tag into its runtime HTML form. In many cases, the dynamic nature of these tags prevents an accurate translation as it is only possible at runtime when resources such as databases or web-services are available. The Struts and JSF tags supported by the Preview mode are:
- JSF Core tag library
- JSF HTML tag library
- Struts HTML tag library
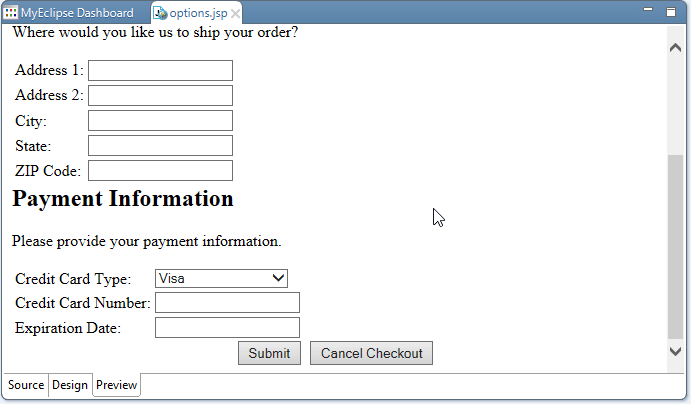
Preview of an order form
6. FAQ
Is the Source/Design mode supported on the Linux and Mac platforms?
Yes.
Is there Snippets support?
Yes. Snippet insertion is available for the Source window in the Design-Source mode only. To open the Snippets view, select Window>Show View>Other from the menu, expand MyEclipse, and choose Snippets. Add a snippet by dragging it into the source editing area or double-clicking the snippet, which adds it to the cursor location in the source.
Is JavaScript execution supported in the Design mode?
No. The Design mode disables all JavaScript evaluation in HTML and JSP documents. Use the Preview mode for limited JavaScript support.
In the Design mode, can I resize a UI control?
Yes.
Is CSS absolute positioning available in the Design mode?
Not at this time.
How is design performed for JSP fragments that do not include <taglib> directives?
When a taglib directive is not present, MyEclipse references default tag library namespace prefixes defined at either the project level or globally in the MyEclipse preferences. To view or edit these namespace prefixes, see either the MyEclipse preferences ( select Window>Preferences from the menu, expand MyEclipse>Java Enterprise Project>Web Project, and choose Tag Libraries) or the properties of any MyEclipse Web project, ( right-click the project, select Properties from the menu, expand MyEclipse>Web, and choose Tag Libraries).
After a large design edit, the synchronization back to the source takes several seconds. What can I do?
If long synchronizations are caused by design edits, these can often be avoided or minimized by making the change in the Source window instead. In addition to updating the source, design edits often reformat the source for readability, since it’s machine generated, and thus takes longer due to the increased work. Also, synchronization of edits from the Design window to the Source window is inherently slower than from the Source window to the Design window for architectural reasons. As a result, for maximum edit speed, the Source window could be more convenient for edits that cause structural changes in the document.