
Building MobiOne Apps Using MyEclipse 2015
This tutorial walks you through using MyEclipse 2015 mobile developer tools to build iOS and Android apps from a MobiOne project. To complete these steps, you first need to complete several prerequisites. These are covered in Section 1. In this tutorial, you will:
- Create a PhoneGap project to contain MobiOne project code
- Configure the project to use your icon and splash screen images
- Import content from a MobiOne project
- Build iOS and Android apps using PhoneGap build services
Update: Development of MobiOne has been discontinued. Read the End of Life Notice for more information.
Note: Mobile development was removed in MyEclipse 2016. This tutorial only applies to MyEclipse 2015.
1. Take Care of the Prerequisites
If you prefer to learn by video, check out the accompanying video tutorial.
- Download the tutorial resource pack and extract all files – MyEclipse-BuildM1ProjectTutorialPack.zip. Save this resource pack in a handy location because you will use it with all MobiOne projects you want to import into MyEclipse.
The pack includes the simple date-time MobiOne project shown below (for example purposes) and the MyEclipse-M1ProjectBuildTemplate project template, which you will use when creating a PhoneGap project.
Sample date-time MobiOne project - Download MyEclipse 2015 CI 7 or later (1.3 GB) and run the installer. We recommend you use the default installation location suggested by the installer.
Note: If you have previously downloaded and installed MyEclipse 2015, check that your build ID includes a date of Nov. 11, 2014 or later (13.0.0-20141111). Find the build ID by selecting Help>About MyEclipse Enterprise Workbench.
Checking for the correct version
If you have an older build, select Help>Check for Updates to update to the latest build. - Acquire an Adobe PhoneGap Build account to perform remote application builds. You can sign up for a free account or purchase a low cost subscription to this service. See Section 2.4 for configuring MyEclipse to use your PhoneGap Build account.
- Be sure you have signing certificate files available.
Similar to building an app in MobiOne, you must provide a signing certificate and identity information when building an app. See Section 2.3 for creating and managing MyEclipse signing profiles.
Recommendation: When possible, use the same certificates and provision profiles that you used when building apps in MobiOne. This practice will enable the update of your existing apps in the iTunes and Google Play app stores.
2. Set Up the MyEclipse IDE for Mobile
In this section, you will perform three key configuration tasks required for building mobile applications.
- Create a MyEclipse workspace and configure the perspective (i.e., the window and tool layout).
- Create a signing profile for each mobile platform you want to target.
- Provide MyEclipse your PhoneGap account details to enable remote application builds.
2.1 Launch MyEclipse and Create a Workspace
MyEclipse stores its projects and meta-data information in a special folder known as a “workspace”. On startup MyEclipse displays a window in which to enter the workspace folder. Enter a folder name that best signifies the type of projects and development you intend to create, e.g., “myeclipseProjects”.

MyEclipse workspace dialog
2.2 Open the MyEclipse Mobile Perspective
From the MyEclipse menu bar, select Window>Open Perspective>MyEclipse Mobile.
The MyEclipse Mobile perspective optimizes the window layout, toolbar and menus for mobile development. You can see the MyEclipse Mobile perspective below.

MyEclipse displaying the Mobile perspective
2.3 Create a Signing Profile
Signing profile management is part of the MyEclipse Mobile Tools preferences.
- Select Window>Preferences.
- Expand MyEclipse>Mobile Tools, and select Signing Profiles.
- Click New to create a new signing profile.
- Complete the fields for the new profile, and click OK.

Managing mobile signing profiles
Note: When building an Android app for debugging, you do not need to have a signing profile configured.
2.4 Configure Remote Builds Using Your PhoneGap Account
- Select Window>Preferences.
- Expand MyEclipse>Mobile Tools>PhoneGap Runtime, and select Remote Build.
- Enter your PhoneGap Build account credentials.
- Click Validate Credentials, and click OK.

PhoneGap Build account configuration
3. Create a MyEclipse PhoneGap Project
In this section, you will create create a PhoneGap Project using the MyEclipse-BuildMobiOneProject template provided in the M1MyEclipseBuildTutorialResources.zip download. This template will populate a new PhoneGap project with additional PhoneGap plugins, resources and build scripts for working with the code of a MobiOne project.
- Select File>New PhoneGap Project to open the New PhoneGap Application Project wizard.
- Type datetimeBuilder in the Name field, and click Next.

New PhoneGap Application Project wizard – project name and runtime settings
Project Naming Recommendation: While you can choose any name for the project, we recommend using a naming pattern such as <MobiOne project name>Builder, such as “datetimeBuilder”. - Select the User Template option, and click Browse beside the Template location drop-down.
- Navigate to the folder where you saved the tutorial resource pack file, and click OK. The MyEclipse-Build1ProjectTemplate appears in the template list.
- Select the template, and click Next.

New PhoneGap Project wizard – user template selection - Enter an application name and ID, and click Finish.
Recommendation: If you have previously published an app built from this project, then continue using the same application ID. Otherwise you will not be able to update the existing app with newer versions built using a different application ID.
New PhoneGap Project wizard – app name and ID settings
Getting Familiar With Your MyEclipse PhoneGap Project
Use the MyEclipse Explorer to browse and interact with the project resources.

PhoneGap project structure
In this tutorial, you will be working with the www/ folder and its config.xml file.
www/ – This folder contains your application UI and logic content, icons and splash screen images (a.k.a., branding artwork) and config.xml file. The New PhoneGap Project wizard populates a new project with default application files and images. The next section describes how to update the application files by importing the application content of a MobiOne project into this folder. In Section 5 you learn how to update the project with you own custom images.
www/config.xml – A required file that tells the PhoneGap SDK and build tools how to configure the application during the build process. It includes information such as application name, application id, icons and splash screen image locations and more.
4. Import Your MobiOne Project Content into the PhoneGap Project
You will use the script/importMobioneProjectContent.ant script file to copy the date-time MobiOne content into the PhoneGap project’s www/ folder before each app build attempt. But, first you need to tell the script where to look for the MobiOne date-time project content.
4.1 Configure the importMobioneProjectContent.ant Script
- Double-click the /script/importMobioneProjectContent.ant file to open the code editor.
- On line #17, change the value of the mobioneProjectWWWContentDir property to the path of your MobiOne project’s generated source content. This is the directory that contains the project’s html, javascript, css and images. Projects created with MobiOne 2.5 and more recent versions will have path ending with a pattern similar to www<project> . For projects created with older versons of MobiOne, the project content directory will have this pattern <project>-www. For this example, the path refers to the sample date-time project.
<property name="mobioneProjectWWWContentDir"
  value="C:MyEclipse-BuildM1ProjectTutorialPackdate-timewwwdate-time"
 />
- On line #23, change the value of the mobioneProjectHTMLStartupFile property to the name of the HTML file that should be started when the app is launched.
<property name="mobioneProjectHTMLStartupFile"
  value="date-time.html"  />

Property location in the script file - Press CTRL + S to save the file.
4.2 Import MobiOne Project Content into the PhoneGap Project
- Right-click importMobioneProjectContent.ant, and select Run As>Ant Build…

Running the importMobiOneProjectContent.ant script
Note: If you have run through these steps before, you can select Run As>Ant Build (without the ellipses) to run the script with previously configured settings. - Configure the Refresh tab settings as shown.

Run Ant script window – Refresh tab - Configure the JRE tab settings as shown.
 Run Ant script window – JRE tab
 - Click Run.
The script copies all files in the MobiOne’s generated folder to your MyEclipse project folder. You can monitor the script’s execution in the Console near the bottom of the MyEclipse window.
MyEclipse Console – Ant script output
PhoneGap project after import
5. Configure the App Details, Icons, and Splash Screen
MyEclipse preconfigures a project’s config.xml and www/branding folder with default branding icons and splash screen images for the iOS and Android platforms. You need to update the config.xml and project to use your custom app images.
5.1 Copy Images to the Branding Folders
Using the File Explorer outside of MyEclipse, copy your icon and splash screen images into their respective project www/branding folders.
The branding folder contains an icon folder and a screen folder, each containing Android and iOS subfolders for your custom branding images.

Branding folder structure
Important Note: The branding folder should contain only application icons and splash screen images. Even though this folder resides under www/, do not include image resources required by the application at runtime as this folder is NOT included in the final application.
5.2 Edit config.xml to Reference Your Custom Branding Images
- Double-click www/config.xml to launch the Config editor.
The Config editor consists of an Outline (left) for quick navigation to key sections of the config.xml file and the Details area (right) for viewing and revising the selected section.
Config Editor Essentials page - Expand Images in the outline, and expand each platform.
- Click
 to browse for and select image files for each type of image you want to include.
Specifying Android icons - Press CTRL + S to save the file.
5.3 Configuration Editor Overview
The following are key sections of the PhoneGap Configuration editor.
Essentials – Includes application name, id and other key application details
Images – Includes the icons and splash screen images for iOS and Android platforms
Preferences – Lets you set the PhoneGap version, orientation, target devices as well as other platform specific settings

Configuration editor – Preferences page
Plugins – Shows currently installed plugins as well as letting you add and remove them

Configuration editor – Plugins page
6. Build Your Application
- Click
 on the toolbar, or right-click your project, and select PhoneGap>Build PhoneGap Application.
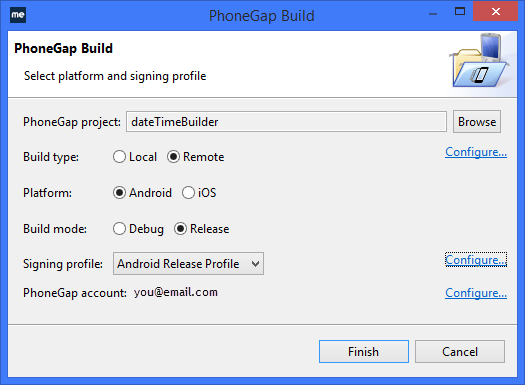
 - Configure the page with the following options:
Build Type – Remote
Platform – select your target platform
Build mode – select whether you’re building for debugging or for release
Signing Profile – select name of signing profile created in Section 2.3, or omit if your platform is Android with a Build mode of Debug
PhoneGap Build wizard - Click Finish to begin the build process.
Monitor the build progress in the lower-right corner.

MyEclipse status bar
A popup notification informs you when the build process completes. The notification includes a link to browse to the location of the new app file.

PhoneGap build notification
When the build process completes successfully, you can find the newly created application binary file in the project’s bin folder. The <project>/bin/ folder contains the binary files created for both Android and iOS.

New app in the project’s bin/ folder
7. Known Issues
Following are the known issues with MobiOne widgets when built with PhoneGap/Cordova 3.X
iOS Platform
- Video widget fails to playback local media file.
- As of iOS 7, when the video playback completes or is manually stopped, the player does not return control to the application.
Android Platform
- Show URL (popup) Action fails to with an embedded pdf.
- Video widget fails to playback local and remote media files.