

Developing Persistence with Hibernate
This tutorial presents basic techniques for Hibernate development. You will create a simple application that uses Hibernate to persist text messages to a single database table. You should be familiar with MyEclipse Database tools before beginning. In this tutorial, you will learn how to:
- Enable Hibernate support in a Java project
- Create a Hibernate configuration file
- Use a custom Session Factory
- Generate Java classes and database mapping filesUse the HQL editor
This feature is available in MyEclipse.
1. Create a Sample Database Table
Before beginning this tutorial, you must have a supported database server set up such as the embedded Derby database or an externally installed database. For this tutorial, use the Oracle database connection profile created in Connecting to a Database in MyEclipse.
Use the following SQL commands to create a database table that you will map to a Java class. The table includes a couple of records to facilitate testing.
echo_message DDL
CREATE TABLE echo_message
(
id integer PRIMARY KEY not null,
msg VARCHAR(255)
);
insert into echo_message values(1, ‘hello world’);
insert into echo_message values(2, ‘goodbye world’);
Note: Even though this tutorial uses Oracle, the instructions and the sample table above are generic enough to work with any database.
2. Create a Hibernate-Enabled Java Project
- Select File>New>Project>Java Project.
- Type HibernateDemo in the Project name field, and click Finish.
New HibernateDemo project - Right-click HibernateDemo, and select MyEclipse>Project Facets>Install Hibernate Facet.
- Select MyEclipse Generic Java Runtime from the Target Runtime drop-down, and click Next. MyEclipse creates a new hibernate.cfg.xml file for you.
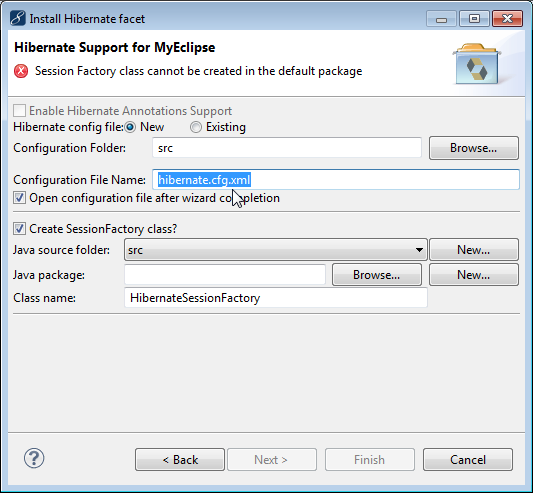
New hibernate configuration file
Note: The Enable Hibernate Annotations Support is available only for Hibernate 3.2 and 3.3. Hibernate 4.x includes annotations support automatically. Annotations support creates an AnnotationConfiguration instead of a regular Configuration in your SessionFactory class. It is necessary if you are going to use annotated POJOs instead of Hibernate mapping files. - Click New beside the Java Package field to create a new package for the session factory class. Type com.myeclipse.hibernate as the package name, and click Finish.
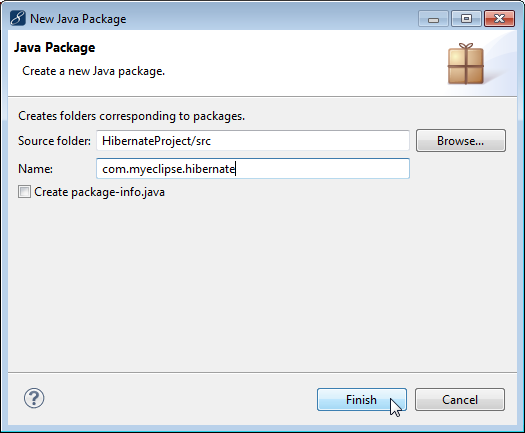
Creating a new Java package - Click Next, and leave the Specify database connection details checkbox selected.
- From the DB Driver drop-down, select the Oracle profile you created in Connecting to a Database in MyEclipse. This automatically populates the remaining fields.
- You can add libraries by clicking Next, or click Finish to accept the default libraries.
Note: A profile is not necessary at this stage; you can manually fill the remaining details as shown on this page without selecting a profile. In this case, you have to make sure you copy the JDBC driver JAR files to your project after the wizard completes.
Hibernate data source configuration
The data source configuration performed above can be skipped now and carried out later using the Hibernate Configuration editor.
Note: The Session Factory can also be created at a later point by using selecting File>New>Other, expanding MyEclipse>Hibernate, and selecting Hibernate Session Factory. If you chose to copy libraries to your project, during the completion process, the wizard could appear inactive for up to 30 seconds as it copies libraries and updates various project resources. Please be patient and wait for it to complete before taking any further actions.
Completing the wizard performs the following actions:
- Installs the Hibernate libraries (JARs) to the project if you chose to copy the libraries into your project
- Updates the project’s build-path to include the installed Hibernate libraries
- Creates and configures the hibernate.cfg.xml file for the project
- Creates a custom SessionFactory class (e.g., HibernateSessionFactory) for your project that simplifies Hibernate session handling
The image below highlights the important features of the newly created HibernateSessionFactory.java file. This class manages a single Hibernate `Session` object that is lazily initialized by the `getSession()` method and is flushed and released by the `closeSession()` method. At runtime, the Hibernate session creation process must be able to locate the hibernate.cfg.xml file on the classpath.
The CONFIG_FILE_LOCATION variable defines the package-relative path to the hibernate.cfg.xml file. The default value is provided by the Hibernate Support wizard. If you relocate the hibernate.cfg.xml file, you must manually revise the CONFIG_FILE_LOCATION value to reference the new location or you can use the `setConfigFile()` method to set it before use.
HibernateSessionFactory class
3. Customize the Hibernate Configuration File
After finishing the wizard for adding Hibernate capabilities, the hibernate configuration file opens automatically. If you skipped the data source configuration while adding capabilities, you will need to do it now using the following steps. If you already configured the data source, move ahead to adding properties.
- Select the Use JDBC Driver option. You will specify the JDBC driver defined in the Database Explorer. If you haven’t configured a JDBC driver, please read Connecting to a Database in MyEclipse, and configure one before continuing.
- Select your profile in the Connection Profile drop-down. If you have configured a JDBC driver but not a connection profile, you can click New Profile to create a new connection profile. If you already have a connection profile, when you select it from the drop-down, the next four fields are filled in automatically.
- Click the Copy JDBC Driver and add to classpath link.
- From the Dialect drop-down, select the appropriate Hibernate dialect for your database.
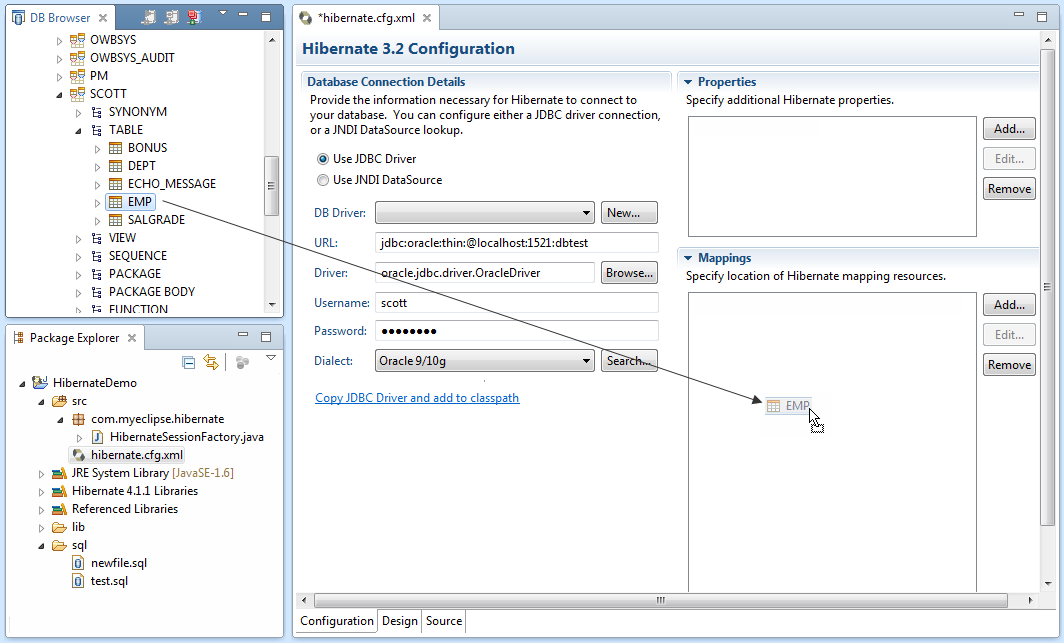
Your Configuration page should now look like this:
Hibernate Configuration file with Oracle connectivity configured
You can use the Properties section to add and edit properties.
Adding properties
The Mappings section allows you to add mapping files that might already exist in your project. Alternatively, dragging and dropping mapping files from the Explorer is also supported.
Adding mapping files
The image below shows the Hibernate configuration file source after the above steps have been completed.
Hibernate configuration source
4. Use Reverse Engineering for Java Table Mapping
Because the majority of corporate web projects involve interacting with existing corporate data in a relational database, this section concentrates on forward-engineering Java data objects and mapping descriptors from an existing database.
- Select Window>Open Perspective>Other, and select MyEclipse Hibernate.
- Open a database connection with the profile you are using in your Hibernate configuration.
- Browse the database schema until you find a table/entity for which you want to create a Hibernate mapping.
- Right-click the table, and select Hibernate Reverse Engineering. Alternatively, you can drag tables from the DB Browser and drop them into the Hibernate Configuration editor to launch the wizard.
Note: You can select multiple tables in the DB Browser to reverse engineer them at the same time.
Launching Hibernate Reverse Engineering wizard - Click Browse beside the Java src folder field to view available Hibernate projects and source folders into which the files can be generated. Select the src folder in the HibernateDemo project.
- Click Browse beside the Java package field, and select the com.myeclipse.hibernate package.
- Complete the rest of the wizard as shown below, and click Next.
Note: Settings on page 2 and 3 of the wizard are used to customize the reverse engineering process. It is possible to start the process without customizing any of the settings by clicking Finish now.
Hibernate reverse engineeringField Description Java src folder
The project and the source folder into which the mapping files, POJOs and DAOs are generated.
Java package
The package into which the mapping files, POJOs and DAOs are generated.
Create POJO<>DB table mapping information
Generates either mapping files or annotated POJOs from the selected tables.
Update hibernate configuration
Adds the mapping files/annotated POJOs generated to your Hibernate configuration file.
Java Data Object
Generates data objects (POJOs) corresponding to your mapping files and tables.
Create abstract class
Generates an abstract superclass for each data object. The abstract classes are overwritten in subsequent generation passes, but the corresponding subclass is not overwritten.
Base persistence class
The fully qualified name of a class which the generated POJOs should extend, if required.
Java Data Access Object
Generates data access object for convenient access to the mapped classes and tables. Choose between Basic, Spring and JNDI DAOs.
Generate precise findBy methods
Generates a findBy method for each property in the mapped class.
e.g. findByFirstName(“name”);Use custom templates
Overrides MyEclipse’s internal velocity templates with your own versions. See Using Templates to Fine-Tune Generated Code for further details.
Template directory
Directory containing the root of the custom template tree.
- Accept the default settings, and click Next.
Mapping detailsField Description Rev-eng settings file
This file contains the reverse engineering configuration and preferences and retains them for future use. Click the Setup button to specify an existing file or create a new one. The wizard creates this file automatically if one cannot be found.
Custom rev-eng strategy
Allows you to specify a custom reverse engineering strategy class. This class allows you to programmatically customize various aspects of the reverse engineering process. See Using a Custom Reverse Engineering Strategy for further details.
Type Mapping
Determines whether Java or Hibernate types are used in the type property of field mappings, e.g. java.lang.String vs. string. This setting is used only if a more specific setting in the Customized Type Mappings list on page 3 of this wizard cannot be found.
ID Generator
The ID Generator is a required field in the Hibernate mapping file. It defines the Java class used to generate unique identifiers for instances of the persistent class. See the Hibernate documentation that describes each of these ID Generator values in detail.
If blank or a more specific setting is not made on page 3 of this wizard, the Hibernate mapping engine chooses an ID generator for you.Generate basic typed composite IDs
If a table has a multi-column primary key, a <composite-id> mapping is always created.
If this option is enabled and there are matching foreign-keys, each key column is still considered a ‘basic’ scalar (string, long, etc.) instead of a reference to an entity. <many-to-one> elements are created, but they are marked as non-updatable and non-insertable.
If you disable this option (recommended default), <key-many-to-one> elements are created instead.Generate version and timestamp tags
If enabled, columns named “version” and “timestamp” are represented as <version> and <timestamp> tags in the generated mapping files.
Enable Many-to-Many Detection Ensures that when many-to-many relationships exist between tables selected for reverse-engineering, the relationships are detected and corresponding code is generated. Enable Many-to-One Detection Ensures that when many-to-one relationships exist between tables selected for reverse-engineering, the relationships are detected and corresponding code is generated. Customized Type Mappings
Allows you to specify a custom mapping from a JDBC type to a Hibernate type, using Length, Scale, Precision and Nullability as qualifying criteria for the JDBC type.
- Click the two Include Referenced Tables checkboxes to have the wizard include referenced tables in the reverse engineering process. Click Finish.
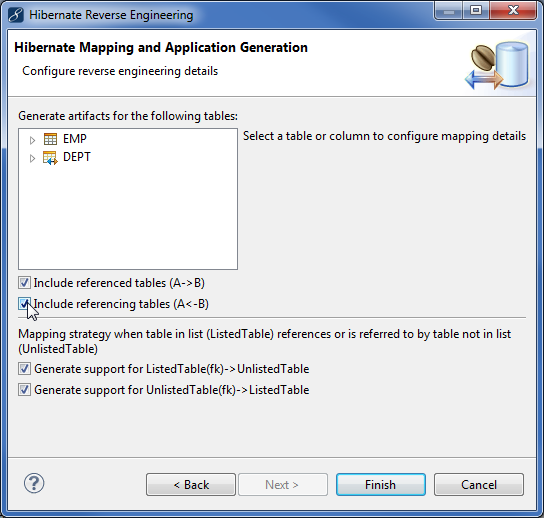
Including referenced tables
Note: You can select a table or a column if you want to customize reverse engineering specifically for the table or for a column.

Reverse engineering details for a table and for a column
| Field | Description |
Class name | The fully qualified name of the data object class corresponding to this table. |
ID Generator | The ID generator you want to use for this table. |
JDBC type | The JDBC type override for this column. |
Property name | The name of the generated property corresponding to this column. |
Hibernate type | The Hibernate type corresponding to this column. |
Include referenced / referencing tables | Expands the set of tables to be reverse engineered to other tables referenced by this table and tables referencing this table respectively. |
Generate support for ListedTable(fk)->UnlistedTable and UnlistedTable(fk)->ListedTable | Generates code corresponding to the relationships this table has with other tables which are not being reverse engineered and are absent from the table list on this page. |
Reverse engineering performs the following actions:
- Creates the Abstract<tablename> class. This abstract class provides the required Hibernate compatibility features such as public getter and setter methods for persistent properties corresponding to columns in the database table.
- Creates the <tablename> Java class, a concrete subclass of the Abstract<tablename> class. The <tablename> class is intended to be modified directly with additional business and validation logic and is not overwritten in subsequent generation passes.
- Creates the <tablename>.hbm.xml Hibernate mapping descriptor. This file instructs Hibernate how to map data to/from the <tablename> Java class and the database table.
- Registers the <tablename>.hbm.xml mapping descriptor in the hibernate.cfg.xml file.
- Creates the <tablename>DAO Java class. This class provides convenient access to the <tablename> data object class.
- Creates the IBaseHibernateDAO interface & BaseHibernateDAO class. These classes are necessary for the functioning of the Basic DAOs and they use the Session factory generated when Hibernate capabilities were added (com.myeclipse.hibernate.HibernateSessionFactory) to obtain Hibernate sessions.
The image below highlights the classes, key methods and mapping file generated as well as the reference to the mapping file added in the hibernate.cfg.xml file.
Updated project following Hibernate mapping
4.1 Using Templates to Fine-Tune Generated Code
- Download and unzip the template file to your file system.
- Follow the instructions in README.txt in the zip file to customize the templates.
- Invoke the Reverse Engineering wizard. On the first page of the wizard, select the Use Custom Templates option, and in the Template Directory field, specify the folder containing the template you downloaded.
4.2 Using a Custom Reverse Engineering Strategy
- Right-click your project, select Properties, and select Java Build Path.
- Click the Libraries tab, and click Add Library.
- Select MyEclipse Library, click Next, and select MyEclipse Persistence Tools. Click Finish.
Adding the MyEclipse Persistence tools library - Create a new class in your project to extend the org.hibernate.cfg.reveng.DelegatingReverseEngineeringStrategy class.
- Define the single argument constructor and override a method of interest, for example, columnToPropertyName. Following is an example MyStrategy.java file that adds ME_ prefixes to all generated propertes.
package com.myeclipse.hibernate; import org.hibernate.cfg.reveng.DelegatingReverseEngineeringStrategy; import org.hibernate.cfg.reveng.ReverseEngineeringStrategy; import org.hibernate.cfg.reveng.TableIdentifier; public class MyStrategy extends DelegatingReverseEngineeringStrategy { public MyStrategy(ReverseEngineeringStrategy strategy){ super(strategy); } public String columnToPropertyName(TableIdentifier table, String columnName) { return "ME_" + super.columnToPropertyName(table, columnName); } } - On the second page of the Reverse Engineering wizard, specify the class you just created.
Specifying the reverse engineering strategy class file
5. Use the HQL Editor
The following steps use the ECHO_MESSAGE table added using the SQL commands presented at the beginning of this tutorial.
- Map to the ECHO_MESSAGE table.
- Right-click the HibernateDemo project, and select MyEclipse>Open HQL Editor.
Note: The HQL editor opens any time you open a file with an .hql extension.
Opening the HQL editor - When the editor opens, type from EchoMessage.
- Click the Run icon or press CTRL+F9 to execute your query.
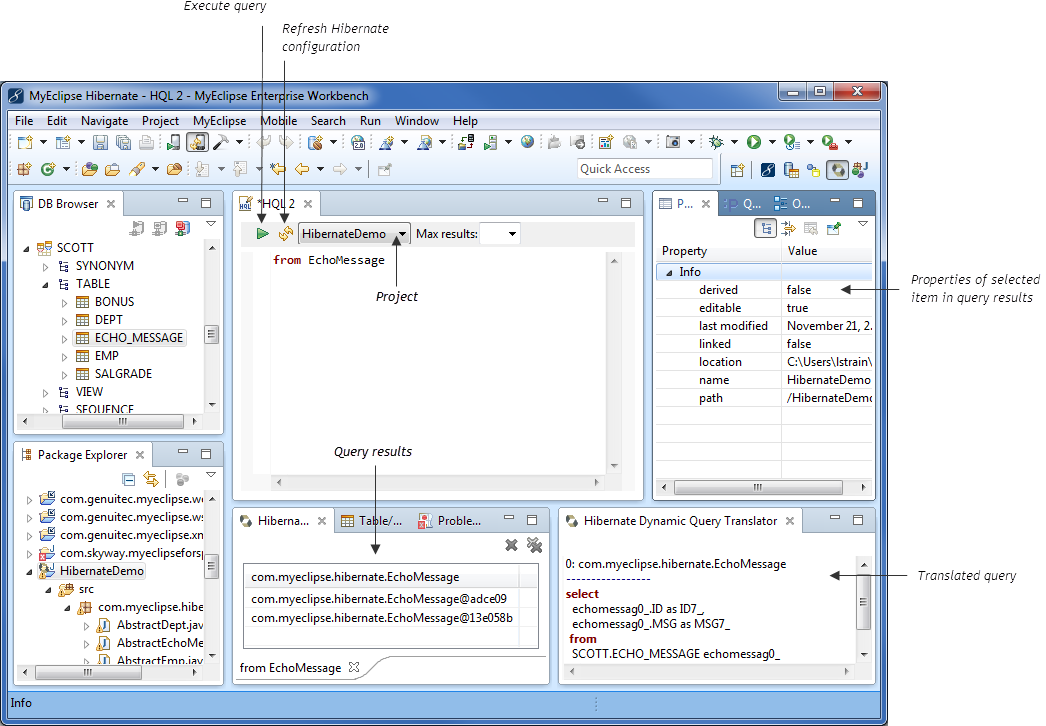
Executing a query in the HQL editor - Use the Query Parameters view to execute a variable query.
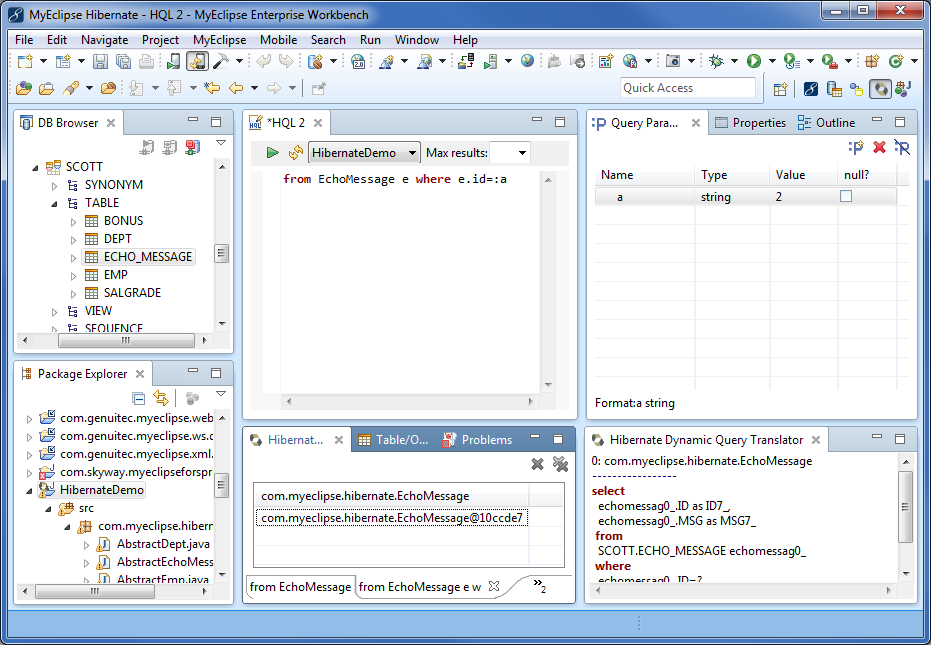
Using the Query Parameters view
Note: If you change configuration, mapping, or data objects after the HQL editor has been initialized for a project, use the Refresh button on the editor toolbar to make sure the editor picks up the latest changes.
If you are editing a NamedQuery annotation, you can invoke quick fix (usually CTRL+1) inside the query attribute to copy to the HQL Editor. This opens the HQL editor, initialized with the query string.
Copy to HQL Editor
You can test and edit your query in the HQL editor. When done, closing the editor allows you to copy the modified query back into the query attribute in the Java editor.
After you open the HQL editor for a project, content assist and validation (CTRL+ spacebar) is provided for NamedQueries.
Named query content assist
Named query validation
6. Test the HibernateDemo Application
One method for testing Hibernate persistence is to create a Java class with a main method. The testing class uses the Java object and HibernateSessionFactory created by the Hibernate wizards. Look at the two important methods defined on the HibernateSession class as shown below that are used in the test code.
Shown are two important static methods in the SessionManager class.
getSession(): This method returns a Session variable that can been used to access the Hibernate Session class. Anytime you want to use the Hibernate session, you can call this method to obtain the cached Hibernate Session.
closeSession(): If a session has been started, this method closes it.
Following is a list of the steps in the test code along with a sample of the source code.
- Select File>New>Class.
- Enter a package name.
- Type HibernateReadTest in the Name field.
- Complete the page as shown, and click Finish.
New Java test class - Open the HibernateReadTest.java file, replace the source code with the code below, and press CTRL+S to save.
package com.myeclipse.hibernate; import java.math.BigDecimal; import org.hibernate.HibernateException; public class HibernateReadTest { public static void main(String[] args) { // Step 1 - Create the DAO EchoMessageDAO dao = new EchoMessageDAO(); try { // Step 2 - Use findById to retrieve the message with ID = 1 EchoMessage echoMessage = dao.findById(new BigDecimal(1)); System.out.println("Entity retrieval successful, message is: " + echoMessage.getMsg()); } catch (HibernateException e){ System.err.println("Entity retrieval failed."); e.printStackTrace(); } finally { try { dao.getSession().close(); } catch (Exception e) { // do nothing } } } } - Right-click the HibernateReadTest.java file in the Explorer, and select Run>Run As>Java Application. The Console view opens, and if the test is successful, you see the output as shown in the figure below.
Note: If you see log4j warnings, you can safely ignore them.
HibernateReadTest console output
7. Importing the Sample HibernateDemo Project
- Download HibernateDemo.zip.
- Select Import>Existing Projects into Workspace from the menu, select the Select archive file option, and navigate to the zip file. Click Finish to import the project into your workspace.
- Because this project was created with an older version of MyEclipse, a Project Migration wizard opens. Follow the steps in the wizard to migrate the project.
- Make the following changes to reconfigure the project to match your environment.
Edit hibernate.cfg.xml and change the connection settings to reflect your database setup. You might need to change EchoMessage.hbm.xml to change the schema specified in the class element.
Establish a connection to your database and execute the code in the DDL/DDL.sql file to create the sample table and populate it. Prior to execution, you might need to qualify the table with a schema prefix and make other changes to the DDL specific to your database.
Copy the JDBC driver JAR for your database into the project. Add it to the build path by right-clicking the project, and selecting Build Path>Add to Build Path.
The following additional files are included:
- log4j.properties is used to control the level of logging performed by the log4j library.
- ehcache.xml is used to configure the ehcache library.
- HibernateWriteTest.java is a sample application that demonstrates how DAOs can be used to write to your database.