

Implementing JPA Persistence
This tutorial introduces some of the JPA-based features. When reading this tutorial, it will be helpful to have a basic idea of how JPA and entity mapping works along with annotations. In this tutorial, you will learn how to:
- Set up a project for JPA
- Connect to a database
- Reverse Engineer a database table to generate entities
- Implement create, retrieve, edit, and delete functions
This feature is available in MyEclipse.
1. Set up a Project
The JPA Facet is most commonly added to Java or Web projects. In this tutorial, you use a simple Java project to see how JPA works.
Note: You can download the project developed in this tutorial, and import into your workspace.
- Click the drop-down arrow
 , and select Java Project.
 - Type SampleJPAProject in the Project Name field, accept the default options, and click Finish.
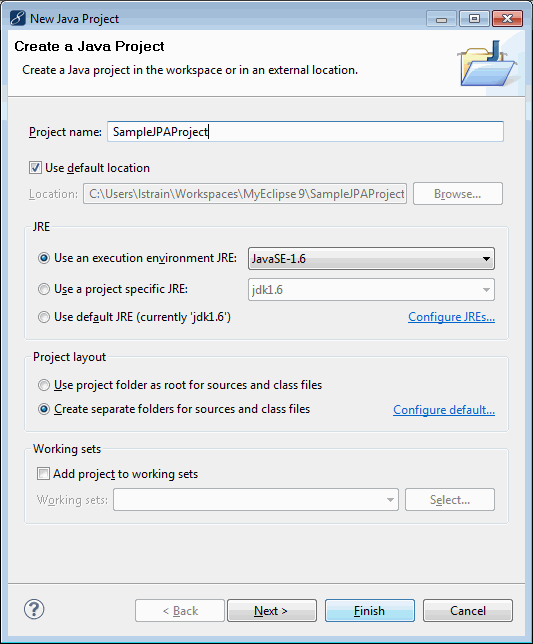
Creating a Java project - Click
 , and select MyEclipse Database Explorer to open the perspective.
 - In the DB Browser, select the MyEclipse Derby connection, and click
 .
. 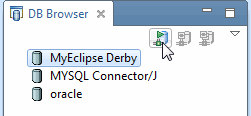
Opening the database connection
Note: You cannot add the JPA Facet until you set up a DB connection because you are required to select the connection to use. - Switch back to the MyEclipse Java Enterprise perspective, right-click the project, and select MyEclipse>Project Facets>Install JPA Facet.
- Select MyEclipse Generic Java Runtime in the Target Runtime drop-down, and click Next.
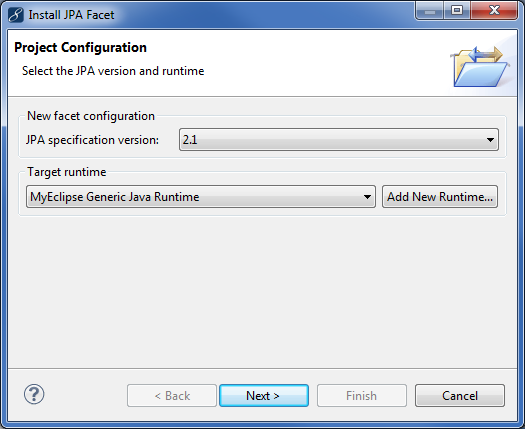
Configuring JPA capabilities - Select a platform from the Platform drop-down, and If the JPA implementation type defaults to a User Library, select the library corresponding to the selected platform. If no library is listed, click
 to download the appropriate library.
Selecting a library - Select MyEclipse Derby in the Connection field, check the Add driver library to build path and Override default schema from connection checkboxes, and choose CLASSICCARS from the Schema drop-down. Click Finish.
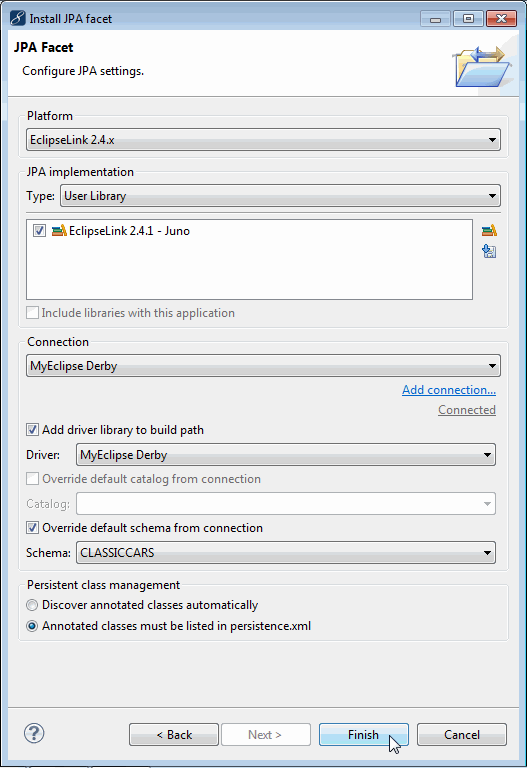
Completing the JPA facets configuration
Now the project has the fully configured JPA Facet added to it, which include JPA configuration information, DB Connection information, and all necessary JDBC and JPA libraries added to the project’s build path. If this were a Web project, all build-path additions would be prepared for deployment when the project was deployed to and run on an app server.
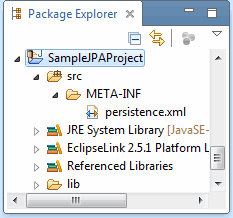
Project structure
2. Create a Java Package
In the following section, you will reverse engineer the data in the database table, and generate entities for your project. Before reverse engineering, you need to create a Java package in which to place these entities.
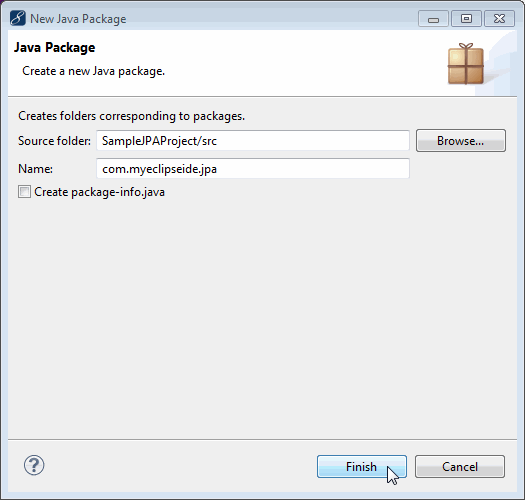
- Expand the project, right-click the src folder, and select New>Package.

Creating a new package - Type com.myeclipseide.jpa in the Name field, and click Finish.
Naming the Java package
3. Reverse Engineer a Database Table
Now that the project is set up, you are ready to reverse-engineer the PRODUCTLINE table into the project and start using the entities that are generated.
- Right-click the project, and select JPA Tools>Generate Entities & DAOs.
Note: You have the option to use MyEclipse reverse-engineering tools or DALI entity generators. Make a selection, click OK, and complete the wizard. This tutorial uses the MyEclipse reverse-engineering tools.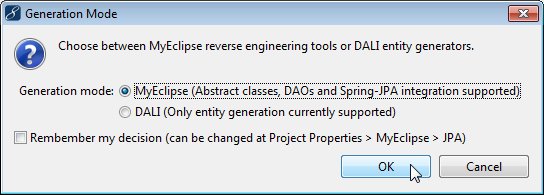
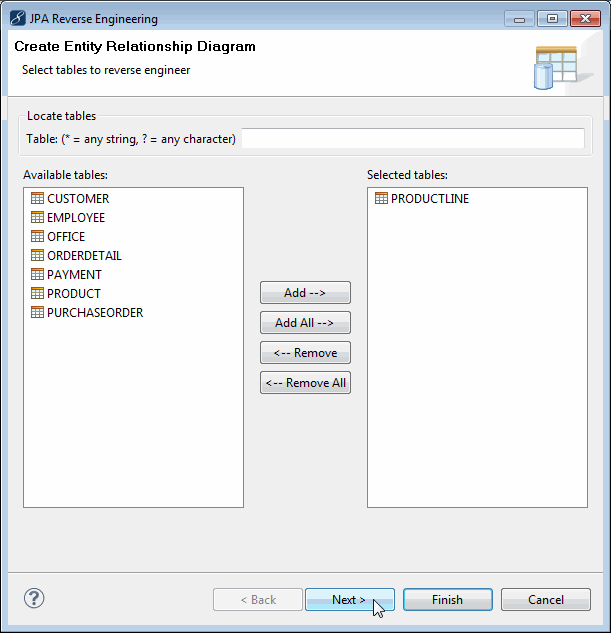
Reverse-engineering tool selection - Select the PRODUCTLINE table, click Add, and click Next.
Specifying the PRODUCTLINE table to be reverse engineered - In the Java Package field, click Browse, and select the com.myeclipseide.jpa package you created earlier. Select the following checkboxes:
Entity Bean Generation: Tells MyEclipse to generate plain Java classes that are annotated to be used as JPA entities
Create abstract class: If you want to customize the generated classes without fear of overwriting your changes each time, MyEclipse can generate base abstract classes as well as concrete subclasses that you can customize and use. Each time you reverse-engineer, MyEclipse only overwrites the abstract base class, maintaining your changes inthe concrete subclass.
Update persistence.xml: Similar to Hibernate; you can list all the JPA entities you are using in the JPA configuration file.
Java Data Access Generation: Tells MyEclipse to generate DAO utility classes for you that allow you to save/find/update/delete the entities from the database right away. This code wraps the JPA entity manager and makes using the entities and the DB very easy.
Generate Precise findBy Methods: Tells MyEclipse to generate findByXXX methods where XXX pertains to each property on the entities that are reversed. This allows easy access to entities from the DB using any property as a means of finding them.
Generate Java Interfaces: Selecting this option creates an interface class with a corresponding DAO implementation class. Deselecting this option generates only the DAO implementation class without a separate class defining the interface.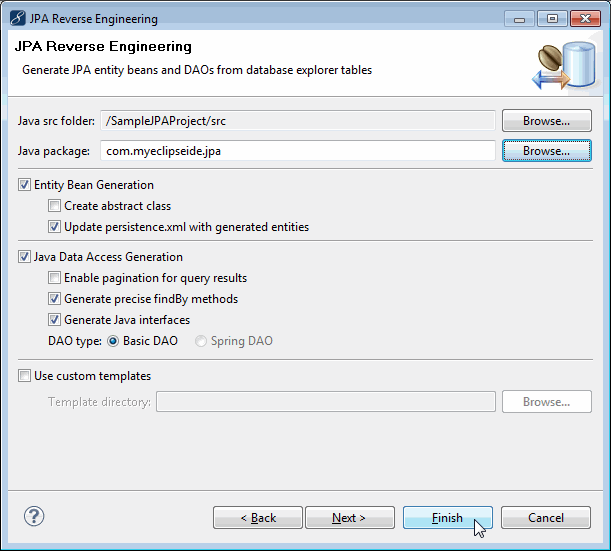
Setting up reverse engineering - Click Finish. View the resources MyEclipse generated by expanding the com.myeclipseide.jpa package.
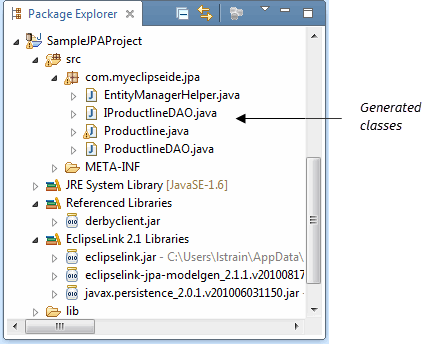
Generated classes
The generated entities are described as follows:
- EntityManagerHelper: When using straight JPA, developers need to make use of the `EntityManager class`. This generated helper class makes using `EntityManager` a much easier process by providing static methods to access the manager as well as the most common operations readily available to call.
- IProductline: The class that defines the interface for the corresponding DAO implementation class.
- Productline: This class is the JPA Entity (POJO) that represents the DB table PRODUCTLINE. This POJO contains the fields of the PRODUCTLINE table and represents one row in the DB.
- ProductlineDAO: This class wraps the EntityManagerHelper to give us easy-to-use methods, specifically for adding/finding/updating and deleting products from the DB.
Note: After reverse-engineering is finished, you can open the Persistence perspective to use some of the persistence and data source tools to analyze data in your DB and project.
4. Write an Application
Because MyEclipse generated much of the code, you can quickly focus on writing your “Business Logic”, or more specifically, “the code that actually does stuff”. In this section, you write a single Java class with a main method that inserts a Productline into the database, retrieves it, updates it, and then deletes it. With this code, you should be able to see how easy it is to use the JPA entities in your own applications without needing to write JDBC code or any other persistence code.
4.1 Creating a Class
- Right-click the com.myeclipseide.jpa package, and select New>Class.
- Type RunJPA in the Name field, select the Public static void main checkbox, and click Finish.
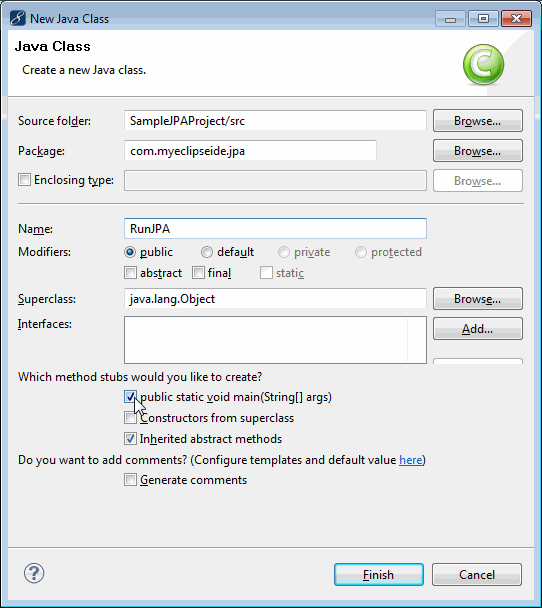
Creating a class with a main method
After the new class and main method are generated, you need to write code to successfully manipulate instances of Productline.
Note: The following code looks long and complex, but that’s because we are trying to show four different examples in one block of code. If you look at each operation (save, load, update, delete), none of them consists of more than a few lines of code. - Add the following code to the main method, and press CTRL+S to save.
/* 1. Create a reference to our ID */
             String productLineID = "Men's Shoes";

 /* 2. Create a new Productline instance */
             Productline newProductline = new Productline(
                     productLineID,
                     "Shoes for men.",  "<strong>Men's Shoes</strong>", null);

 /* 3. Create a DAO instance to use */
             ProductlineDAO dao = new ProductlineDAO();

 /* 4. Store our new product line in the DB  */
EntityManagerHelper.beginTransaction();
             dao.save(newProductline);
EntityManagerHelper.commit();

 /* 5. Now retrieve the new product line,
                 using the ID we created */
             Productline loadedProductline = dao.findById(productLineID);

 /* 6. Print out the product line information  */
             System.out.println("*NEW* Product Line
             [productLine="
                     +
             loadedProductline.getProductline() + ",
             textDescription="
                     +
             loadedProductline.getTextdescription() + ", image="
                     +
             loadedProductline.getImage() + "]");

 /*
     * 7. Now let's change  same value on the product line, and save the
     * change
 */
loadedProductline.setTextdescription("Product line for men's shoes.");
EntityManagerHelper.beginTransaction();
             dao.save(loadedProductline);
EntityManagerHelper.commit();

 /*
   * 8. Now let's load the product line from the DB again, and make sure
   * it text description changed
  */
             Productline secondLoadedProductline =
             dao.findById(productLineID);
             System.out.println("*REVISED* Product Line ["
                 + "productLine=" +
             secondLoadedProductline.getProductline()
                 + ", textDescription=" +
             secondLoadedProductline.getTextdescription()
                 + ", image=" +
             secondLoadedProductline.getImage() + "]");

 /* 9. Now let's delete the product line from the DB */
EntityManagerHelper.beginTransaction();
             dao.delete(secondLoadedProductline);
EntityManagerHelper.commit();

 /*
    * 10. To confirm the deletion, try and load it again and make sure it
    * fails
 */
             Productline deletedProductline = dao.findById(productLineID);

 /*
     * We use a simple inlined IF clause to test for null and print
     * SUCCESSFUL/FAILED
 */
             System.out.println("Productline deletion: "
                     + (deletedProductline ==
             null ? "SUCCESSFUL" : "FAILED"));
Note: The code in green marks the beginning and the end of each transaction. It is a good idea to wrap segments of code that change the database with transactions, so if the operation fails (e.g. DB crashes), then all the changes that tried to occur in the transaction are rolled back to their original values instead of only half of the work getting done.
The code above may look daunting, but it’s doing a lot of simple things back-to-back. If, for example, you are interested only in storing a new item in the database, you only need the code from Steps 1-3 in your program, which amounts (minus comments) to three lines of code. Below is a breakdown of each numbered section:
- The PRODUCTLINE table uses the name of the product line as the primary key. To make this tutorial easier to follow, we define the product line name in a String and reuse it throughout the code (to create and store the product line, then to retrieve it twice). You could just as easily typed “Men’s Shoes” multiple times, but we thought this made the tutorial easier to follow.
- This creates a new instance of the Productline POJO that was generated by MyEclipse and will be inserted into the DB. For the purpose of this tutorial, the values are not important, so we just used sample information.
- This creates an instance of the DAO to use. The DAO is needed for DB access. This was generated by MyEclipse, as well.
- This tells the DAO to store the new Productline in the DB. Because you are going to write something to the DB, you wrap the save call in a transaction.
- To make sure that the Productline was stored correctly, using the ID defined in Step 1, we ask the DAO to get the Productline, and the result is assigned to a brand new object to make absolutely sure that what is loaded is from the DB. (We could have assigned the value back to newProductline, but for the purpose of the tutorial, we wanted to be very obvious where objects are coming from and that the loaded instance didn’t exist before in the code accidentally).
- This prints out the values from the loaded entity to make sure it’s what was just stored in the DB.
- This changes a value on the POJO just loaded to show how updating records work. The change is then committed back to the DB using the DAO. Again, this operation is wrapped in a transaction to make sure the change to the DB is made safely.
- Just like in Step 5, the record is reloaded from the DB, using its ID defined in Step 1, to make sure the update operation worked. The POJO values are then printed out to make sure the new description was saved to the DB.
- This shows how deleting a record from the DB works. And again, because this requires a change to the DB, this code is wrapped in a transaction.
- Similar to Step 8 and Step 5, to prove that the delete worked, we try and load the entity from the DB using the ID we gave it. This operation should fail because we already erased the Productline. After getting the result from the DAO, a statement is printed with an embedded IF clause to make sure the result was null.
4.2 Running the Application
- Right-click the project, and select Run As>Java Application.
- Select the RunJPA application, and click OK.
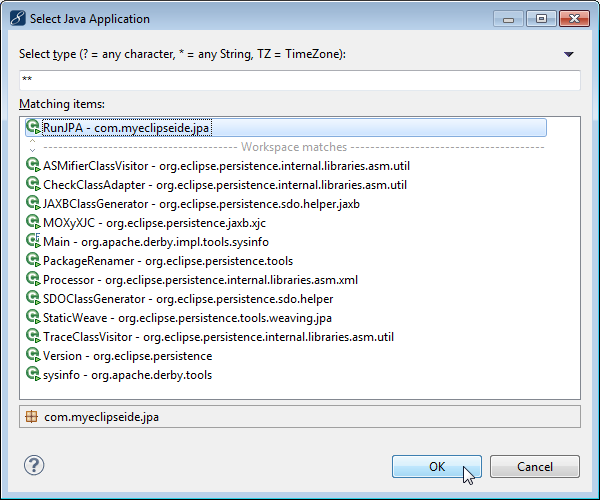
Selecting the application to run
The output displays in the Console view.
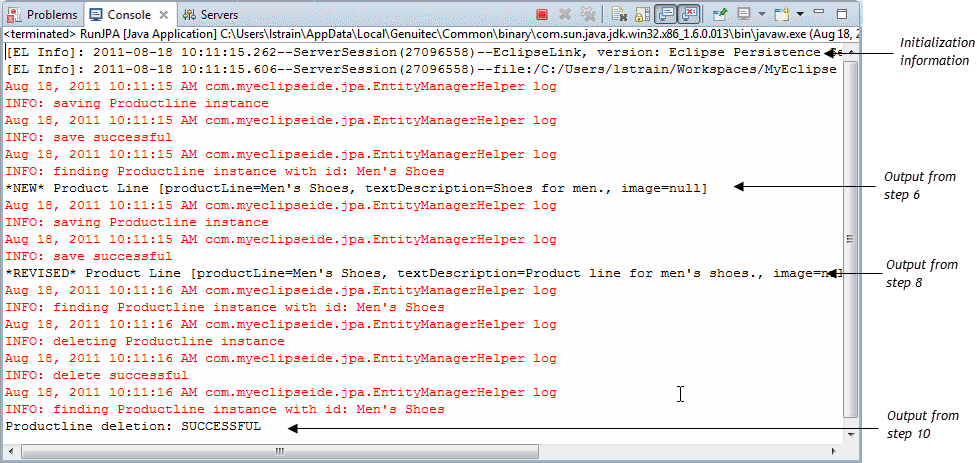
Output from running the application
The red text is default log messages from the generated DAO and EntityHelper classes in MyEclipse. The black text is the System.out.println text from the code to track the progress. As you can see, the first print out from Step 6 and the updated print out from Step 8 all worked as expected. Also, the deletion was successful as well since there was no Productline returned from the query after it was erased.