

Performing DB Operations Using Hibernate and Spring
Using Spring with Hibernate adds a level of abstraction between the persistence code and business logic for controlling the underlying persistence engine. This tutorial is for those familiar with Spring and dependency injection and persistence in Java. In this tutorial, you will learn how to:
- Connect to a database
- Add Hibernate and Spring facets to a project
- Reverse Engineer a database table to generate entities
- Create Spring Beans as the persistence layer and data source
- Enable Hibernate 3.x annotations support
This feature is available in MyEclipse.
1. Set Up a Sample Database
The example in this tutorial uses an instance of MySQL 5 with a sample USER table and data. Use the following files to prepare the sample data. You must have a database set up before beginning the tutorial.
2. Connect to the Database
- Open the Database Explorer perspective by clicking
 , and selecting MyEclipse Database Explorer.
 - In the DB Explorer, click
 , and select New.
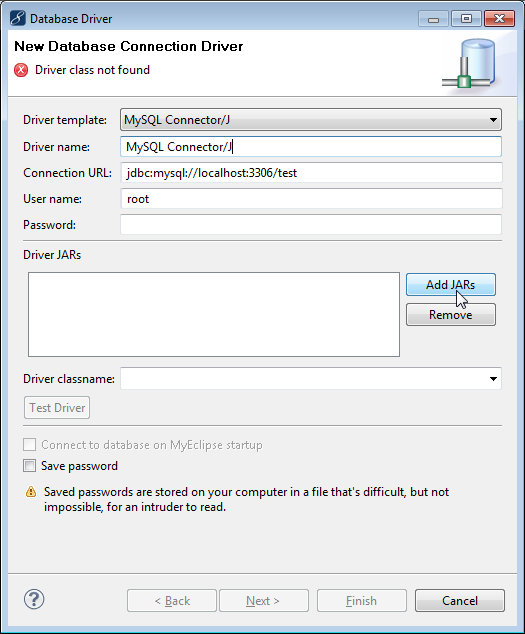
 - Select MySQL Connector /J from the Driver Template drop-down, type MySQL Connector/J in the Driver name field, replace <hostname>[<:3306>]/<dbname> with localhost:3306/test, and enter a user name and password.
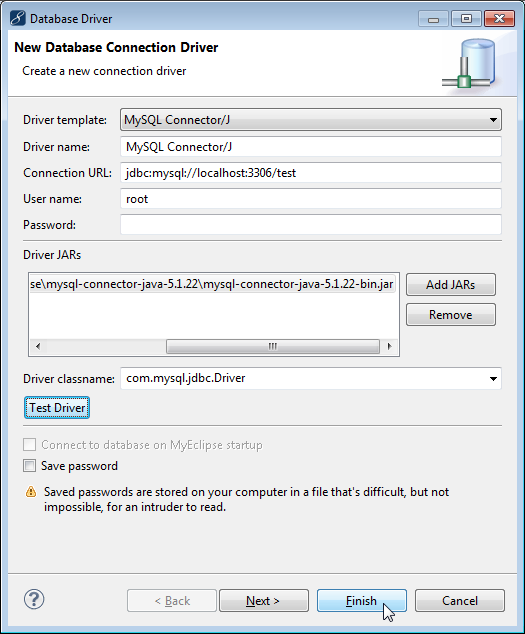
Adding a new database connector - Click Add JARs. Navigate to the location of the MySQL Connector/J JAR file, and select it. The Driver classname field is filled in for you. Click Finish.
JAR file added to the connector information - Select MySQL Connector/J in the DB Explorer, and click
 to open the connection.
3. Create a Hibernate-Enabled Project
You can enable Hibernate and Spring to any supported base projects, commonly Java or Web.
Note: This is the same project created in the introduction to Hibernate in case you already have this project. You can download the complete Hibernate/Spring project created in this tutorial if you prefer.
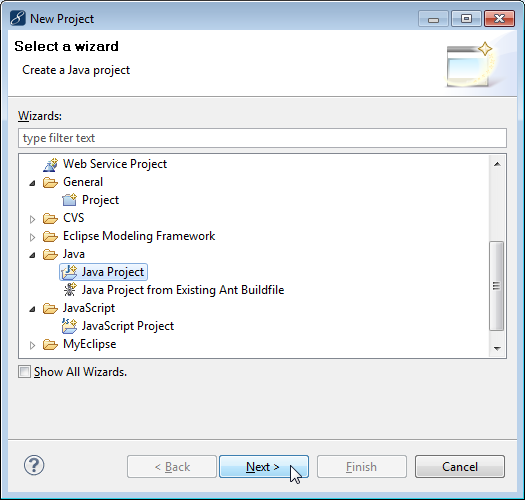
- Select File>New>Project, expand Java, select Java Project, and click Next.
Creating a new Java project - Type HibernateSpringProject in the Project name field, and click Finish. You are prompted to switch to the Java perspective. Choose Yes.

Java project details - Right-click the project, and select Configure Facets>Install Hibernate Facet
 This menu option was updated in MyEclipse 2017. For prior versions, click here.
. Select 4.1 as the Hibernate specification version.
This menu option was updated in MyEclipse 2017. For prior versions, click here.
. Select 4.1 as the Hibernate specification version.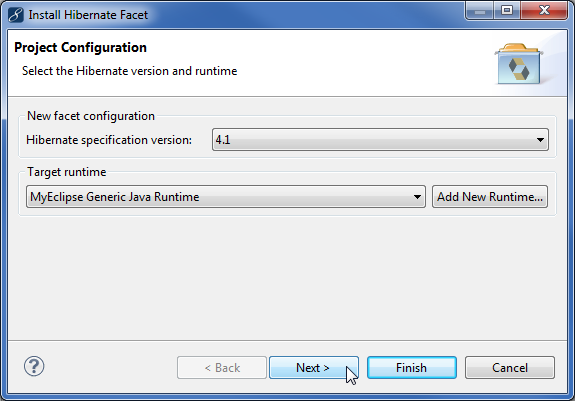
Selecting Hibernate specification version - Click Next. MyEclipse creates a new hibernate.cfg.xml file for you.
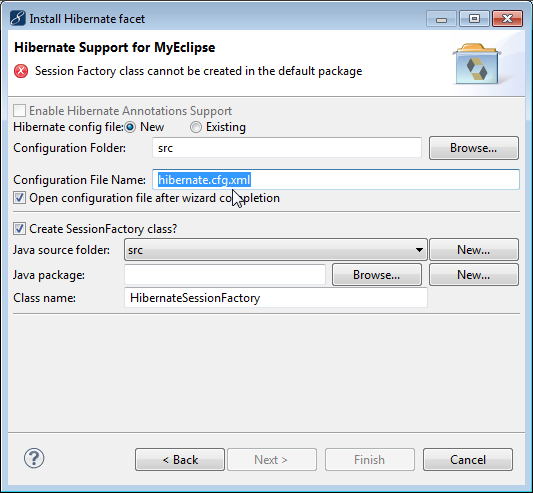
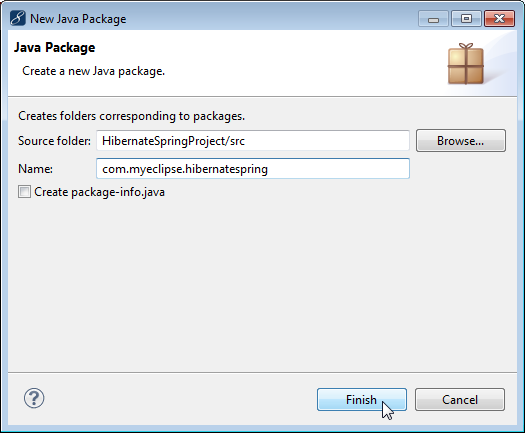
New hibernate configuration file - Click New beside the Java package field to create a new package for the session factory class. Type com.myeclipse.hibernatespring as the package name, and click Finish.
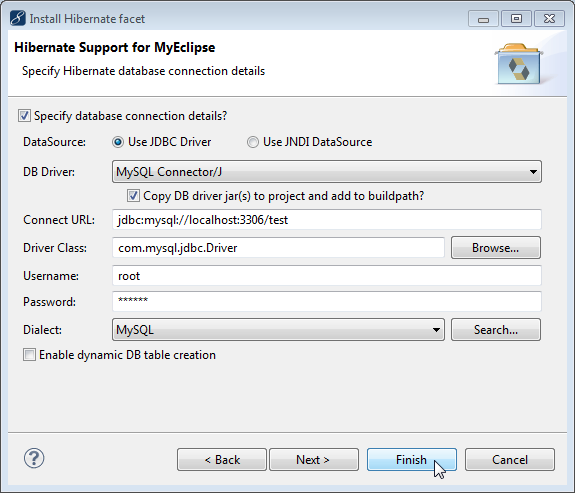
Creating a new Java package - Click Next, select MySQL Connector/J from the DB Driver drop-down, enter your password, and click Finish.
Selecting the database connector
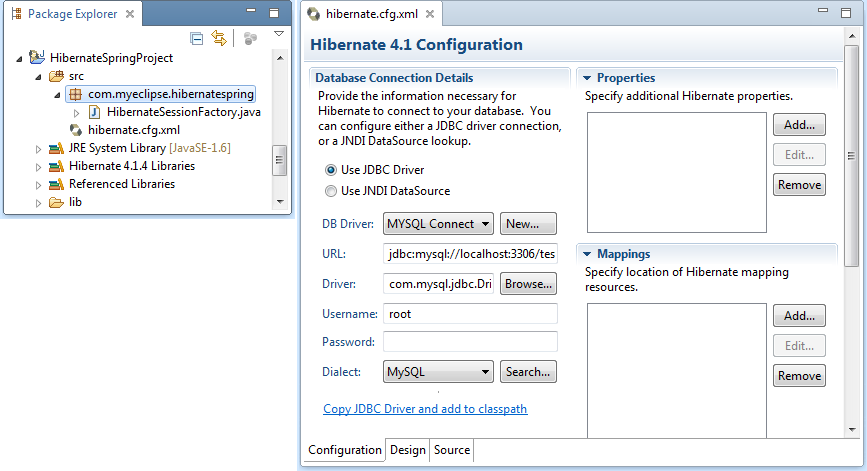
The project now contains all the Hibernate and JDBC libraries, and the hibernate.cfg.xml file opens in the Configuration editor. The configuration file contains connection information from the connection profile. When you reverse-engineer the database tables, the entities will appear in the Mappings section of the configuration file.
Project with Hibernate capabilities and the Hibernate configuration file
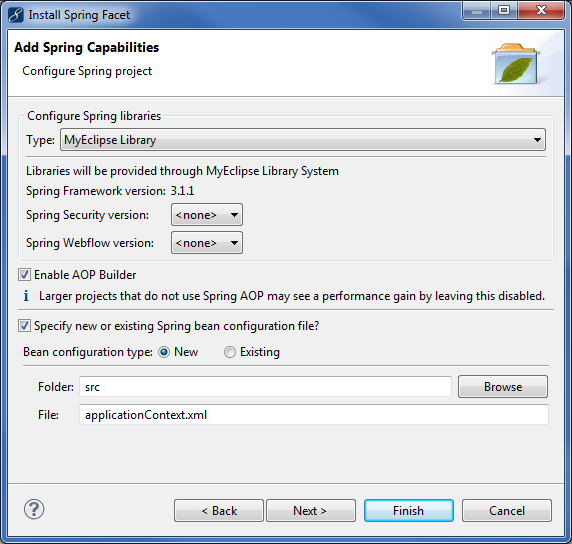
4. Add the Spring Facet to the Project
For small applications, using Spring might seem inconsequential, but when you see how easy it is to use Spring to swap out entire portions of your code base by simply adjusting references in your bean configuration file, you recognize the power of this tool. For the most obvious case, it makes testing much easier. For example, you can swap in a persistence implementation that makes all its calls to an embedded DBMS or maybe logs all its activity. Then, when the application is deployed to production, the persistence implementation is switched back to the code that makes use of the main DBMS with no logging for improved performance.
- Right-click the project, and select Configure Facets>Install Spring Facet
This menu option was updated in MyEclipse 2017. For prior versions, click here.
.
- Accept the default Spring version and target Runtime, and click Next.
- MyEclipse creates a new applicationContext.xml file for you. Click Finish.
New Spring bean configuration file

Project with both Hibernate and Spring capabilities
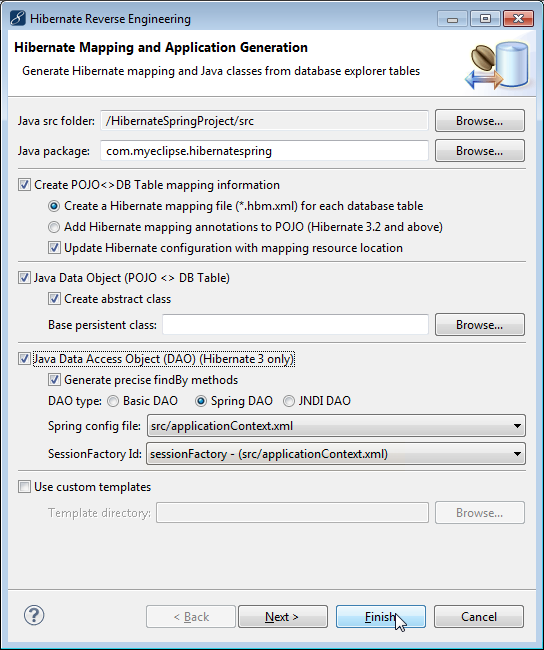
5. Reverse Engineer a Database Table
Reverse-engineering the database table generates Hibernate (Java) objects into the project. Because the project is a Hibernate-Spring project, MyEclipse gives you the option to generate Spring DAOs instead of just plain DAOs during the reverse engineering. This automatically creates DAO Spring beans that have their sessionFactory properties correctly configured to the existing Spring reference to the Hibernate SessionFactory. The steps below use the simplest form of reverse-engineering, letting the wizard take all the default values. However, for maximum control, you could use the Next button and step through the wizard to select details like primary key generation strategy, object names, types and more.
- Switch back to the Database Explorer perspective.
- In the DB Browser, expand MySQL Connector/J to the user table.
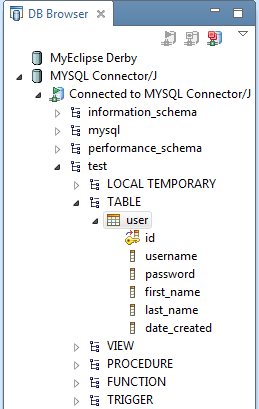
Expanded database - Right-click the user table, and select Hibernate Reverse Engineering.
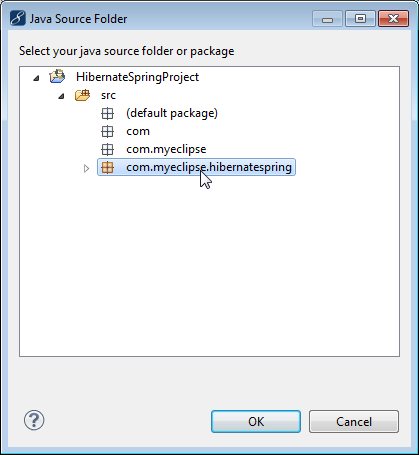
- Click Browse beside the Java src folder field, expand HibernateSpringProject>src, select com.myeclipse.hibernatespring, and click OK.
Selecting Java package for the location of generated files - Select the Create POJO <> DB Table mapping information checkbox, select the Java Data Object checkbox, select the Java Data Access Object (DAO) checkbox, and click Finish. You are prompted to switch to the Hibernate perspective. Click Yes.
Reverse engineering details
The Hibernate classes were generated into the Java package and the Spring beans were created.
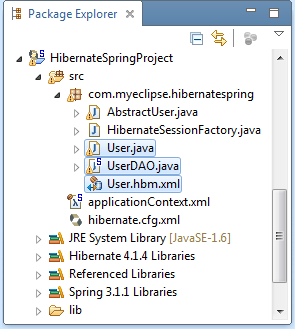
Generated classes
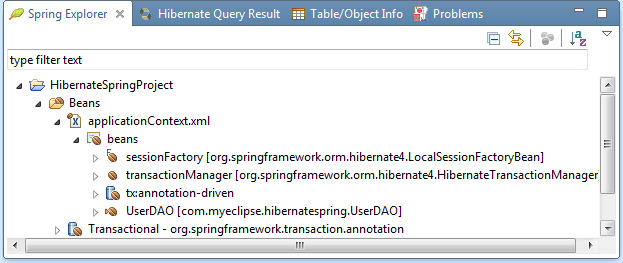
Spring beans
6. Write Hibernate-Spring Code
With your project set up, you are ready to start writing code. There are two pieces of code needed:
- Business Logic: The main method that represents the code for your applications.
- Persistence Layer: This is the abstracted portion of the application that the business logic relies on for database functions. If all the business logic ever uses is the persistence layer, that allows you to hide some of the details of how it all works behind this layer. This example uses Spring to populate the persistence layer with the necessary DAO reference it needs to perform the database operations, but the benefit here is that the business logic doesn’t need to know anything about that.
Add a class for each called BusinessLogic.java and PersistenceLayer.java to the com.myeclipse.hibernatespring package. Start with the persistence layer because that is what sits between all the code you just generated and the code you write in the business logic layer. It’s an abstraction between the persistence technology (Hibernate) and the business logic (main method) that is managed by Spring.Add the following code to the PersistenceLayer class.The purpose of this class is to get a UserDAO instance injected into it by Spring and then it uses that reference under the hood to actually implement the save/find/update and delete operations without the calling code’s knowledge. This allows you to easily and quickly modify the persistence code in the application without changing the application code at all. More specifically, if you ever wanted to change how PersistenceLayer was implemented, say to manage exceptions better, transactions, or anything else, you could edit this class and be done. There would be no need to refactor the entire application as long as all the method signatures stay the same.
package com.myeclipse.hibernatespring;

         public class PersistenceLayer {
               private UserDAO userDAO;
               public UserDAO getUserDAO() {
                   return userDAO;
               }

               public void setUserDAO(UserDAO userDAO) {
                   this.userDAO = userDAO;
               }

               public void addUser(User user) {
                   userDAO.save(user);
               }

               public User findUserById(Integer id) {
                   return
                   userDAO.findById(id);
               }

               public void updateUser(User user) {
                   userDAO.merge(user);
               }

               public void deleteUser(User user) {
                   userDAO.delete(user);
               }
         }
The other important thing to note is that since this layer of abstraction is loosely coupled with the persistence code from the application code, it’s easy for you to use Spring to inject a testing UserDAO implementation, for example, that simulates DB operations but doesn’t actually perform them. There are all sorts of advantages to this design. Now that you have PersistenceLayer implemented, add the following business logic (or the main method implementation) code to the BusinessLogic class. The business logic (main method) makes use of the abstracted persistence layer to add/find/update and delete a user from the database.
package com.myeclipse.hibernatespring;
import org.springframework.context.ApplicationContext;

import org.springframework.context.support.ClassPathXmlApplicationContext;

 public class BusinessLogic {

      public static void main(String[] args) {

          /* 1. Create a new user */
          Integer id = new Integer(1);
          User user = new User();
          user.setId(id);
          user.setUsername("jdoe");
          user.setPassword("1234");
          user.setFirstName("John");
          user.setLastName("Doe");
          user.setDateCreated(Long.valueOf(System.currentTimeMillis()));

          /* 2. Load the Spring bean configuration and create a bean factory */
          ApplicationContext ctx = new ClassPathXmlApplicationContext("applicationContext.xml");

          /* 3. Create instance of PersistenceLayer */
          PersistenceLayer persistenceLayer = (PersistenceLayer) ctx.getBean("persistenceLayer");

          /* 4. Save the new user to the database */
          persistenceLayer.addUser(user);

          /* 5. Confirm that our user was saved */
          User userLoadedFromDB = persistenceLayer.findUserById(id);
           System.out.println("User Loaded from DB [username="
                + userLoadedFromDB.getUsername() + ", password="
                    + userLoadedFromDB.getPassword() + ", firstName="
                + userLoadedFromDB.getFirstName() + ", lastName="
                  + userLoadedFromDB.getLastName() + "]");

          /* 6. Update the user */
          userLoadedFromDB.setFirstName("Johnathan");
          persistenceLayer.updateUser(userLoadedFromDB);

          /* 7. Confirm that the update worked */
          User userLoadedFromDBAgain = persistenceLayer
                .findUserById(id);
          System.out.println("User Loaded from DB Again [firstName="
 + userLoadedFromDBAgain.getFirstName() + "]");

          /* 8. Delete the user */
           persistenceLayer.deleteUser(user);
      }
 }
Here is a quick look at what this code is doing:
- Creates a new user to insert into the database. This is just a POJO; nothing interesting. This uses the User POJO generated by MyEclipse when you reverse-engineered the USER table from the database.
- Creates a bean factory. What this does is read in the Spring bean configuration file and then provide an instance to a “factory” that can be used to get instances of beans based on the specification from that file. This is the Spring “entry point.”
- Creates an instance of PersistenceLayer so you can perform DB operations. Notice how you have to use the bean factory to get the instance in order to have the UserDAO reference populated correctly.
- Saves the new user to the DB using the PersistenceLayer instance you created. Notice how the BusinessLogic class has no knowledge of the UserDAO class or any underlying details because all the calls are going through the PersistenceLayer.
- Reloads the user from the database using the ID assigned to it when it was saved, and checks to make sure all the values are correct.
- Updates the user name to see if updating records works.
- Reloads the user from the database again to make sure the updated change stuck.
- Deletes the user from the DB.
7. Create a Spring Bean as the PersistenceLayer
Some of you might be asking yourself, “How does the PersistenceLayer get a reference to UserDAO in order to actually execute those persistence operations? I don’t see that code anywhere.” The answer is that you need to create a new Spring bean configuration entry for the abstracted persistence layer so it gets the correct reference to the DAO generated by MyEclipse in order to communicate with the DB.
- Open the Spring Explorer by clicking Window>Show View>Other, expanding Spring, and selecting Spring Explorer
This menu option was updated in MyEclipse 2017. For prior versions, click here.
.
- Expand HibernateSpringProject>Beans>applicationContext.xml, right-click beans, and select New Bean.
- Type persistenceLayer in the Bean Id field, and type com.myeclipse.hibernatespring.PersistenceLayer in the Bean class field.
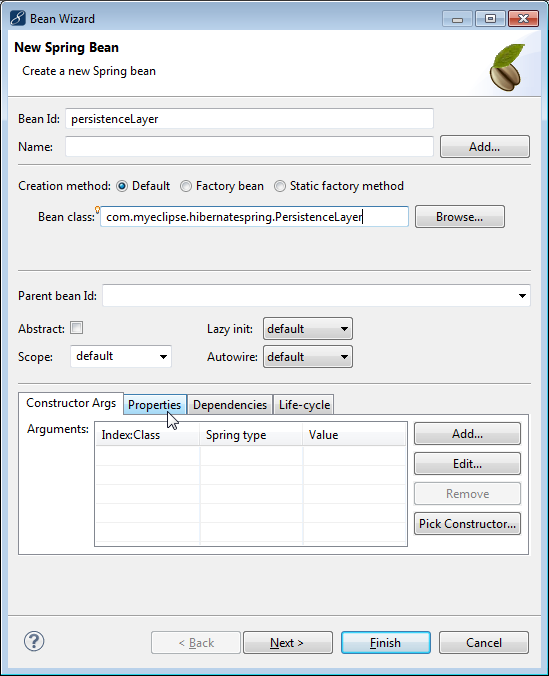
Spring bean details - Click the Properties tab, and click Add.
- Type userDAO, in the Name field, select ref from the Spring type drop-down, type UserDAO in the Reference field, and click Finish.
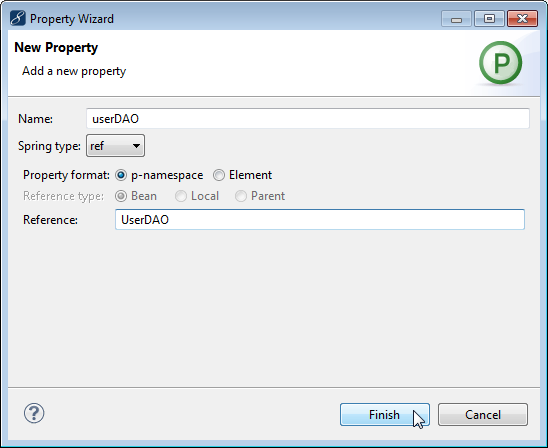
Editing the userDAO value - Click Finish on the Bean wizard window, and press Ctrl+S to save the configuration file. Now, the business logic code can ask the BeanFactory for the persistenceLayer bean and get back a prepared instance of the bean.
8. Create a Data Source Spring Bean
- Create another new bean using the Spring Explorer.
- Type dataSource in the Bean Id field, and type org.springframework.jdbc.datasource.DriverManagerDataSource in the Bean class field.
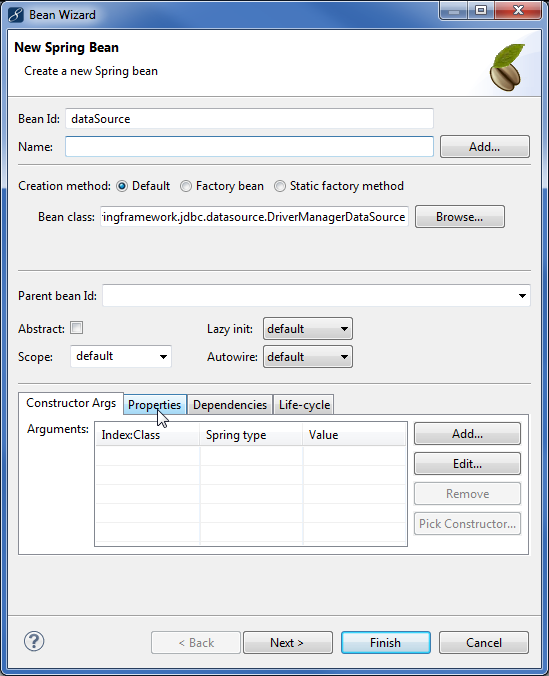
Spring bean details - Click the Properties tab, and add the following properties:
Name Type Value
driverClassName value com.mysql.jdbc.Driver
url value jdbc:mysql://localhost:3306/test
username value root
password value <your password> - Click Finish on the Bean wizard window.
- In the Spring explorer, right-click the sessionFactory bean, and select Add Properties.
- Type dataSource in the Name field, leave the Spring type as ref, and type dataSource in the Reference field.
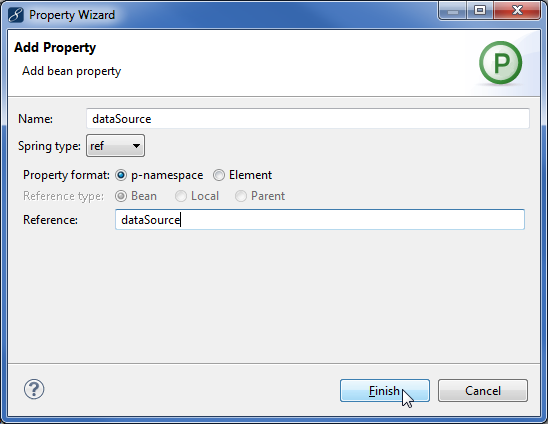
Adding property to sessionFactory - Click Finish, and press Ctrl+S to save the configuration file.
9. Run the Application
- In the Explorer, expand HibernateSpringProject>src>com.myeclipse.hibernatespring.
- Right-click BusinessLogic.java, and select Run As>Java Application. The Console view displays the results.
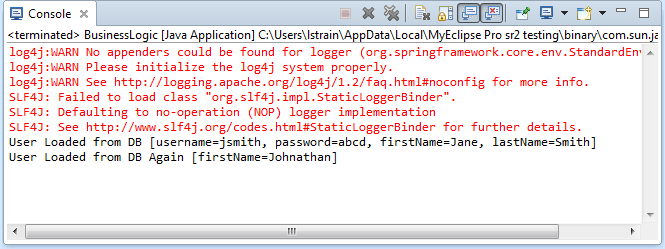
Run results
10. Working with Hibernate Annotations and Spring
MyEclipse provides Hibernate Annotations support for both stand-alone Hibernate projects and for Spring/Hibernate projects. The following section presents a brief overview of the support for Hibernate Annotations and Spring.
Note: Hibernate 4.x includes annotations support automatically.
10.1 Creating a Hibernate/Spring Project with Annotations Support (Hibernate 3.x)
When creating a Hibernate and Spring-enabled project for Hibernate 3.x, do the following to enable annotation support. When adding Hibernate3.x capabilities to your project, select the Enable Hibernate Annotations Support checkbox.
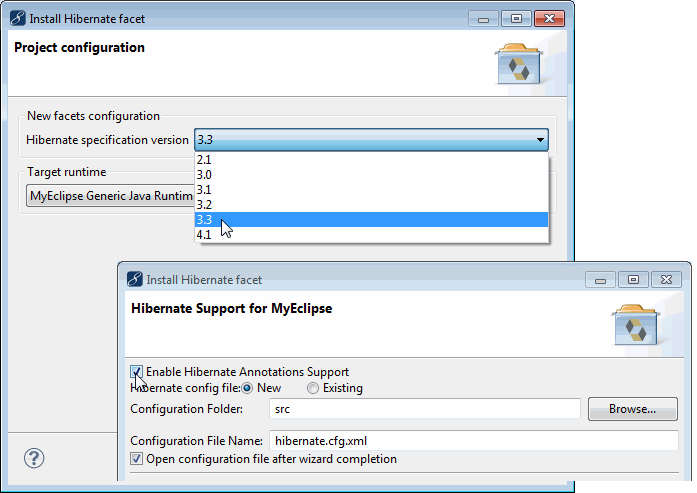
Adding Hibernate capabilities with Annotations support
When adding Spring capabilities on page 3, select the Enable Hibernate Annotations support checkbox. This creates an AnnotationSessionFactoryBean instead of a LocalSessionFactoryBean; the former is required when working with annotations.

Adding Spring capabilities with Annotations support

AnnotationSessionFactoryBean generated by adding Spring capabilities
10.2 Reverse Engineering
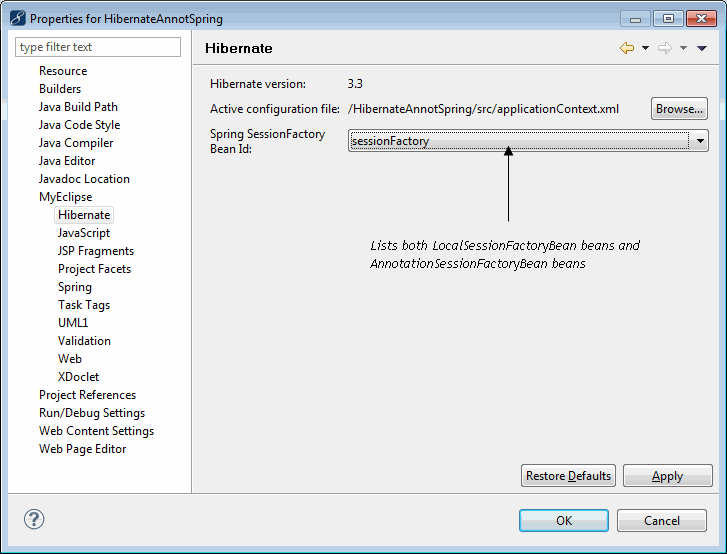
The Hibernate project properties page in a project setup using the above process lists both LocalSessionFactoryBean beans as well as AnnotationSessionFactoryBean beans in the SessionFactory Bean ID drop-down when you select a Spring beans configuration file.
Note: For annotations support for Hibernate 3.x during reverse engineering, you must either select a Hibernate configuration file in the Active Configuration File field or a Spring beans configuration file and an AnnotationSessionFactoryBean for the SessionFactory.
Hibernate project property page
The session factory beans Ids presented for Spring DAOs depend on whether you’ve chosen to generate annotated POJOs or Hibernate mapping files. If you chose to generate annotated POJOs, then only AnnotationSessionFactoryBeans are presented in the SessionFactory Id drop-down, otherwise both LocalSessionFactoryBean beans and AnnotationSessionFactoryBean beans are listed.
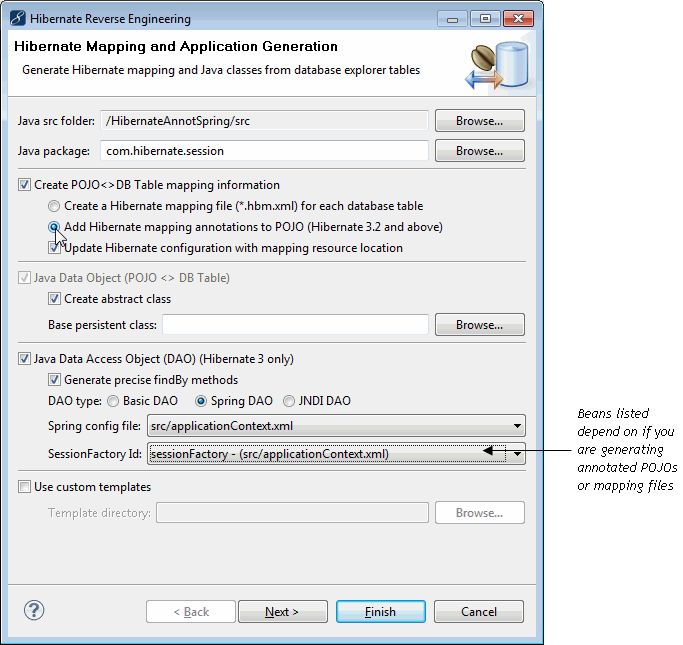
Hibernate Annotations reverse engineering