

Performing DB Operations Using Hibernate
This tutorial presents basic techniques for Hibernate development. You will create a simple application that uses Hibernate to persist text messages to a single database table. This tutorial is for those familiar with Spring and dependency injection and persistence in Java. In this tutorial, you will learn how to:
- Enable Hibernate support in a Java project
- Generate Java classes and database mapping files
- Use the HQL editor
This feature is available in MyEclipse.
1. Set Up a Sample Database
The example in this tutorial uses an instance of MySQL 5 with a sample USER table and data. Use the following files to prepare the sample data. You must have a database set up before beginning the tutorial.
2. Connect to the Database
- Open the Database Explorer perspective by clicking
 , and selecting MyEclipse Database Explorer.
 - In the DB Explorer, click
 , and select New.
 - Select MySQL Connector /J from the Driver Template drop-down, type MySQL Connector/J in the Driver name field, replace <hostname>[<:3306>]/<dbname> with localhost:3306/test, and enter a user name and password.
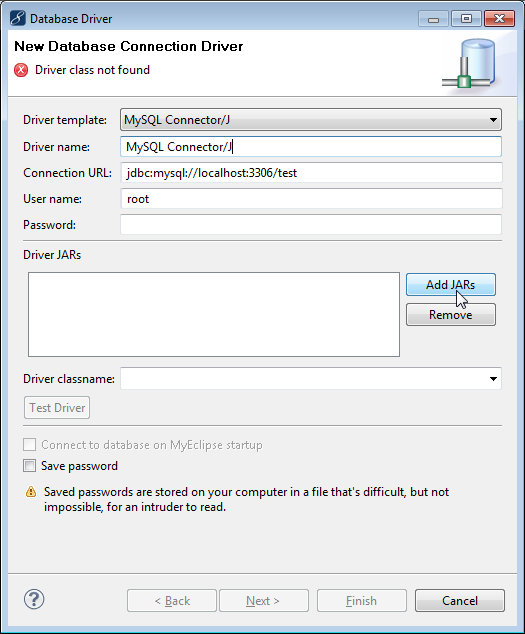
Adding a new database connector - Click Add JARs. Navigate to the location of the MySQL Connector/J JAR file, and select it. The Driver classname field is filled in for you. Click Finish.
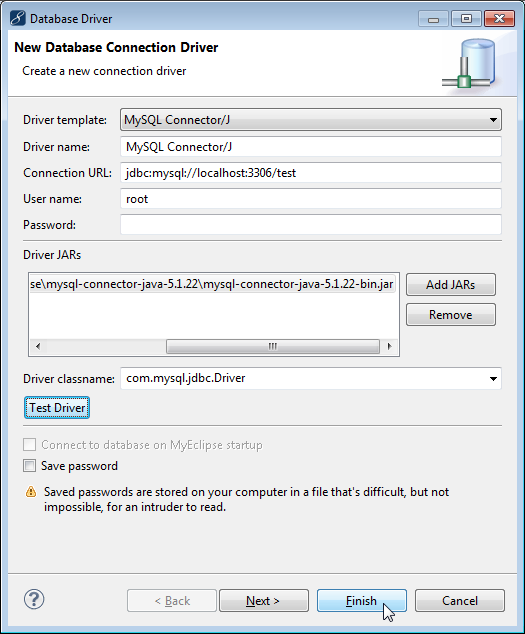
JAR file added to the connector information - Select MySQL Connector/J in the DB Explorer, and click
 to open the connection.
3. Create a Hibernate-Enabled Project
You can enable Hibernate and Spring to any supported base projects, commonly Java or Web.
Note: You can download the complete Hibernate project created in this tutorial if you prefer.
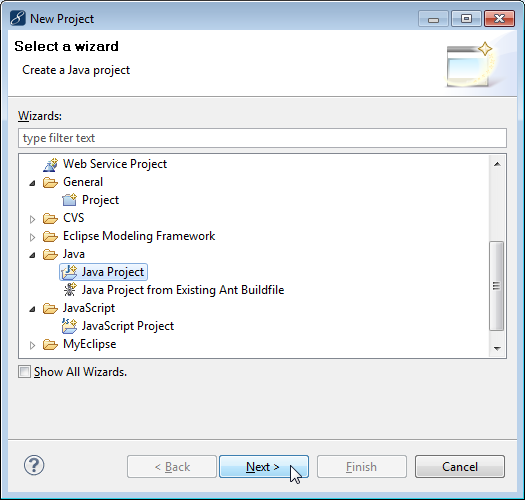
- Select File>New>Project, expand Java, select Java Project, and click Next.
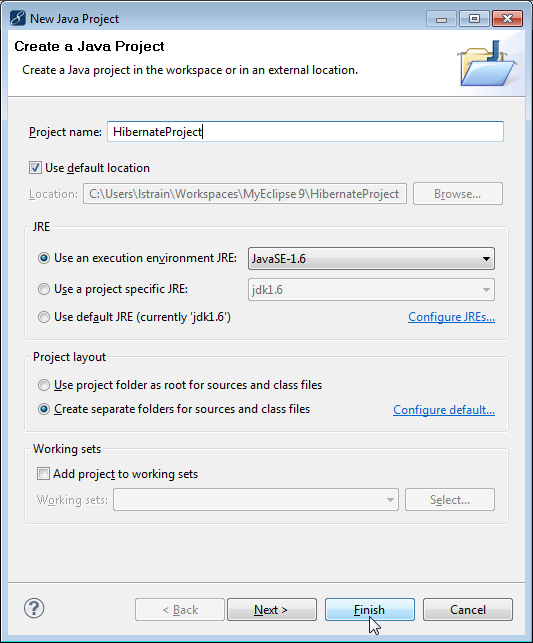
Creating a new Java project - Type HibernateProject in the Project name field, and click Finish. You are prompted to switch to the Java perspective. Choose Yes.
Java project details - Right-click the project, and select MyEclipse>Project Facets>Install Hibernate Facet. Select 4.1 as the Hibernate specification version.
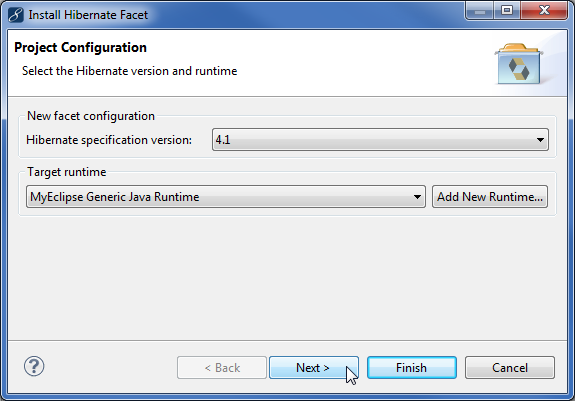
Selecting Hibernate specification version - Click Next. MyEclipse creates a new hibernate.cfg.xml file for you.
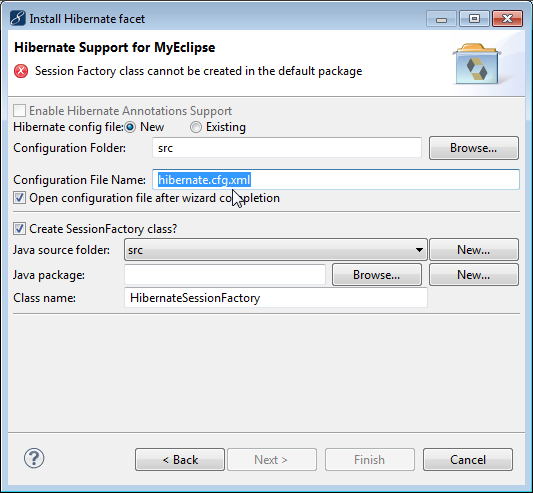
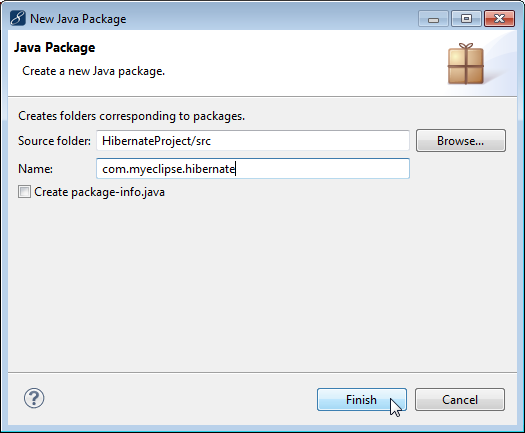
New hibernate configuration file - Click New beside the Java package field to create a new package for the session factory class. Type com.myeclipse.hibernate as the package name, and click Finish.
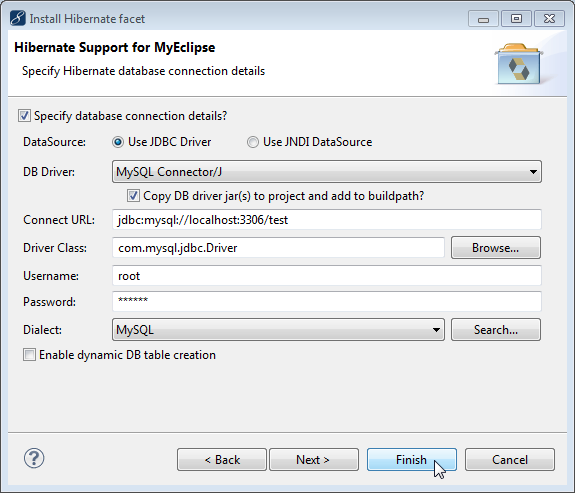
Creating a new Java package - Click Next, select MySQL Connector/J from the DB Driver drop-down, enter your password, and click Finish.
Selecting the database connector
The project now contains all the Hibernate and JDBC libraries, and the hibernate.cfg.xml file opens in the Configuration editor. The configuration file contains connection information from the connection profile. When you reverse-engineer the database tables, the entities will appear in the Mappings section of the configuration file.
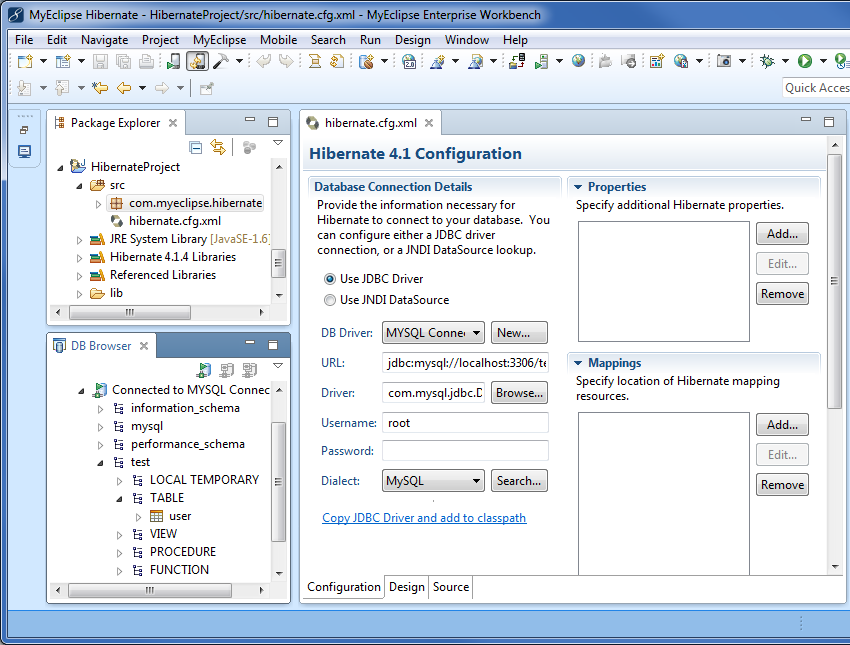
Project with Hibernate capabilities and the Hibernate configuration file
4. Use Reverse Engineering for Java Table Mapping
Reverse-engineering the database table generates Hibernate (Java) objects into the project. The example below uses the simplest form of reverse-engineering, accepting all default values. However, for maximum control you can use the Next button to step through the wizard and select details like primary key generation strategy, object names, types and more.
Note: A detailed Hibernate Reference Guide can be found on the Hibernate site.
- Switch back to the Database Explorer perspective.
- In the DB Explorer, expand MySQL Connector/J to the user table.
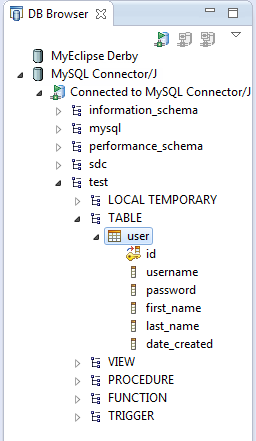
Expanded database - Right-click the user table, and select Hibernate Reverse Engineering.
- Click Browse beside the Java src folder field, expand HibernateProject>src, select com.myeclipse.hibernate, and click OK.
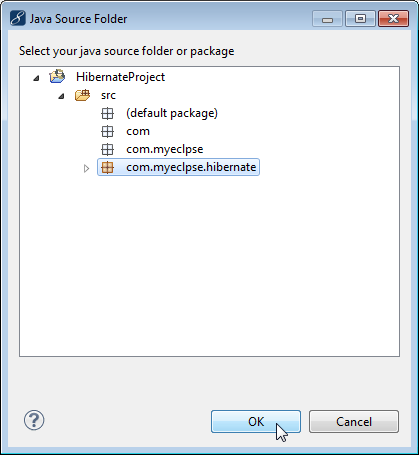
Selecting Java package for the location of generated files - Select the Create POJO <> DB Table mapping information checkbox, select the Java Data Object checkbox, select the Java Data Access Object (DAO) checkbox, and click Finish. You are prompted to switch to the Hibernate perspective. Click Yes.
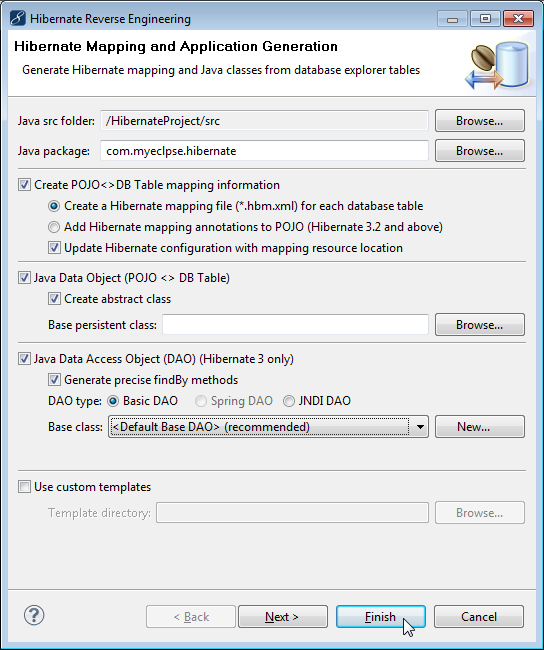
Reverse engineering details
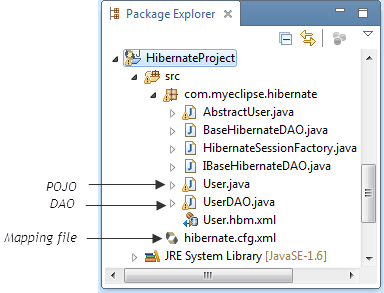
Generated classes
5. Use the HQL Editor to Check Table Contents
- Right-click HibernateProject, and select MyEclipse>Open HQL Editor.
- Type from User in the editor. (This is essentially a `SELECT * FROM user` statement.) As you type, the HQL is translated to SQL.

HQL query translated to SQL - Click
 . The results, which should be empty at this point, appear in the Hibernate Query Results view.
6. Writing and Running Hibernate Code
One of the nicest parts of using MyEclipse to work with Hibernate is the fact that it generates all the boiler-plate Hibernate mapping and even DAO code for you. This means that after you reverse-engineer a database, you are ready to start writing your application to read, write, and update objects in your database.
In this tutorial, you write a series of simple methods that do three things in the following order:
- Create a new User and add him to the database
- Load a User from the database, using his primary key, and print out his information
- Change the User’s values, update that record in the database and print the changed values to verify
The three methods (addUser, listUser, changeUser) are all called from the main method in the new class. To better understand how this Hibernate code is written, create that class, put those methods in the class (using copy & paste) and then review them line-by-line.
- Switch to the MyEclipse Java Enterprise perspective.
- Click
 to create a new Java class.
 - Click Browse beside the Source folder field, and select the HibernateProject/src folder. In the Package field, browse and select com.myeclipse.hibernate.
- Type HibernateExample in the Name field.
- Select the Public static void checkbox, and click Finish.
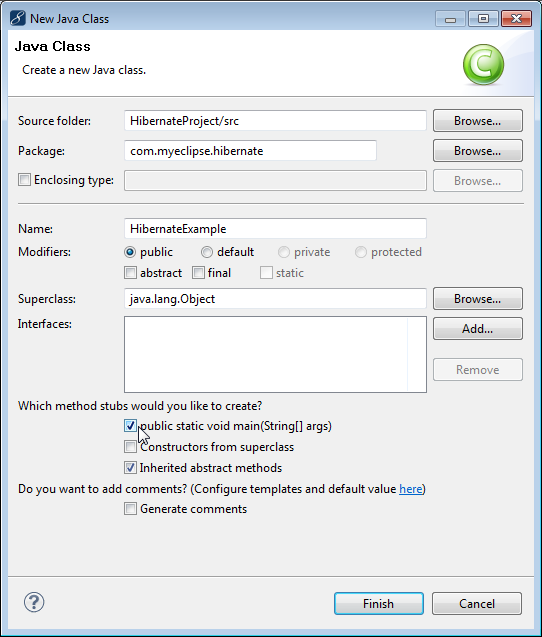
Adding a Java class - Copy the following code and replace the contents of HibernateExample.java, and press CTRL+Save.
package com.myeclipse.hibernate;

import org.hibernate.Transaction;

public class HibernateExample {

/**
 * @param args
 */

  public static void main(String[] args) {

     // 1. Add the new user
     addUser();

    // 2. Retrieve the user and print it
    listUser();

    // 3. Change the user record and update it
    changeUser();
  }

   private static void addUser() {
     // 1. Create user
     User user = new User();
     user.setId(1);
     user.setUsername("jdoe");
     user.setPassword("1234");
     user.setFirstName("John");
     user.setLastName("Doe");
     user.setDateCreated(System.currentTimeMillis());

     // 2. Create DAO
     UserDAO dao = new UserDAO();

     // 3. Start the transaction
     Transaction tx = dao.getSession().beginTransaction();

     // 4. Add user
     dao.save(user);

     // 5. Commit the transaction (write to database)
     tx.commit();

     // 6. Close the session (cleanup connections)
     dao.getSession().close();
  }

  private static void listUser() {
     // 1. Create DAO
     UserDAO dao = new UserDAO();

    // 2. Find user by ID
    User user = dao.findById(1);

    // 3. Print the user information out
    printUser("Printing User, ", user);

    // 4. Close the session (cleanup connections)
    dao.getSession().close();
 }

 private static void changeUser() {
    // 1. Create DAO
    UserDAO dao = new UserDAO();

    // 2. Find user by ID
    User user = dao.findById(1);

    // 3. Change user information
    user.setUsername("jsmith");
    user.setPassword("abcd");
    user.setFirstName("Jane");
    user.setLastName("Smith");

   // 4. Start the transaction
   Transaction tx = dao.getSession().beginTransaction();

   // 5. Update the user record with the changes
   dao.save(user);

   // 6. Commit the transaction (write to database)
   tx.commit();

   // 7. Load the updated user from the database
   User updatedUser = dao.findById(1);

   // 8. Print the updated user information out to confirm the changes
   printUser("Printing Updated User, ", updatedUser);

   // 9. Close the session (cleanup connections)
   dao.getSession().close();
 }

 private static void printUser(String extraText, User user) {
   System.out.println(extraText
      + " User[Username: "
      + user.getUsername()
      + ", Password: "
      + user.getPassword()
      + ", First Name: "
      + user.getFirstName()
      + ", Last Name: "
      + user.getLastName() + "]");
   }
}
The addUser mehod adds a new user to the database. The listUser method retrieves the single user and prints it to the Console view. The changeUser method changes the user’s values. The printUser method prints to the Console view. The first three methods end by closing the Hibernate session, and these are called by the main method.
After looking at that code, you can see how straight-forward everything is. You use the DAO classes MyEclipse generated for you to get, update, and save your objects to the database and MyEclipse/Hibernate takes care of the other details for you.
Run the code and see if it does what it should.
- Click the Console tab to open the Console view.
- With HibernateExample.java selected, click
 . The first two messages you see in the console are only warnings. The third line is the printUser result of the listUser method. The fourth line is the printUser result of the changeUser method.
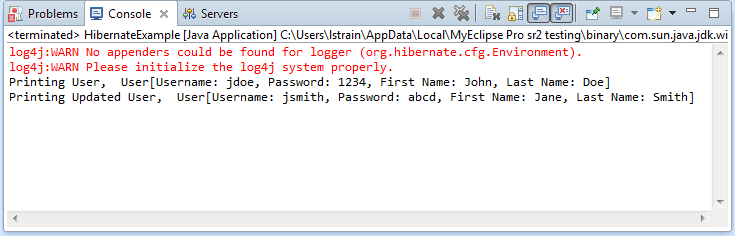
Run results - Run the HQL query again to see the results. Right-click HibernateProject, and select MyEclipse>Open HQL Editor. Type from User in the editor, and Execute the query.
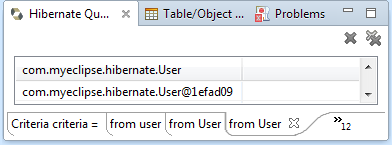
Results of HQL query
Tip: You can have a more friendly label by adding a toString method to the User.Java POJO.
The HQL Editor was used to query the database and make sure that the user was saved to it. You could have just as easily switched to the Database Explorer perspective and queried the database from there to see that the user record was in the table.
7. FAQ
Do I need all the Hibernate libraries in my application? There are a lot of them!
Not necessarily. Hibernate is a very complex framework and makes use of a lot of other 3rd party frameworks. Depending on what you are doing with Hibernate, it’s possible that you don’t need a lot of the JARs that are in your build path. There is a README that ships with Hibernate in the /lib folder explaining which each library does if you really want to trim back your deployment footprint.
What is the “Session” in Hibernate? Why do I need to bother with it?
Hibernate does a lot of “magic” under the hood. Part of that magic is to monitor mapped objects’ state and see if they have changed (e.g. a setter has been called) an then persist the changed values to the database in a timely fashion. In a small system, you could imagine Hibernate managing all the objects at a time, but in bigger enterprise, systems where there may be millions of mapped objects loaded at a time, a computer simply wouldn’t have enough memory or CPU cycles to process so many entities. This is where the “session” comes into play.
A Hibernate session represents a container of all the objects processed since that session has been opened. Most folks find that making a session the length of a transaction works for them, although for performance-critical applications, that might be too short of a span of time for the session to exist when weighed against the cost of creating one. Another Hibernate session design is to use a ServletFilter to open a Hibernate session when a new HTTP session is created, and then close the Hibernate session when the HTTP session is destroyed. For most small to mid-sized web applications running on a server with a decent sized heap, this is a great balance between performance and memory requirements. Although you should always be aware of what objects you are loading and saving to a database, because if the session is left open, it’s possible those objects could be hanging around in memory.
MyEclipse FAQ
Support Forum FAQ