

Developing an EJB 2 Session Bean Using XDoclet
This tutorial presents the basic features, concepts, and techniques for getting started in the development of EJB 2.0-compliant Java EE Enterprise Java Beans. In this tutorial, you will learn how to:
- Create an EJB project
- Create a session EJB
- Configure the project to use XDoclet code generation
- Package and deploy the session EJB
This feature is available in MyEclipse.
1. Create an EJB Project
- Select File>New Project, select EJB Project, and click Next.
- Type firstejb in the Project name field.
- Select the J2EE 1.3 option for Specification Level, select MyEclipse Generic Runtime for J2EE 1.3 from the Target Runtime drop-down, and click Next.
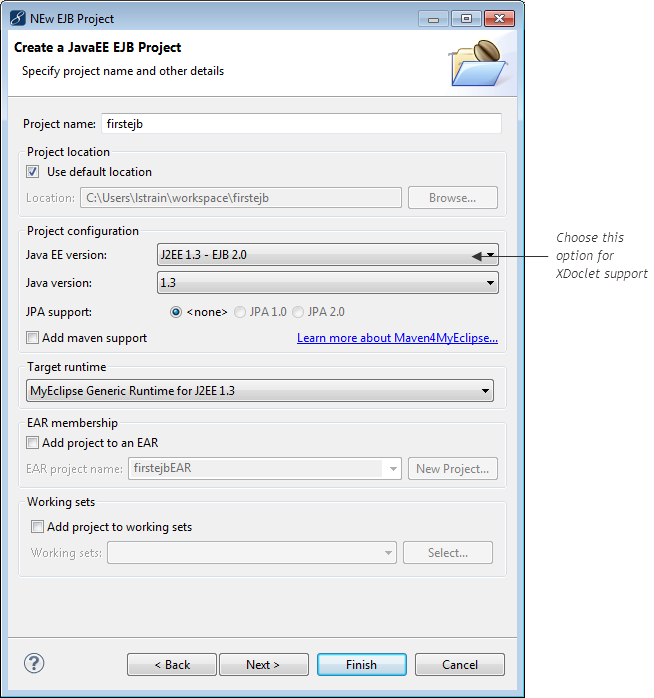
Creating a new EJB project
Project Name – Must be a valid Eclipse Java project name.
Location – Deselect checkbox to specify a custom file-system location for the new project and its resources.
Directory – The default file-system location for the project is under the workspace folder for which MyEclipse was started. You may choose an alternative file location outside of the workspace folder
Note: You cannot choose an alternate folder in the workspace folder as this is not allowed by Eclipse.
Source Folder – The Java source folder – will contain Java packages, *.java files, and your properties files. The contents of this folder are added to the project’s Java build path.
Note: If a non-default value is specified, then the XDoclet default setting described in Section 3 of this document needs to be updated accordingly.
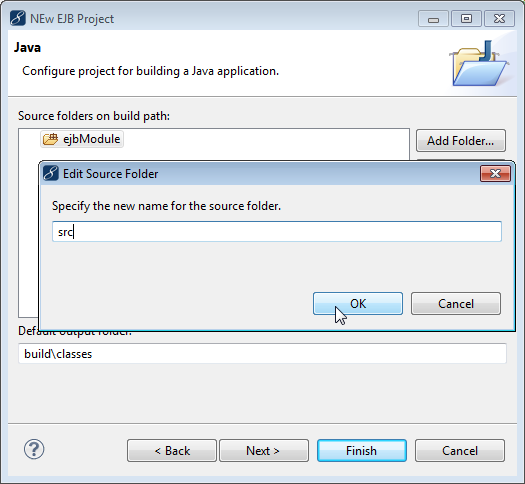
Java EE Specification Level – Specifies the Java EE specification compliance level. Ensure you select the proper specification level for the Java EE features your application requires and that your target deployment application server(s) support this specification level. Check with your application server vendor for information regarding Java EE specification level compliance. - Click the default source folder, and click Edit. Change the folder name to src, and click OK.
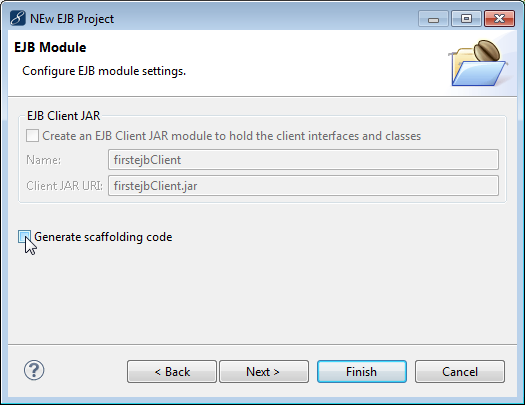
Renaming the source folder - Click Next, and deselect the Generate scaffolding code checkbox.
Disabling scaffolding generation - Click Finish. The remaining wizard pages are filled in from the MyEclipse EJB project template. This template is defined in the MyEclipse Java EE Project preferences.
The figure below depicts the new EJB project structure. Newly created EJB projects include a default ejb-jar.xml file. However, at this point in the process, no EJBs exist and the ejb-jar.xml file appears with an error marker as a result. The required EJB definition is created later using XDoclet technology.
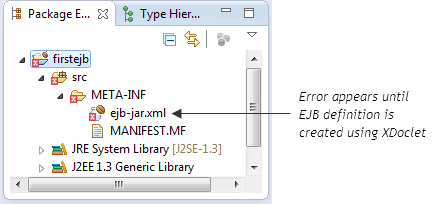
EJB project structure
2. Create a Session EJB – Part 1
EJB 2.x development in MyEclipse uses a combination of EJB wizards and integrated XDoclet support. Every EJB consists of three basic parts:
- The EJB Remote interface class declaring the business operations available to a client
- The EJB implementation class, also known as the bean class, that contains the business logic
- The EJB Home interface class, which controls the bean’s life-cycle
The bean class is the primary implementation concern because it provides the EJB’s functions. From the bean class using XDoclet annotations, the bean’s Remote and Home interfaces can be automatically generated as well as the EJB’s entry within the ejb-jar.xml deployment descriptor. This 2-part example demonstrates the process for creating a stateless session bean known as the Trader EJB. Part 1 focuses on using the MyEclipse EJB Creation wizard and XDoclet support to create a basic deployable Trader EJB. Part 2 introduces the process for the implementation of business services or functions to the Trader EJB.
The example Trader EJB provides simplified services for the sale and purchase of stocks. Because the scope of this document is a quick introduction to MyEclipse EJB development features, the Trader EJB does not address transactions or integration of enterprise resources such as databases or message queues.
Begin by creating the Trader bean implementation class using the EJB creation wizard. After creation of the Trader bean class, you will generate the Remote and Home interfaces as well as the ejb-jar.xml entry for the bean.
- With the firstejb project selected in the Explorer, select File>New>Other.
- Expand MyEclipse>EJB, select EJB2 Session Bean, and click Next.
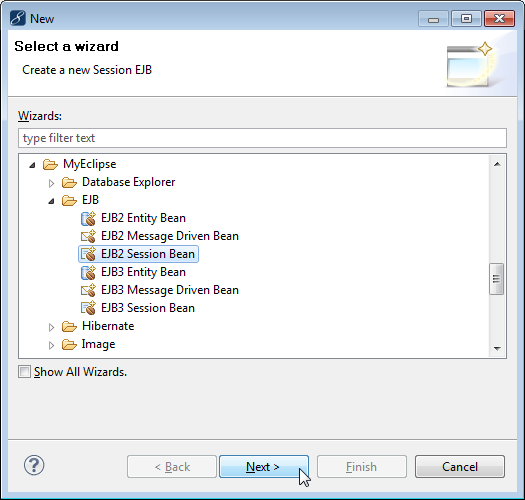
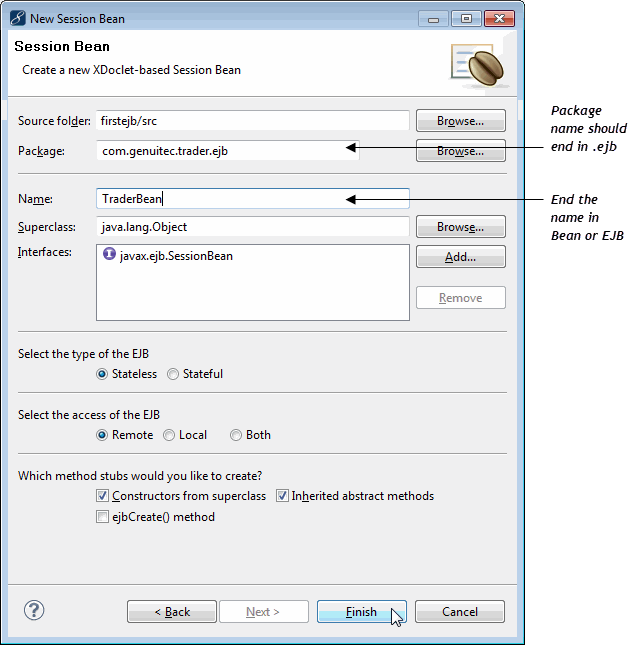
Creating a new EJB2 Session Bean - The source folder is entered by default. This is where the new EJB class is placed. Type com.genuitec.trader.ejb in the Package field. You can browse for an existing package, but if the package does not exist it will be created for you.
Note: XDoclet’s default configuration requires the package name to end with .ejb. Other package suffixes may be used, but doing so requires updating the project’s EJB XDoclet settings manually before generation. - Type TraderBean in the Name field. This is the name of the EJB bean implementation class that is created. The “Bean” suffix is a convention used to identify bean implementation classes. The EJB wizard removes this suffix when creating the XDoclet tags for related EJB files.
- Click Finish to accept the remaining defaults.
New Session EJB details
The TraderBean implementation class is created and opens in the Java editor. Notice how the EJB creation wizard automatically inserts XDoclet EJB tags that define the EJB interface and deployment details.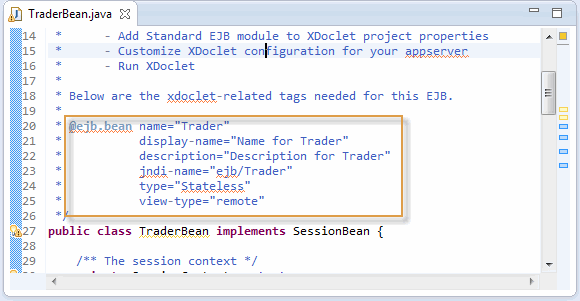
TraderBean source with XDoclet tags required for a stateless session EJB - Revise the TraderBean XDoclet jndi-name tag to match the one below to be more consistent with examples used in other MyEclipse documentation.
jndi-name = "ejb/com/genuitec/trader/ejb/TraderHome"
- Press CTRL+S to save the TraderBean.java class.
3. Configure the Project for XDoclet Support
By default, MyEclipse EJB projects are not configured to use XDoclet features. This section presents the steps for enabling and configuring the firstejb EJB project with XDoclet support and executing XDoclet code generation to derive the Trader EJB’s dependent source code and deployment components.
Begin by adding the Standard EJB XDoclet configuration to the firstejb project. The end goal of this section is to produce the XDoclet configuration that is used to create the ANT script that MyEclipse executes to generate the additional EJB artifacts required to deploy the Trader EJB.
- Right-click firstejb, and select Properties. Expand MyEclipse, and choose XDoclet.
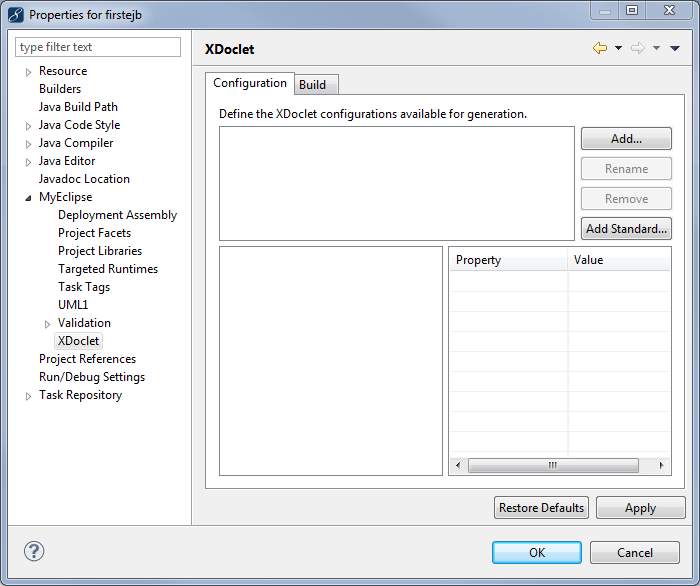
XDoclet configuration page - Click Add Standard, select Standard EJB, and click OK.
Note: In addition to the preconfigured XDoclet modules provided by MyEclipse, you can create your own custom XDoclet configurations. The process for integrating a custom XDoclet module is beyond the scope of this document.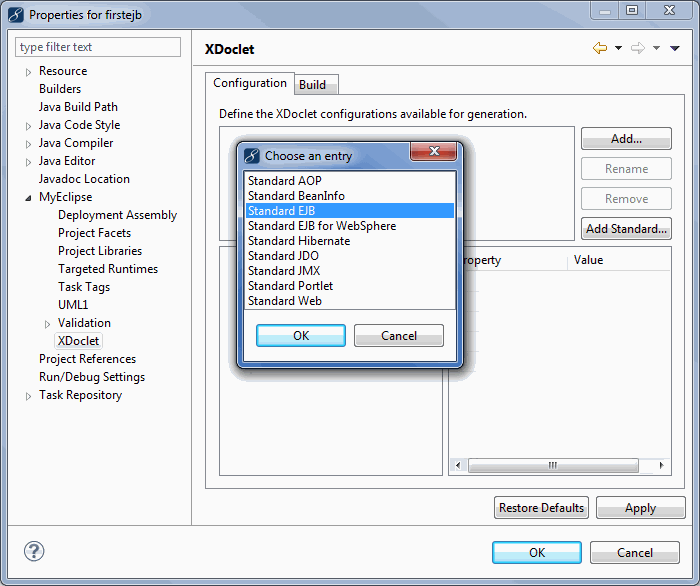
Adding a Standard EJB configuration
After the Standard EJB module is added to the list, select it to reveal the doclets it contains. Notice the ejbdoclet appears in lower left-hand list. The subdoclets under ejbdoclet contain both required and optional subtasks. Many of the subtasks are not applicable to a simple stateless session bean such as Trader EJB.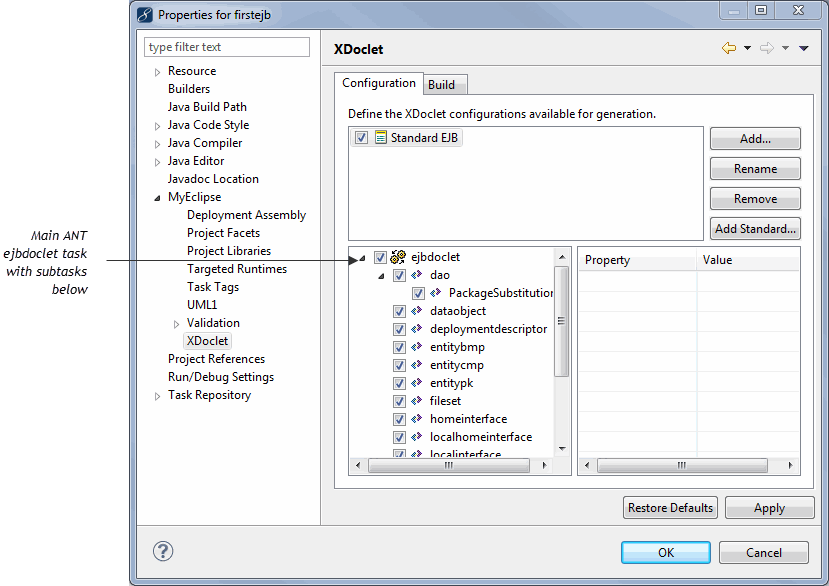
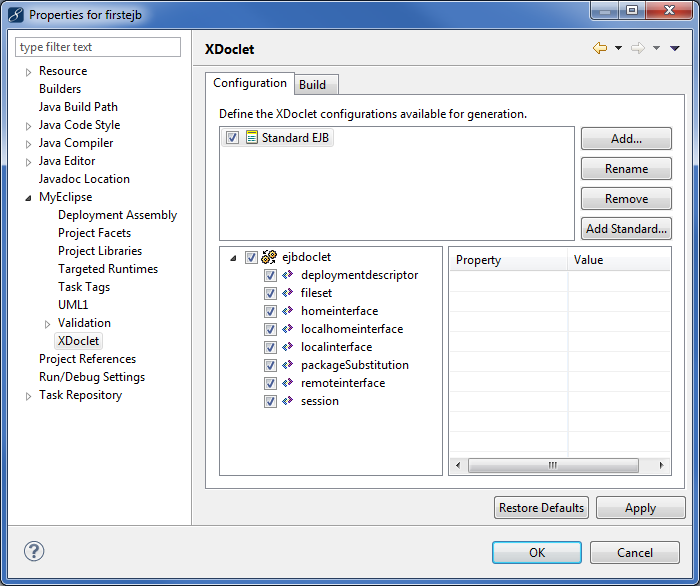
Default subtasks for Standard ejbdoclet - Remove unneeded subtasks until only the list shown in the image below remains. To remove, right-click each subtask, and select Remove. Each of the items in this configuration represent EJB XDoclet subtasks. A link to a detailed description of ejbdoclet and its subtasks is provided in the Resources section.
XDoclet EJB subtasks required by Trader EJB - (Optional) If you specified a non-default source folder when you created the project, you must update the project relative path attributes of the following elements ejbdoclet>destDir, deploymentdescriptor>destDir and fileset>src tasks. Select each of these elements in the bottom left panel and then review and revise their respective properties in the lower right panel.
- Click the Build tab to configure the project’s XDoclet build file policy.
Note: If this is a new project, the Build policy is set to the default policy, so you can skip to step 7. - Select the Use dynamic build specification policy option.
If you are using an existing project that already contains XDoclet configurations, you can choose to delete the unnecessary xdoclet-build.xml file. It is no longer needed. For a more detailed explanation of these policies see the table below. By default, new projects are set to use the dynamic build policy. You can override this default for a project on this preference page.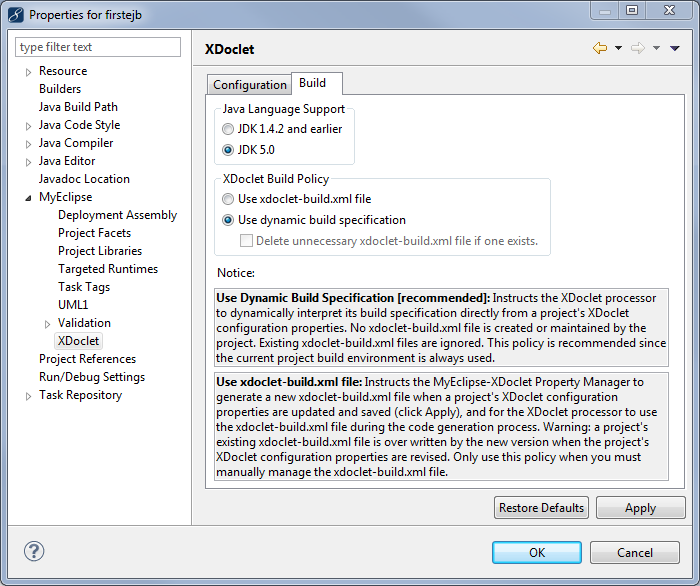
XDoclet build file policy configuration
Warning! A project’s xdoclet-build.xml file is overwritten by the new version when the project’s XDoclet configuration properties are revised. Use the Use XDoclet-build.xml file policy only when you must manually manage the xdoclet-build.xml file. - Click OK. XDoclet configurations are saved to the file named .xdoclet. Additionally, if the “Use xdoclet-build.xml file” build policy is enabled, then MyEclipse generates a file named xdoclet-build.xml from your XDoclet settings and stores this file in the root folder of your project.
3.2 Configure the Application Server XDoclet (optional)
XDoclet is able to generate application server-specific deployment descriptors. This section demonstrates con3 below.
Note: Later you will see steps for deploying firstejb to a local JBoss server. Therefore, these steps use the JBoss subtask.
- Right-click firstejb, select Properties, expand MyEclipse, and choose XDoclet.
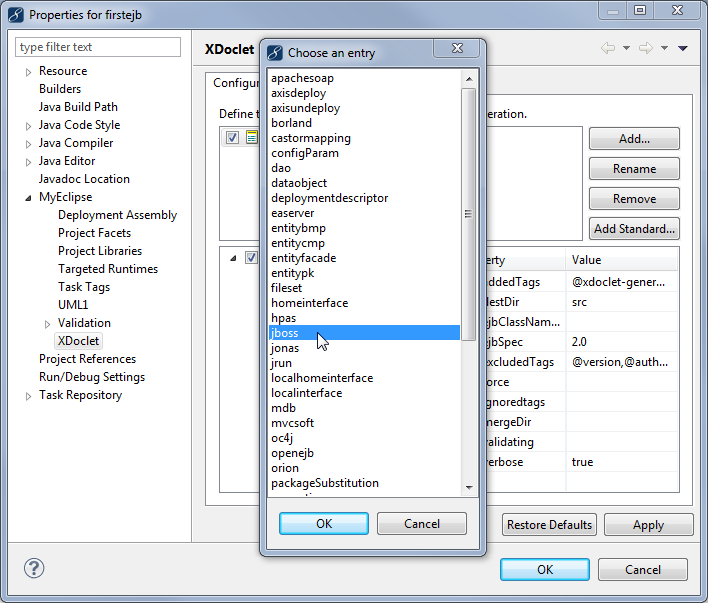
- Select Standard EJB to view tasks. Right-click ejbdoclet, and select Add.
- Select jboss, and click OK.
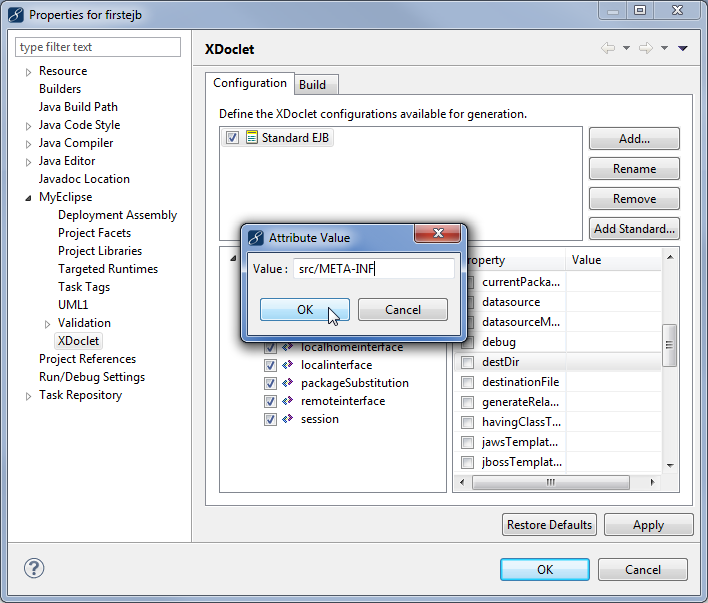
Adding JBoss subtask to ejbdoclet - Select the jboss subtask, double-click the destDir property, type src/META-INF in the Value field, and click OK.
Setting jboss subtask attributes - Click OK on the Properties window.
4. Run XDoclet Code Generation
Typically you should execute XDoclet after each change to the XDoclet EJB configuration or application server settings or when you modify the XDoclet annotations of any EJB bean implementation class.
Now is a good opportunity to execute XDoclet on the firstejb project and test the new XDoclet settings because Trader EJB has not yet been extended with new XDoclet-annotated business methods.
- Right-click firstejb, and select MyEclipse>Run XDoclet.
- Monitor the Console view for anomalous output messages from the xdoclet-build script.
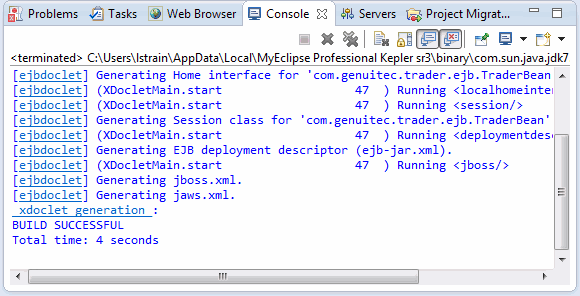
Console output of Run XDoclet action
After running XDoclet, the firstejb project includes new versions of the Trader and TraderHome interfaces and the ejb-jar.xml and jboss.xml deployment descriptors.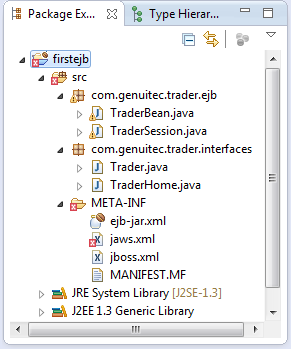
Contents of EJB project after XDoclet generation
Note: When you created the TraderBean.java class during Section 2, you specified its Java package name as com.genuitec.trader.ejb and emphasized that the package name should end in .ejb. This is because the Standard EJB XDoclet packageSubstitution subtask creates a corresponding Java package name ending in .interfaces and adds generated EJB and Home interfaces to it. In this example, the com.genuitec.trader.interfaces package was created and it contains the for the Trader EJB and TraderHome interfaces. If you did not follow this package naming convention and are using default XDoclet setting, some of the files might not be generated.
5. Create a Session EJB – Part 2
In Part 1, you saw the process for creating the TraderBean class. In this section, you add business methods as well as XDoclet annotations to the TraderBean class and then use XDoclet to update the Trader and TraderHome interfaces created earlier.
When you created the initial TraderBean.java class, the EJB Creation wizard added an example business method you can use as a pattern for adding your own business methods. Notice this method includes the javadoc tag `@ejb.interface-method`. This custom ejbdoclet tag identifies the method as an implementation of an EJB interface method. When XDoclet is run on this class, the Trader.java EJB interface class is revised to include all methods with the `@ejb.interface-method` annotation.
TraderBean example method
/**
   * An example business method
   *
   * @ejb.interface-method view-type = "remote"
   *
   * @throws EJBException Thrown if method fails due to system-level error.
   */
  public void replaceWithRealBusinessMethod() throws EJBException {
   // rename and start putting your business logic here< BR >  }
*- Double-click TraderBean.java to open it in the editor.
- Add the following two business methods before the final bracket, and press CTRL+S to save.
/** * Buys shares of a stock for a named customer. * * @param customerName String Customer name * @param stockSymbol String Stock symbol * @param shares int Number of shares to buy * @return Number of shares purchased * * @ejb.interface-method */ public int buy(String stockSymbol, int shares) { System.out.println("Buying "+shares+" shares of "+stockSymbol + ". Good move."); return shares; } /** * Sells shares of a stock for a named customer. * * @param customerName String Customer name * @param stockSymbol String Stock symbol * @param shares int Number of shares to buy * @return The number for shares sold * * @ejb.interface-method */ public int sell(String stockSymbol, int shares) { System.out.println("Selling "+shares+" shares of "+stockSymbol); return shares; } - Run XDoclet on the firstejb project to synchronize the Trader and TraderHome classes and the deployment descriptors (see Section 4 for details).
- Double-click Trader.java in the com.genuitec.trader.interfaces package. Notice the addition of the `buy()` and `sell()` business methods.
/*
  * Generated by XDoclet - Do not edit!
  */
 package com.genuitec.trader.interfaces;

 /**
  * Remote interface for Trader.
  * @author XDoclet
  */
 public interface Trader
extends javax.ejb.EJBObject
 {
/**
 * Buys shares of a stock for a named customer.
 * @param customerName String Customer name
 * @param stockSymbol String Stock symbol
 * @param shares int Number of shares to buy
 * @return Number of shares purchased
 */
public int buy( java.lang.String stockSymbol,int shares )
   throws java.rmi.RemoteException;

/**
 * Sells shares of a stock for a named customer.
 * @param customerName String Customer name
 * @param stockSymbol String Stock symbol
 * @param shares int Number of shares to buy
 * @return The number for shares sold
 */
public int sell( java.lang.String stockSymbol,int shares )
   throws java.rmi.RemoteException;

 }
6. Deploy to a JBoss Server
- Right-click the Servers view, and select New>Server. Select the JBoss version you have installed.
- Continue through the wizard to configure the server connector. See the Using MyEclipse Application Servers for details.
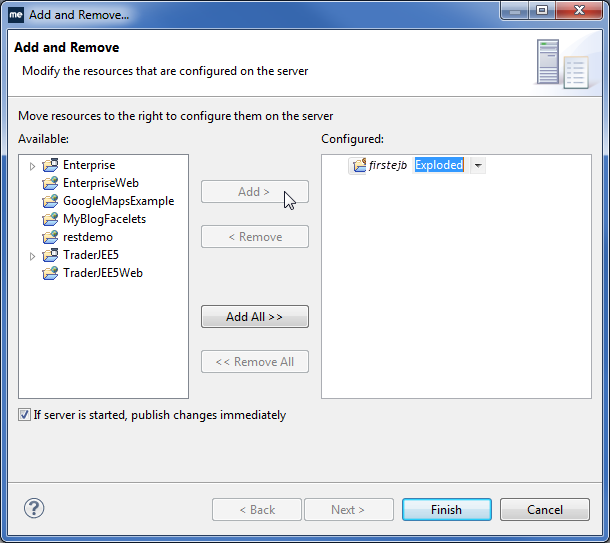
Note: Be sure to select a full JDK, not just a JRE. You will need to add a new JDK if only a JRE is listed. - On the Add and Remove page of the New Server wizard, select the firstejb project in the Available column.
- Click Add. You can select either packaged or exploded deployment by using the drop-down beside the module in the Configured column. Click Finish.
Adding a project to the server - Right-click the server in the Servers view, and select Start.
- Inspect the message log for indication that EJB was successfully deployed.
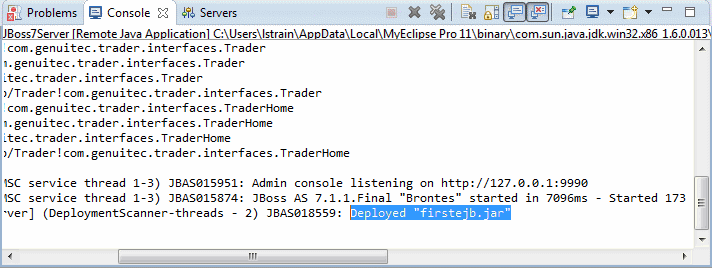
Console output of JBoss showing the EJB was successfully deployed