

Managing Transactions Using JPA and Spring
This tutorial introduces some of the JPA/Spring-based features. For basics on setting up a JPA project, read the JPA Tutorial first. The detail in this tutorial focuses on JPA-Spring integration and how to utilize those functions. You will learn how to:
- Set up a project for JPA and Spring
- Reverse engineer a database table to generate entities
- Implement create, retrieve, edit, and delete functions
- Enable container-managed transactions.
This feature is available in MyEclipse.
1. Create a Java Project with JPA and Spring Facets
It’s most common to add JPA and Spring capabilities to Java or Web projects. This tutorial uses a Java project to demonstrate how these technologies work.
Note: You can download the project developed in this tutorial, and import into your workspace.
- Create a sample Java project named SampleJPASpringProject, and add the JPA facet to it.
- Right-click the project, and select MyEclipse>Project Facets>Install Spring Facet.
- Click Next to accept the Spring version and runtime defaults.
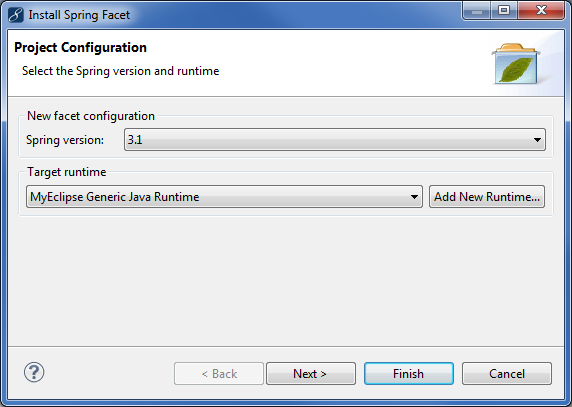
Setting Spring version and target runtime - MyEclipse creates a new applicationContext.xml file for you. Click Next.
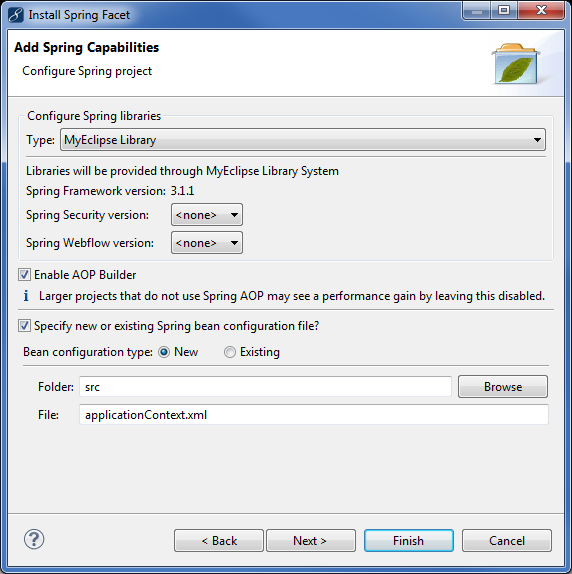
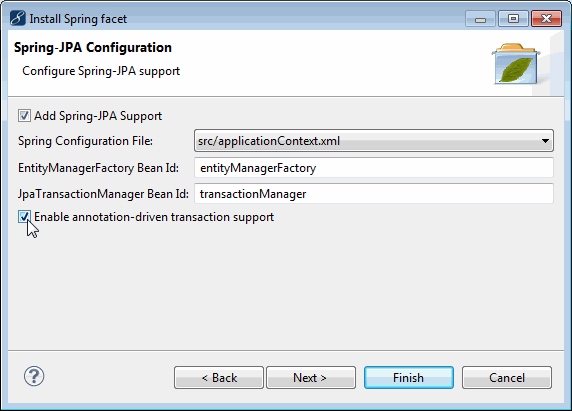
Setting up bean configuration - Notice the Add Spring-JPA support checkbox, which tells MyEclipse to generate sources in this JPA project that integrate Spring and JPA together. Because you are adding Spring to a JPA project, this is selected by default. Also, support for using @Transactional Spring annotation is enabled by default. Click Finish.
Adding Spring-JPA capabilities
Note: Annotation-based transaction support is covered in the Spring Container-Managed Transactions section.
Now that the project has JPA and Spring facets added to it, you can open the applicationContext.xml Spring bean configuration file and see how the project is configured. Open the graphical view by clicking the Beans Graph tab at the bottom of the editor.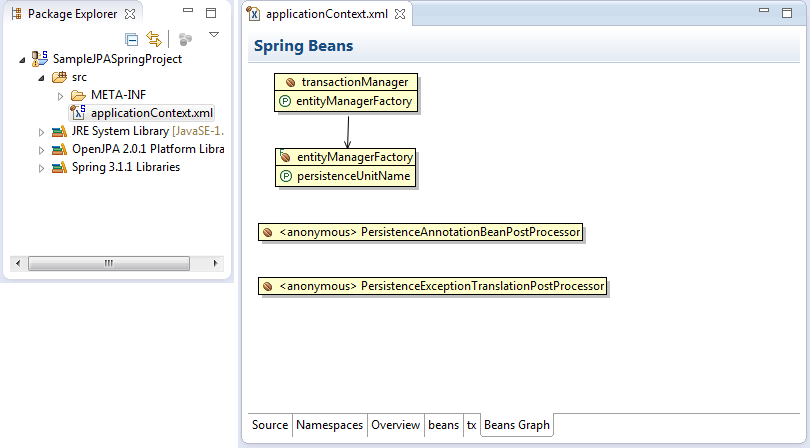
Spring configuration
You can see from the Spring bean configuration file how the different beans are configured. The transactionManager uses the entitytManagerFactory, which in turn uses the JPA persistence unit (that was created when you added JPA facets).
2. Reverse Engineering
Now that the project is set up, you are ready to reverse-engineer the PRODUCTLINE table into the project and start using the generated entities.
- Right-click the src folder, and select New>Package to create a package in which to generate entities.
- Right-click the package, and select MyEclipse>Generate Entities & DAOs.
- Select PRODUCTLINE, click Add, and click Next.
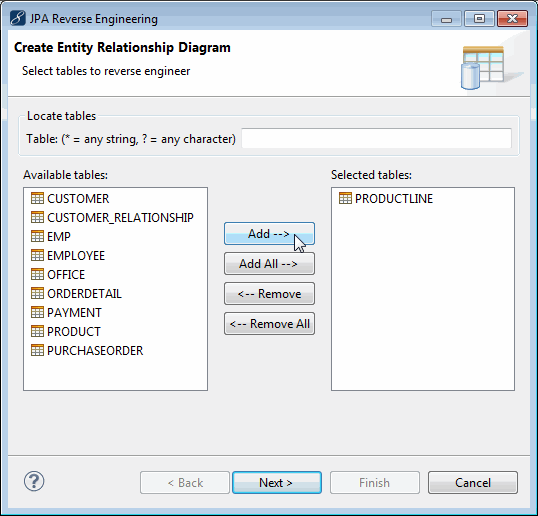
Selecting the PRODUCTLINE table - Fill in the fields as described below.
Java source folder: The folder in your project where the files are generated
Java package: The package you created above in which to place the generated classes
Entity Bean Generation: Tells MyEclipse to generate plain Java classes that are correctly annotated for use as JPA entities
Create abstract class: If you want to customize the generated classes without overwriting your changes each time, MyEclipse can generate base abstract classes as well as concrete subclasses you can customize and use. Each time you reverse-engineer, MyEclipse overwrites only the abstract base class, maintaining your changes inthe concrete subclass.
Update persistence.xml: Similar to Hibernate, you can list all JPA entities you are using in the JPA configuration file.
Java Data Access Generation: Tells MyEclipse to generate DAO utility classes that allow you to save/find/update/delete the entities from the database right away. This code wraps the JPA entity manager and makes using the entities and the DB very easy.
Generate Precise findBy Methods: Tells MyEclipse to generate findByXXX methods where XXX pertains to each property on the entities that are reversed. This allows easy access to entities from the DB using any property as a means of finding them.
Generate Java interfaces: Tells MyEclipse to generate top-level DAO interfaces as well as concrete implementations (e.g. IProductlineDAO and ProductlineDAO)
DAO Type: Depending on the type of DAO generated, MyEclipse (besides generating the DAO implementation for you) can also update your Spring bean configuration file with the new DAO hooked to the existing entityManagerFactory for you.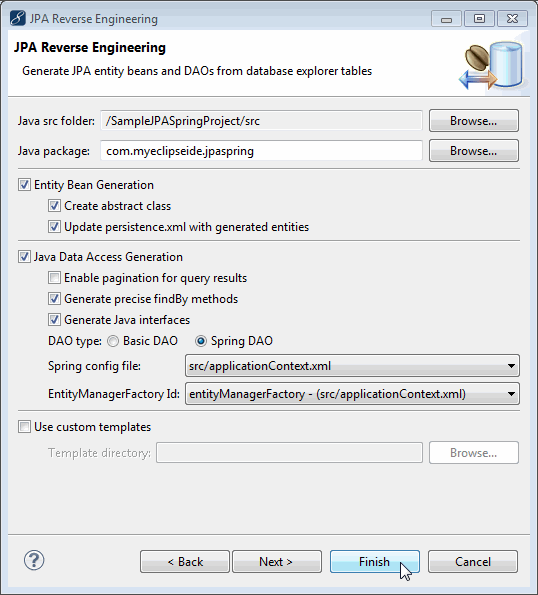
Generating entities - Click Finish to reverse-engineer the table. When reverse-engineering is done, you can look at the project’s Spring configuration again and see the updates.
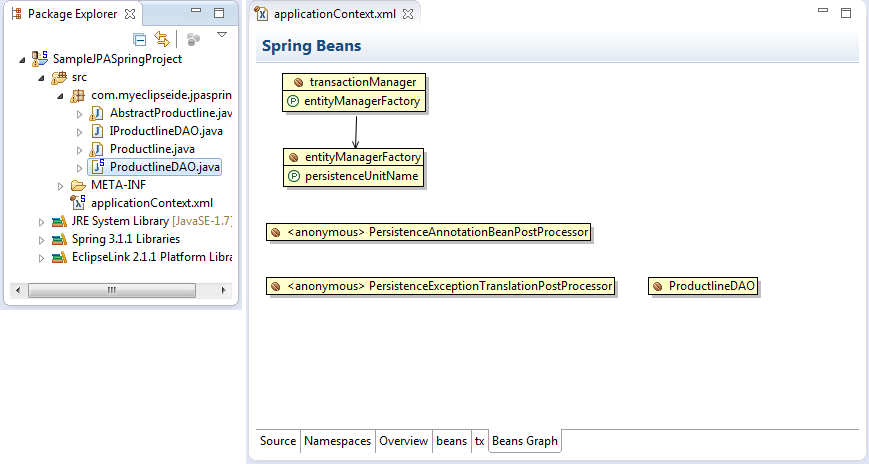
New Spring DAO
3. Write an Application
Now that MyEclipse has generate all this code, you can quickly focus on writing your “Business Logic”, or more specifically, “the code that actually does stuff”.
The JPA tutorial covered what each of the entity and DAO classes did as well as the basic outline of the main method that ran a simple scenario including:
- Create a new entity and insert it in the database
- Retrieve the entity
- Update the entity
- Delete the entity
Similarly, in this tutorial you see how to use Spring to get and use the DAO as well as manage transactions.
The starting point for this demo is the RunJPA.java class. Look at the main method in that class.
/* 1. Initialize the transactionManager and DAO */
ClassPathXmlApplicationContext ctx = new ClassPathXmlApplicationContext("/applicationContext.xml");
txManager = ((JpaTransactionManager) ctx.getBean("transactionManager"));
dao = ProductlineDAO.getFromApplicationContext(ctx);

/* 2. Create a reference to our ID */
String productlineID = "Men Shoes";

/* 3. Save a new productline to the DB */
saveProductline(productlineID);

/* 4. Load the productline from DB to make sure it worked */
loadProductline(productlineID);

/* 5. Update the productline in the DB and check it */
updateProductline(productlineID);

/* 6. Delete the productline from the DB */
deleteProductline(productlineID);
The section of the code marked in blue is the Spring calls where you retrieve the configured beans from the bean configuration. Notice that since you are managing the transactions manually, you also retrieve the `transactionManager` from the bean configuration.
The remaining items, #2 – #6, simple make calls to each of the methods that “do something”.
3.1 Saving an Entity
The first interesting method is `saveProductline`. The purpose of this method is to create a new entity and store it in the DB.
/* 1. Create a new Productline instance */
Productline newProductline = new Productline(productlineID,
        "Shoes formen.", "<strong>MenShoes</strong>", null);

/* 2. Store our new product line in the DB */
TransactionStatus status = txManager
        .getTransaction(new DefaultTransactionDefinition());
dao.save(newProductline);
txManager.commit(status);
First, the new Productline instance is created with some basic values. Second, using the transactionManager, a transaction begins right before saving the entity in the DB. After saving the entity, the transaction is committed.
The purpose of managing the transaction manually is because as developers, you know the scope of the “save” operation. Depending on how your application is written, some operations can have a scope that encompasses many DB modifications. Wrapping those all in a single transaction is important in case half way through the job it fails. You wouldn’t want to leave your data in a state where some of it is correct and some of it is stale.
3.2 Retrieving an Entity
The next method retrieves the entity from the DB using the ID assigned to it, and display its values; this confirms the save operation worked.
/* 1. Now retrieve the new product line, using the ID we created */
Productline loadedProductline = dao.findById(productlineID);

/* 2. Print out the product line information */
System.out.println("*NEW* Product Line [productLine="
  + loadedProductline.getProductline() + ", textDescription="
  + loadedProductline.getTextdescription() + "]");
Notice in this code, no transaction is used. The reason for this is that this code performs only a read operation and not a write operation. Even if the operation failed, none of the data in the DB would be effected. So, there is no need to protect the operation using a transaction.
3.3 Updating an Entity
Now the next section of code might look longer, but that’s because it prints out the new values and confirms that the record was updated in the DB.
/* 1. Now retrieve the new product line, using the ID we created */
Productline loadedProductline = dao.findById(productlineID);

/*
 * 2. Now let's change same value on the product line, and save the
 * change
 */
loadedProductline.setTextdescription("Product line for men's shoes.");

TransactionStatus status = txManager
         .getTransaction(new DefaultTransactionDefinition());
dao.update(loadedProductline);
txManager.commit(status);

/*
  * 3. Now let's load the product line from the DB again, and make sure
  * its text description changed
  */
Productline secondLoadedProductline = dao.findById(productlineID);

System.out.println("*REVISED* Product Line [" + "productLine="
         + secondLoadedProductline.getProductline()
         + ", textDescription="
         + secondLoadedProductline.getTextdescription() + "]");
Notice the update call is wrapped with a transaction because it has to write something to the database and it needs protection from failure.
In section #3 above, productline is loaded from the database right after it is updated, and by printing out the values returned from the database confirms the update.
3.4 Deleting an Entity
Deleting an entity is almost identical to saving and updating the entity. The work is wrapped in a transaction, and then the DAO is told to do the work.
/* 1. Now retrieve the new product line,
             using the ID we created */
TransactionStatus status = txManager
         .getTransaction(new DefaultTransactionDefinition());
Productline loadedProductline = dao.findById(productlineID);

/* 2. Now let's delete the product line from
    the DB */
dao.delete(loadedProductline);
txManager.commit(status);

/*
  * 3. To confirm the deletion, try and load it again and make sure it
     * fails
 */
Productline deletedProductline = dao.findById(productlineID);

/*
 * 4. We use a simple inline IF clause to test for null and print
 * SUCCESSFUL/FAILED
 */
System.out.println("Productline deletion: "
         + (deletedProductline == null ? "SUCCESSFUL" : "FAILED"));
Similar to the `updateProductline` implementation above, you’ll notice that a transaction is used to wrap the `delete` call, and then the code attempts to load the entity from the DB and confirm that the operation should fail.
Note: The reason the transaction has to wrap both the `findById` and `delete` method calls is because objects managed by JPA must be part of the same transaction. To erase the loaded object, it has to be in the same transaction in which it was loaded and the attempt was made to erase it.
3.5 Running the Program
The output from running this looks like this:
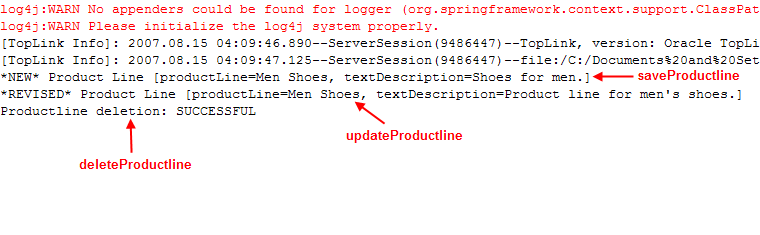
Output
The red text is default log messages that can be ignored (You can set up a custom log4j.properties file if you want to control logging). Below the log warnings you see two messages from TopLink (the JPA implementation libraries) and then three more messages, all from the implementation.
The first message prints out the new productline information that was added, the second one updates it and prints the new information, and the last one deletes it from the DB and prints the confirmation message.
4. Enabling Spring Container-Managed Transactions
In addition to the user managed transactions, Spring supports container-managed transactions via the @Transactional attribute. For container-managed transaction support, you must enable it when you add facets, which you did earlier in this tutorial.
Enabling support for the @Transactional annotation
Enabling this adds the following transaction element to your bean configuration file. You should also add a JPAServiceBean, which is used to delete an entity using container-managed transactions. See the implementation below.

Annotation-driven configuration element
The JPAServiceBean implementation is shown below; note the `@Transactional` annotation on the `deleteProductLine` method and the absence of any user-managed transaction statements.
public class JPAServiceBean
{  private IProductlineDAO dao; @Transactional public void deleteProductLine(String productlineID)

{ /* 1. Now retrieve the new product line, using the ID we created */Productline loadedProductline = dao.findById(productlineID);

/* 2. Now let's delete the product line from the DB */
dao.delete(loadedProductline);

/*
 * 3. To confirm the deletion, try and load it again and make sure it * fails
 */
Productline deletedProductline = dao.findById(productlineID);

/*
 * 4. We use a simple inline IF clause to test for null and print
 * SUCCESSFUL/FAILED
 */
System.out.println("Productline deletion: " + (deletedProductline == null ? "SUCCESSFUL" : "FAILED"));}

public void setProductLineDAO(IProductlineDAO dao) { this.dao = dao; }
}
Obtain an instance of JPAServiceBean from the application context and use it as follows:
JPAServiceBean bean = (JPAServiceBean) ctx.getBean("JPAServiceBean");
             bean.deleteProductLine(productlineID);