

Using Basic Spring Capabilities
Because Spring is such an expansive set of frameworks, this tutorial focuses on dependency injection, which is one of the
core capabilities of Spring that permeates all of Spring. You will learn how to:
- Import a sample project
- Use a UML class diagram and Spring Explorer for project visualization
- Create a new bean definition and implementation
1. Spring Dependency Injection
To put it simply, dependency injection is the idea of having a framework manage and assign object references at the moment the reference is needed. This removes the need for the developer to call a property setter or JNDI lookup to get a reference to an object when needed. If the system is clearly defined, using XML or annotations for example, then the Spring runtime knows when the dependency is needed and makes sure it is provided appropriately. By removing “object bookkeeping”, the developer can more easily focus on the business logic of the application.
The application used in this tutorial is the Knight example from the Spring in Action book. The contents of the project were modified slightly to remove compilation warnings and to help clarify the example. You can download a ZIP version of the MyEclipse Spring project example and import into your MyEclipse workspace.
2. Import the Sample Project
- Select File>Import, expand General, select Existing Projects into Workspace, and click Next.
- Select the Select archive file option, and browse for the downloaded zip file. Click Finish.
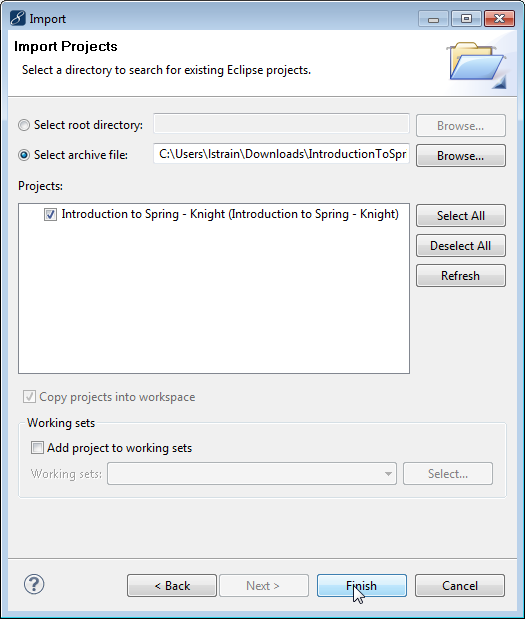
Importing sample project
The project appears in the Explorer.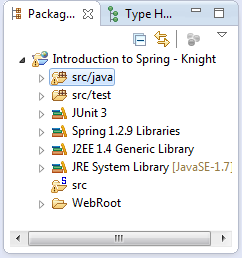
Project imported into workspace
Because this project was created with an older version of MyEclipse, a Project Migration wizard opens. Follow the steps in the wizard to migrate the project. After you import the project, you can use some of MyEclipse’s advanced software development features to get a better idea how this Spring application is architected.
3. Visualize the Project with UML and the Spring Explorer
A UML class diagram of the source code allows you to see how the classes are related to one another. The sample project you just imported already includes this UMR (UML Model Repository) file in the root of the src/java folder by the name Knight.umr. Double-click that file to open the diagram.
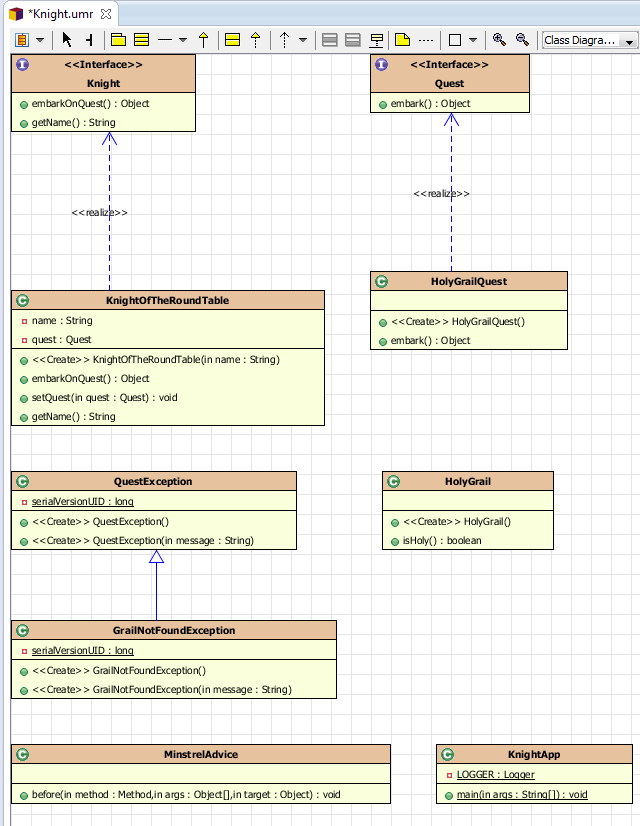
This diagram provides immediate visual relationships between the knights, quests, exceptions and other classes involved in the application. While this application is quite small, you could just have easily reverse engineered a much larger application to get an idea of what it looked like. In this case, the classes were selected from the Package Explorer and dropped onto a new class diagram to get this result.
Looking at a UML class diagram is nice, but it doesn’t tell the whole story, especially about a Spring application. For that, it would be helpful to could get help visualizing the relationships between the different beans in the application. The MyEclipse Spring Explorer view helps with this.
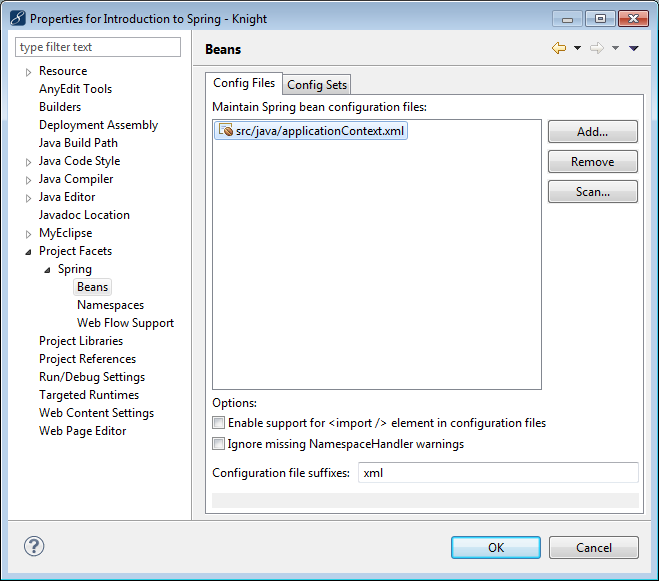
The Spring Explorer is a display of all the beans configured in your Spring application through one or more Spring bean configuration files. These configuration files don’t have a clearly defined naming convention (like struts-config.xml, faces-config.xml, etc.) and an application can contain any number of these bean configuration files. Because of this, MyEclipse allows you to configure a list of XML files that represent your bean configurations. This information can be found in the project properties under MyEclipse>Spring>Beans.
- Right-click the Knight project, and select Properties.
- Expand Project Facets>Spring, and select Beans. This is the list of existing bean configuration files. Click Cancel.
Spring beans properties - Open the Spring Explorer view by selecting Window>Show View>Other, expand MyEclipse Java Enterprise, and select Spring Explorer. The project appears in the Spring Explorer view.
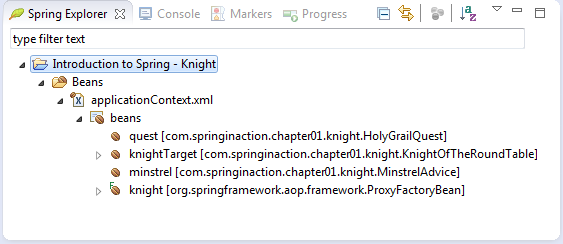
Project beans in the Spring Explorer view - Double-click the bean configuration file, applicationContext.xml, and click the Beans Graph tab at the bottom of the editor.
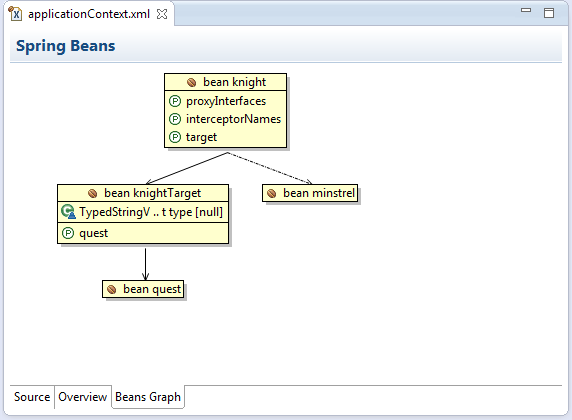
Bean dependency graph
From the graph of the Spring beans, you see that Knight has a reference to a minstrel and a knightTarget, which in turn has a reference to a quest on which the Knight embarks. This application uses Aspect Oriented Programming (AOP) in the form of an interceptor to implement the minstrel.
4. Run the Code
The minstrel is going to “sing” (actually log) about the actions the Knight does before the Knight does them by way of a “before” method interceptor. This type of “before” interceptor is a method that performs an action (like writing a description to the console about what the Knight is about to do) “before” the real operation occurs. To accomplish this, you instruct Spring to weave this interceptor into the behavior of the other class in your bean definition. For web developers reading this, you can immediately see an application of this: handling transactions.
MyEclipse helps you navigate your Spring application quickly. In this case, say you want to see exactly how the minstrel was implemented. You can double-click the minstrel bean in the graph, jump to that definition in the Spring bean configuration file, and then by using CTRL+Click, you can jump directly to the minstrel implementation.
- Double-click the minstrel bean in the graph. The Spring bean configuration file opens to the minstrel bean.
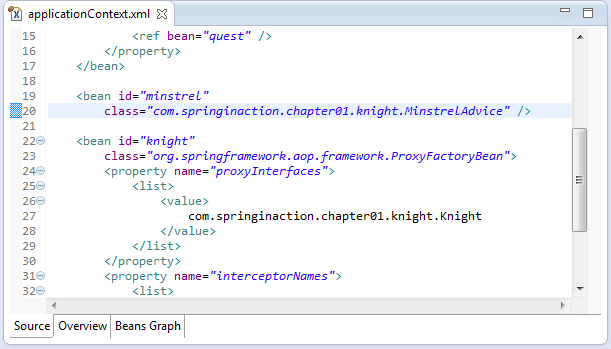
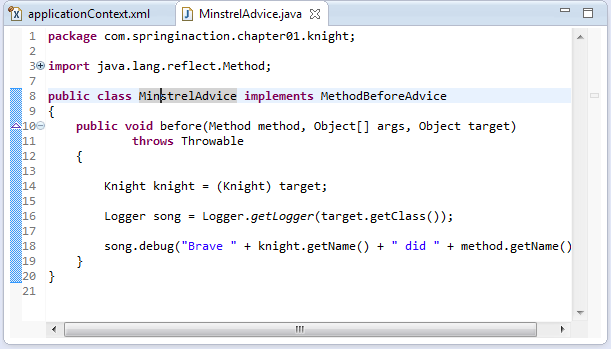
Minstrel bean in the bean configuration file - Press CTRL, and click the MinstrelAdvice class to open its source. This class logs what the knight does.
MinstrelAdvice class source file - In the Explorer, expand Knight project>src/java>com.springinaction.chapter01.knight, and double-click KnightApp.java.
- Click the Run icon drop-down arrow
 , and select Run As>Java Application. The following output appears in the Console view:
[DEBUG] 10:51:03 KnightApp – Running KnightApp
[DEBUG] 10:51:04 KnightOfTheRoundTable – Brave Bedivere did embarkOnQuest
[DEBUG] 10:51:04 KnightApp – KnightApp Finished
You can see the default minstrel implementation outputting the line “Brave Bedivere did embarkOnQuest”. Say you want a different minstrel implementation entirely but don’t want to recode the entire MinstrelAdvice class. This is not a problem at all. You just need to write a new minstrel implementation, and then plug it in using Spring.
5. Create a New Bean for Replacing the Interceptor
- Right-click the com.springinaction.chapter01.knight package, and select New>Class.
- Type BetterMinstrelAdvice in the Name field, and click Finish.
- Copy the following code, and replace the default class code. Press CTRL+S to save. Notice the implementation is still simple, but the minstrel sings a better song and does a better job praising the Knight.
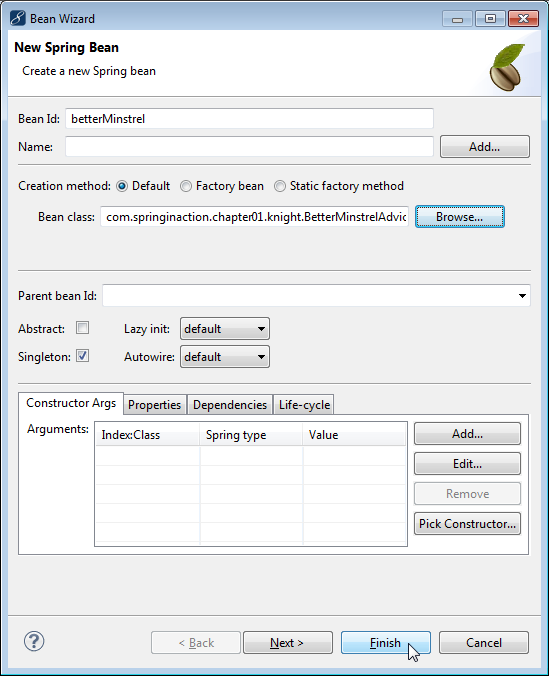
package com.springinaction.chapter01.knight;

   import java.lang.reflect.Method;
   import org.apache.log4j.Logger;
   import org.springframework.aop.MethodBeforeAdvice;

    public class BetterMinstrelAdvice implements MethodBeforeAdvice
       {

        public void before(Method method, Object[] args, Object target)

          throws Throwable
           {
            Knight knight = (Knight) target;
            Logger song = Logger.getLogger(target.getClass());
            song.debug("La la
            lee la, our fair knight " + knight.getName() + " has
            performed " + method.getName() + " with such grace!");
           }
       }
To plug this new implementation into the Spring application, you need to create a new bean definition in the bean configuration file, and replace the minstrel interceptor for the Knight with the new betterMinstrel interceptor. - Open applicationContext.xml, click the Overview tab, and click New Bean.
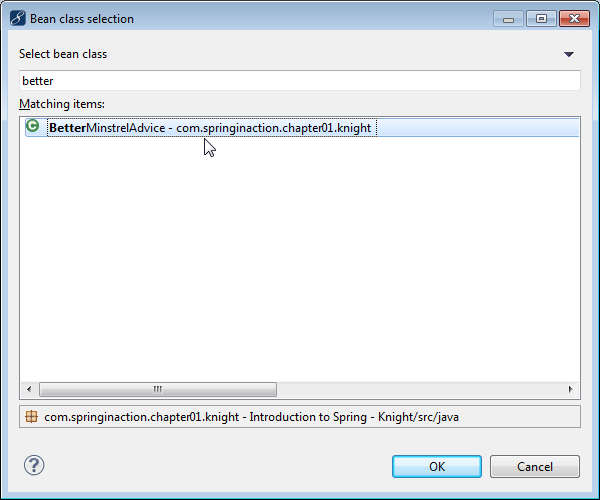
- Type betterMinstrel in the Bean Id field, and click Browse beside the Bean Class field.
- Type better in the search field, select BetterMinstrelAdvice, and click OK.
Selecting the bean class for the new bean - Click Finish to create the new bean, and press CTRL+S to save the bean configuration file. The new bean appears in the Spring Explorer view.
Creating a new bean - In the Spring Explorer, expand the Knight bean>Interceptor Names>List, and double-click minstrel. The minstrel value is highlighted in the configuration source.
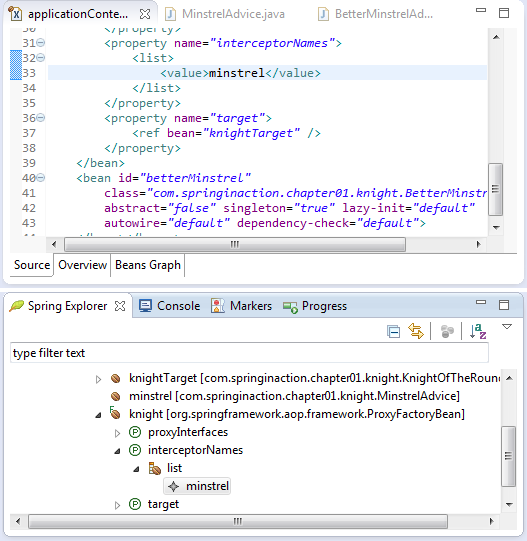
Selecting the interceptor property value of the Knight bean - Replace the minstrel value with betterMinstrel, and press CTRL+S to save.
- Run the KnightApp class again to see the results of the changes. The following output appears in the Console view.
[DEBUG] 11:38:57 KnightApp – Running KnightApp
[DEBUG] 11:38:57 KnightOfTheRoundTable – La la lee la, our fair knight Bedivere has performed embarkOnQuest with such grace!
[DEBUG] 11:38:57 KnightApp – KnightApp Finished
You can really see the value of the modulization that Spring allows in your projects. One of the most obvious uses of plugging and unplugging of portions of an application instantly is in testing. Consider a web application; you could write up mock DAO implementations and plug them in before running all the test cases without needing to change anything. You could wire your test classes, via Spring, to the testing DAO classes instead of the real ones that would require an active database connection.
Another example is switching out entire implementation details of an application (like caching, data access, etc.) without breaking the application or spending time refactoring the classes and references in the application itself.