

Creating a JAX-WS Web Service & Client
This tutorial outlines the process of developing a JAX-WS web service and deploying it to the Tomcat server. The web service used in this tutorial is a very simple calculator service that provides add, subtract, multiply and divide operations to the caller. In this tutorial, you will learn how to:
- Create a Web Service project
- Create a service class as the basis for the web service
- Create a web service
- Deploy and test the web service
- Create a web service client
This feature is available in MyEclipse.
1. Create a Web Service Project
You can download and import the Example Web Service Project & Web Service Client Project if you prefer.
Note: The example project is configured to run against WebSphere 6.1. You might need to adjust the Target Server and/or the runtime JRE libraries used to build the projects to more closely match your build and deployment environment.
- Select File>New>Web Service Project.
- Type WebServiceProject in the Project name field, select the JAX-WS framework option, and click Finish.
Note: This tutorial uses the JavaEE 6 version; however, JavaEE 7 is an available option when creating new projects.
Creating a Web Service project
2. Create a Service Class
Use a simple Java class as the basis of the web service. The service class is nothing more than a plain Java class that provides implementations for the methods you want to expose as a web service. This simple class is a calculator implementation that provides the following functions for any two ints:
- add
- subtract
- multiply
- divide
- Right-click the project’s src folder, and select New>Package.

Creating a new package to hold the Customer class - Type com.myeclipseide.ws in the Name field, and click Finish.

Naming the package - Right-click the com.myeclipseide.ws package, and select New>Class.

Creating a new class - Type Calculator in the Name field, and click Finish. The class file opens in the editor.

Naming the class - Replace the default code in the class file with the following code, and press Ctrl+S to save.
package com.myeclipseide.ws;

             public class Calculator {
                 public int add(int a, int b) {
                     return (a + b);
                 }

                 public int subtract(int a, int b) {
                     return (a - b);
                 }

                 public int multiply(int a, int b) {
                     return (a * b);
                 }

                 public int divide(int a, int b) {
                     return (a / b);
                 }
            }
As you can see from the source code, this class is a very simple POJO offering four operations. There is no use of special annotations, interfaces, or base classes.
3. Create a Web Service
With the service class written (Calculator.java), you need to create a web service that exposes that server class as a web service.
- Right-click the project and select New Web Service.
- Select the Create web service from Java class strategy option because you already have the
Calculatorclass and you want to generate a JAX-WS web service from it. Click Next.
Selecting the strategy scenario - Type com.myeclipseide.ws.Calculator in the Java class field. This is the bean that implements the operations for your web service. After you set the Java bean class, MyEclipse fills in the remainder of the fields.
- Select the Generate WSDL in project checkbox, and click Finish.

Specifying a Java bean for the bottom-up strategy
MyEclipse generates the JAX-WS delegate class in the Java package and the JAX-WS descriptor in the WEB-INF folder of your web project. MyEclipse also modifies the web.xml file to include the new web service mappings so you can deploy and use the web service.
Check your project contents to view the generated artifacts that allow the web service to be deployable to the target server.

Project artifacts
4. Deploy the Project
Note: If you are deploying to an application server other than MyEclipse Tomcat, see Adding JAX-WS Libraries to Your Build Path.
- Right-click the project, and select Debug As (or Run As)>MyEclipse Server Application.
- Select MyEclipse Tomcat, and click Finish.

Project deployed to the Tomcat server
MyEclipse performs the following steps:
- Packages the Web Service project and deploys it in Exploded mode to the application server
- Starts the application server and loads the project
5. Test the JAX-WS Web Service
- Click the drop-down arrow
 , and select Launch SOAP Web Services Explorer.
 - Click
 on the Web Services Explorer toolbar, click WSDL Main, and then click to open the Open WSDL page.
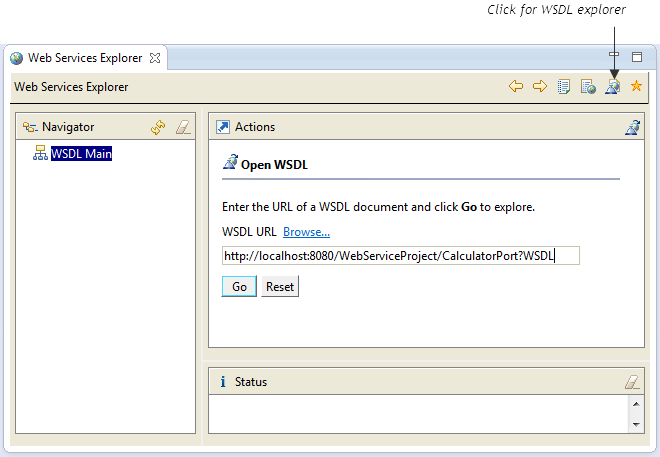
Opening the web service for testing - Type http://localhost:8080/WebServiceProject/CalculatorPort?WSDL in the WSDL URL field. This is the URL for the web service WSDL. Click Go.
The URL can be broken down into the following components:
http://localhost:8080 = The server is running on localhost, and the default Tomcat port is 8080.
/WebServiceProject = By default, the Web Context-root used to deploy web projects matches the name of the projects. Because you didn’t customize the Web Context-root for this project, it is the same name as the project name.
/CalculatorPort = As we saw from the last screenshot in Section 4, when the JAX-WS web service was generated, it was bound using a `servlet-mapping` in the web.xml file to the /CalculatorPort path.
?WSDL = This is a universal query string argument that can be added to the end of any web service. It tells the web service to return its full WSDL to the caller. In this case, the WSDL is returned to the Web Services Explorer tool, which loads it, and displays the web services exposed operations.
The Web Services Explorer load and displays the operations exposed from this web service.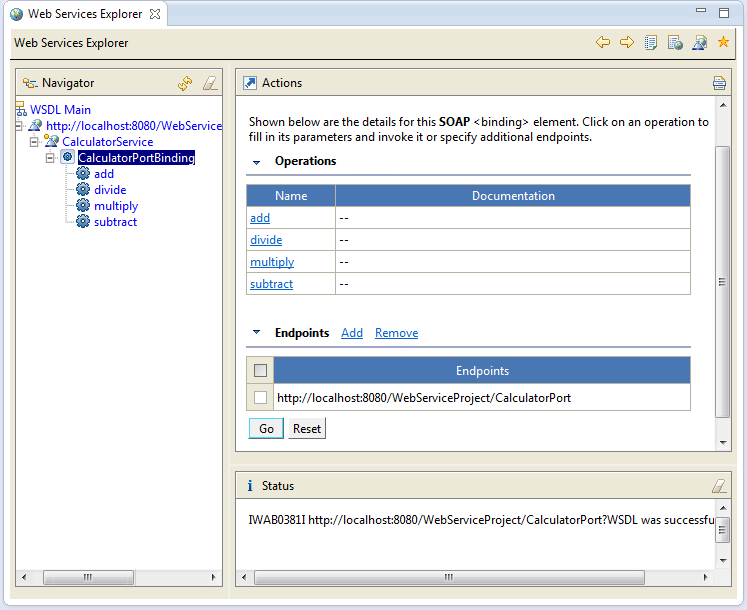 Exposed operations loaded into the Web Services Explorer
 - Expand CalculatorPortBinding, and click the Add operation, and then click Go in the Actions area. The Invoke a WSDL Operation page appears, displaying the endpoint to test (Calculator), each argument the operation takes, and a field to enter values for each operation.
- Type the values 10 and 20 to add, and click Go.
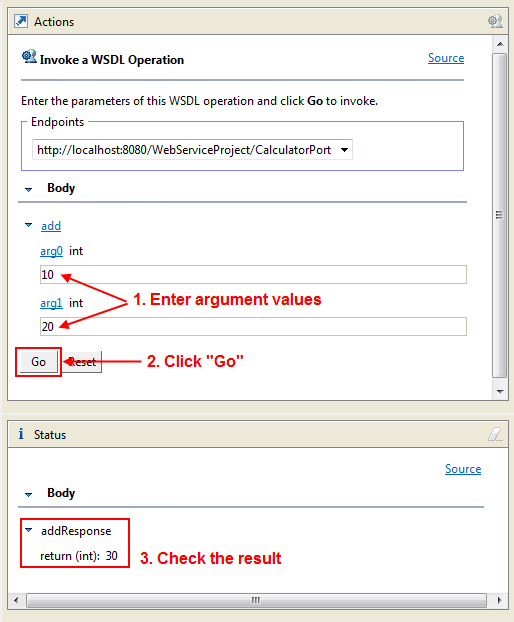
Testing the ‘add’ operation
In the Status view, you can see the response from the web service, which in this case is “30”.
6. Create a Java Project as a Web Service Client
With the web service deployed and tested, you can generate a web service client that allows you to interact with the web service and its exposed operations without needing to write the marshalling or connection code.
- Select File>New>Java Project.
- Type WebServiceClientProject in the Project name field, and click Finish.

Creating a new Java project - Right-click on the WebServiceClientProject in the Explorer and select New>Other>Web Services>New Web Service Client.
- Your project name is in the Project field, and the only Framework option is JAX-WS. Click Next.

Adding a web service client - Select the WSDL URL option, and type http://localhost:8080/WebServiceProject/CalculatorPort?WSDL in the WSDL URL field. This specifies the WSDL URL from which the wizard retrieves the web service WSDL.
- Click New beside the Java package field, type com.myeclipseide.ws.client in the Name field, and click Finish. This is the package in which to generate the web service client.

Specifying the location of the WSDL and creating a Java package for the client - Click Next. MyEclipse loads the WSDL for the web service you are attempting to create a client for and validates it, letting you know of any problems that might exist with the WSDL. Click Finish.

WSDL valiation
After the client is generated, the src folder contains a new package, as well as a few new classes you can use to work with your web service.

Web service client project structure
With the new generated resources, you can use the CalculatorDelegate class to access a reference to the web service and then execute the exposed operations (add, subtract, multiply and divide).
7. Add Code to Use Web Service Operations
Add code that uses the different operations from the web service. As an example, say you want to compute the following four things:
- Add 3 and 7
- Subtract 2 from 12
- Multiply 9 by 9
- Divide 40 by 2
- Right-click the com.myeclipseide.ws.client package, and select New>Class.
- Type WebServiceClient in the Name field, select the Public static void main checkbox so this class is generated with a main method. Click Finish. The class file opens in the editor.

Creating a class with a main method
After the class is generated, it needs an implementation of the main method so it does the four mathematical calculations listed above. The code below performs the calculations with with the web service, and prints the results to the Console view. - Replace the main method in the class file with the following code, and press Ctrl+S to save.
public static void main(String[] args) { /* Create the service instance */ CalculatorService service = new CalculatorService(); CalculatorDelegate delegate = service.getCalculatorPort(); /* Using the web service, perform the 4 calculations */ System.out.println("1. 3+7=" + delegate.add(3, 7)); System.out.println("2. 12-2=" + delegate.subtract(12, 2)); System.out.println("3. 9*9=" + delegate.multiply(9, 9)); System.out.println("4. 40/2=" + delegate.divide(40, 2)); } - Right-click on WebServiceProject in the Explorer, select Debug As>MyEclipse Server Application, select the MyEclipse Tomcat server and click Finish.
- Right-click the WebServiceClient class, and select Run As>Java Application.

Running the Java client application
The client code runs, accesses the web service using the locator class generated for it, and then produces the following output in the Console view:
Viewing the output in the Console view