

Exposing JPA Entities via REST Web Services
Use REST web services to provide exposure to JPA entities. Generate REST web service methods after reverse-engineering database tables. The following example creates a simple web service for managing blog entries. You will learn to:
- Develop a REST web service using database reverse-engineering
- Deploy to the Tomcat server
- Test with the REST Web Services Explorer
This feature is available in MyEclipse.
1. Set Up a Project and Database Connection
To get started with REST and reverse-engineering in MyEclipse you will need the following:
- A project with JPA Facets added to it
- Use the DB Explorer to select table(s) to reverse-engineer using JPA
In MyEclipse, you can add JPA Facets to many different kinds of projects. JPA Facets are most commonly added to Java projects or Web projects. In this tutorial, you use a simple Web project.
1.1 Set up a Web Project
- Click the drop-down arrow on the New icon
 , and select Web Project.
 - Type RESTProject in the Project Name field, accept the default options, and click Finish.

Creating a Web project
Now that your project is created, the next step is to create a DB Connection to use with this project. You are required to select a connection when adding JPA Facets.
1.2 Set up a DB Connection
MyEclipse ships a preconfigured DB Connection pointed at an embedded installation of the Apache Derby DBMS. You can immediately use this connection without needing to set up your own DBMS or connection.
- Click the Open Perspective icon
 , and select Database Explorer from the menu.
 - In the DB Browser view, select the MyEclipse Derby connection, and click the Open Connection icon
 . This starts the embedded MyEclipse Derby server and gives you instant access to the tables in the database.
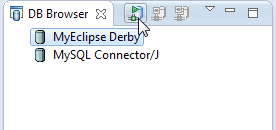
Opening the database connection
MyEclipse Derby includes a few sample schemas. The table you will work with is the MYBLOG table, which contains a table for handling blog posts.
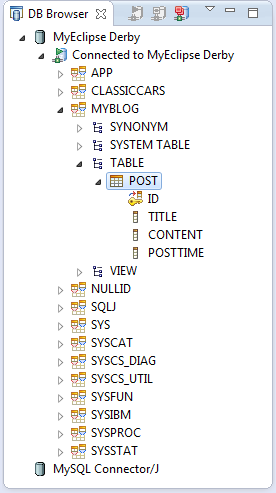
Post table
1.3 Add JPA Facets to your Project
With the DB connection open, you can add the JPA facet to the project so it can access tables and information from the DB connection.
- Switch back to the Java Enterprise perspective, right-click the project, and select Configure Facets>Install JPA Facet
 This menu option was updated in MyEclipse 2017. For prior versions, click here.
.
This menu option was updated in MyEclipse 2017. For prior versions, click here.
. - Select 2.1 as the JPA specification version, and the MyEclipse Generic Java Runtime in the Target Runtime drop-down, and click Next.

Configuring the JPA facet - Use EclipseLink 2.5.x as the platform and MyEclipse Library as the JPA implementation type. Select MyEclipse Derby in the Connection field, select the Add driver library to build path and Override default schema from connection checkboxes, and choose MYBLOG from the Schema drop-down. Click Finish.

Completing the JPA facets configuration

Project structure
2. Reverse-Engineer the POST Table
Now that the project is set up, you are ready to reverse-engineer the POST table into the project and start using the entities that are generated.
- Right-click the project, and select JPA Tools>Generate Entities & DAOs
This menu option was updated in MyEclipse 2017. For prior versions, click here.
.
Note: You have the option to use MyEclipse reverse-engineering tools or DALI entity generators. Make a selection, click OK, and complete the wizard. This tutorial uses the MyEclipse reverse-engineering tools.
Reverse-engineering tool selection - Select the POST table, click Add, and click Next.

Specifying the POST table to be reverse engineered - In the Java Package field, type com.myeclipseide.jpa. Select the following checkboxes:
Entity Bean Generation: Tells MyEclipse to generate plain Java classes that are annotated to be used as JPA entities
Update persistence.xml: Similar to Hibernate; you can list all the JPA entities you are using in the JPA configuration file.
Java Data Access Generation: Tells MyEclipse to generate DAO utility classes for you that allow you to save/find/update/delete the entities from the database right away. This code wraps the JPA entity manager and makes using the entities and the DB very easy.
Generate Precise findBy Methods: Tells MyEclipse to generate findByXXX methods where XXX pertains to each property on the entities that are reversed. This allows easy access to entities from the DB using any property as a means of finding them.
Generate Java Interfaces: Selecting this option creates an interface class with a corresponding DAO implementation class. Deselecting this option generates only the DAO implementation class without a separate class defining the interface.
Setting up reverse engineering - Click Finish.You can view the resources MyEclipse generated by expanding the com.myeclipseide.jpa package in the Explorer view.

Generated classes
The generated entities are described as follows:
- EntityManagerHelper: When using straight JPA, developers need to make use of the `EntityManager` class. This generated helper class makes using `EntityManager` a much easier process by providing static methods to access the manager as well as the most common operations readily available to call.
- IPostDAO: The class that defines the interface for the corresponding DAO implementation class.
- Post: This class is the JPA Entity (POJO) that represents the DB table POST. This POJO contains the fields of the POST table and represents one row in the DB.
- PostDAO: This class wraps the EntityManagerHelper to give us easy-to-use methods, specifically for adding/finding/updating and deleting products from the DB.
Note: After reverse-engineering is finished, you can open the Persistence perspective to use some of the persistence and datasource tools to analyze data in your DB and project.
3. Access Data Using REST Web Services
The JPA entities you generated from the database table can be exposed via REST web services. To do so, you must first install the JAX-RS facet to your project. When you expose the entities via REST services, REST facades are generated. The facades provide methods that are exposed via REST for managing the database.
- Right-click the project, and select Configure Facets>Install JAX-RS (REST Web Services) Facet
This menu option was updated in MyEclipse 2017. For prior versions, click here.
.
- Accept the default JAX-RS 2.1 version and the default target runtime, and click Next.
Selecting JAX-RS version and target runtime - Accept the default facet configuration, and click Finish.

Completing JAX-RS configuration - Right-click the com.myeclipseide.jpa package in the Explorer, and select Web Service Tools>Expose via REST Web Service
This menu option was updated in MyEclipse 2017. For prior versions, click here.
.
- The package and EntityManagerHelper class are defaulted for you. If you had reverse-engineered multiple entities, you could choose the ones to expose. In this case, you have only one. Click Finish to generate the REST facades.

Generating REST facades
If you open the PostFacadeREST.java file, you can see the methods available, such as create, edit, remove, and find.

Available REST facade methods
4. Deploy the Web Service Application
The fastest way to deploy the web service is to deploy the project using the Run As or Debug As MyEclipse Server Application action.
- Right-click the project, and select Run As>MyEclipse Server Application.
- Select MyEclipse Tomcat, and click Finish.
MyEclipse performs the following steps:
- Packages the project and deploys it in Exploded mode to the application server
- Starts the application server and loads the project
5. Test with the REST Web Services Explorer
The REST Web Services Explorer is unavailable at the MyEclipse Standard subscription level. If you are a MyEclipse Standard subscriber, follow the instructions in Testing a Web Service Using a Standard Browser.
- Right-click the project, and select Web Service Tools>Test with REST Web Services Explorer
This menu option was updated in MyEclipse 2017. For prior versions, click here.
.
Note: If you deployed to an application server other than MyEclipse Tomcat, the WADL URL used in the explorer could contain an incorrect port, preventing the explorer from loading your WADL file. Correct the port, and click the Go button to proceed.
You can also open the REST Web Services Explorer by clicking the drop-down arrow on the Web Services Explorer icon on the toolbar, and selecting Launch REST Web Services Explorer. In this case, you must enter the path of a WADL file in the address bar before proceeding.
 - Expand the tree to the count node, and select the countREST method.
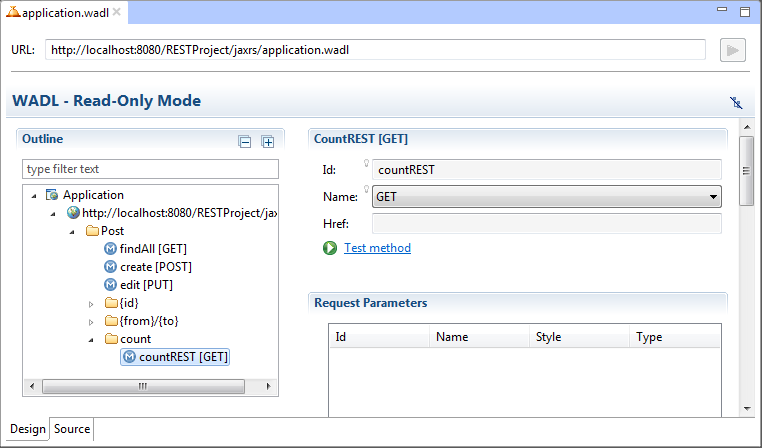
Selecting the method to test - Click Test method. A new tab opens where you can enter information and run the test.
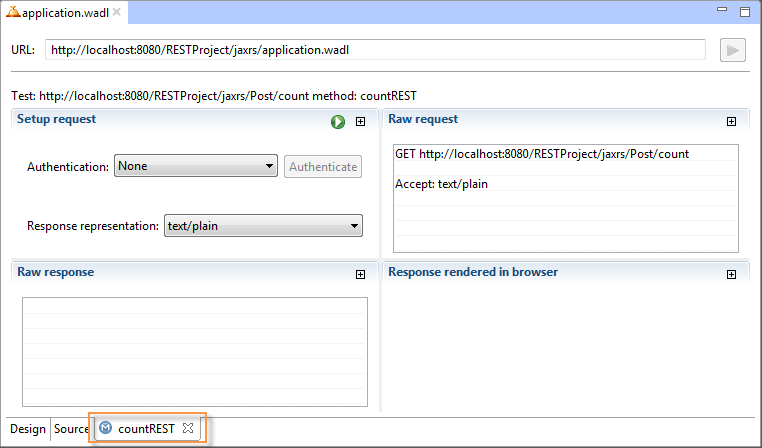
countREST tab for testing the method - Click the Run Test icon
 . In the Raw response area, observe the count is 0 because no posts have been created.
 - Close the countREST tab.
- Select the create method in the Post node, and click Test method.
- Select application/xml from the Representation drop-down list on the create tab.
- In the Body, type application/xml area, paste the following code, and click . The entity is created successfully.
<post>
     <title>My First Post</title>
     <content>Welcome to my new blog</content>
</post>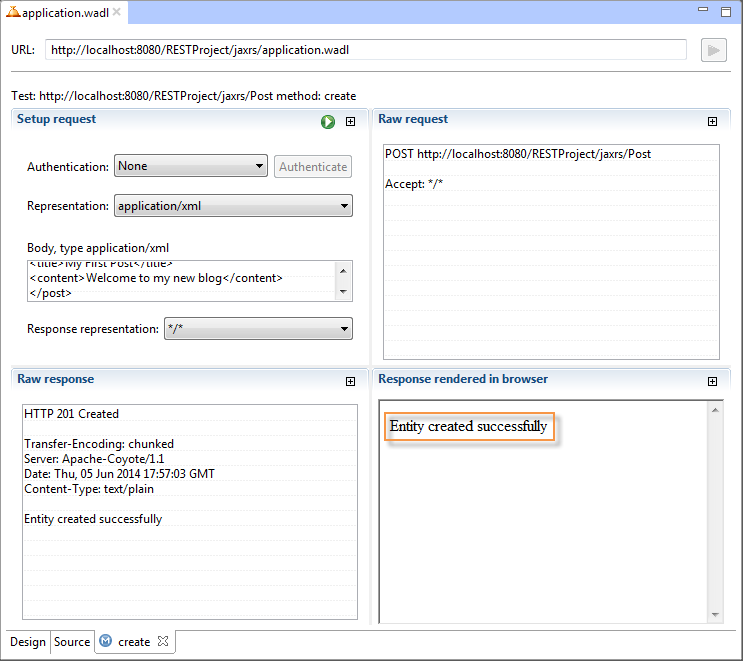
Blog entry test response - Close the create tab.
- Select the countREST method, and click Test method.
- Click . The count now shows 1 for the entry you just posted.
- In the Post node, choose the findAll method, and click Test method.
- Click . You can see your post entry in the Raw view.
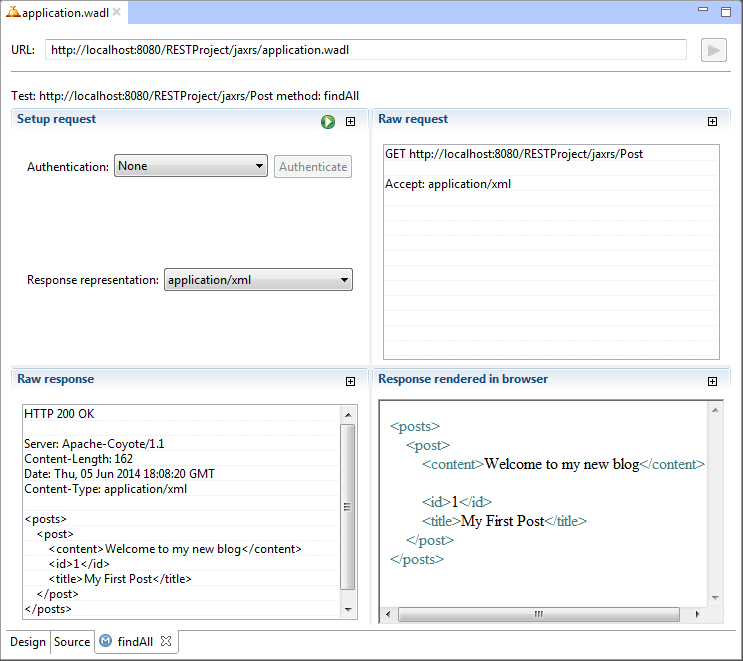
GET test