
Creating an Angular Component
Components are the building blocks of Angular applications. The New Angular CLI Component wizard provides a quick way to create components.
This wizard is included in MyEclipse, CodeMix, and Angular IDE.
Overview of Angular Components
Before diving in to make a component, it is worthwhile to understand what a component is. At its most basic form, it is the encapsulation of a User Interface component including the controller and the interface elements. An Angular component can be a page on a dashboard using a bunch of sub-components, or something as small as a custom widget for dropping down a list of items.
For instance, this example shows making a drop-down calendar with particular controls. Think of it like any other input form control in that it is going to render the UI and provide the backing logic.
<dd-calendar dd-height=”400px” dd-width=”600px”
      [dataset]=”calData.EVENTS”
      (selection)=”onSelection($event)”>
</dd-calendar>
This HTML snippet inside an Angular component template file allows a property as an input, in this case “options” and emits an output event, in this case for selection events.
Inside the TypeScript file, the similar elements are going to be defined.
@Component({
    selector: 'dd-calendar',
    templateUrl: 'dd-calendar.component.html',
    styleUrls: ['dd-calendar.component.css'],
    providers: [CalendarDatasourceService]
})
export class DDCalendarComponent implements OnInit {
    @Input('dataset') dataSet;
    // Logic
}
Inside the file, the @Component designation describes the inputs that the dd-calendar widget supports.
Create an Angular Component
The Angular team has made significant strides to ensure users follow best practices with the framework. To that end, they created a CLI for Angular, run as ng on the command line. The ng command allows generation of components as well as other important steps like running a server.
To create an Angular component, select File>New>Component to open the New Angular CLI Component wizard. If you do not see the Component option, switch to the Angular perspective or select Other and open the Angular folder. The wizard provides a way to learn the capabilities of the CLI as well as simplify adding new components.

Creating a new component
Alternatively, you can click the New button and select Component in the Angular folder; or, right-click from the Explorer and select New>Component.
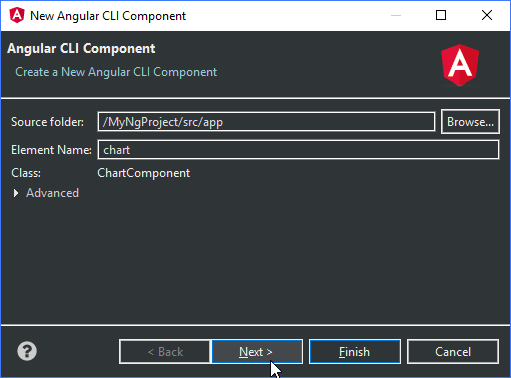
Inside the Angular Component wizard, specify the Name of the component and optionally the paths to the location where the component will be generated.
An important note about components is that there is a particular convention that should be followed. Filenames are lowercase like my-calendar.component.ts which would have a TypeScript class named MyCalendarComponent. Note that the component suffix is automatically added by the generator.
Adding a new component with the wizard
The wizard inside the Angular IDE will automatically provide context on this as component names are filled in.
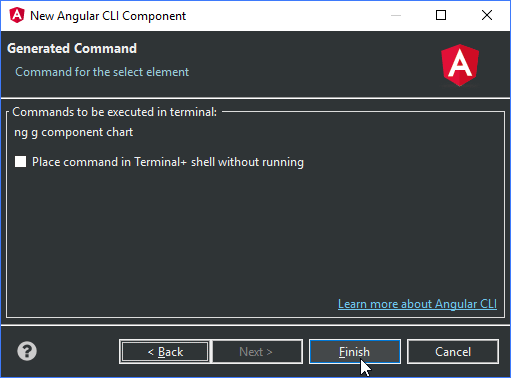
The generated command for the component
In the my-angular example, three files are automatically generated.
my-angular.component.ts—Contains the TypeScript class declaration for the component.
my-angular.component.html—Contains the HTML structure of the component.
my-angular.component.css—Contains any extra styling to be used when rendering the component.
Next up, start using the component’s element declaration in other areas of the application then head on over to the Debugger area in the Learning Center to start up your server and see your app in action.